


How to Fix Cracks in a Concrete Patio Yourself

By Judy Schumer
A concrete patio is beautiful and durable, but many patios develop cracks over time. And if the cracks are raised, they can be a tripping hazard in what’s supposed to be your backyard oasis.
If you have cracks in your concrete patio, it’s time to fix them. Unfilled cracks can become more extensive and deeper, turning a DIY project into an expensive repair requiring a professional. If the cracks or chips aren’t deep or causing separation of your patio, try the DIY fixes you’ll find in this guide first (as soon as you notice the crack).
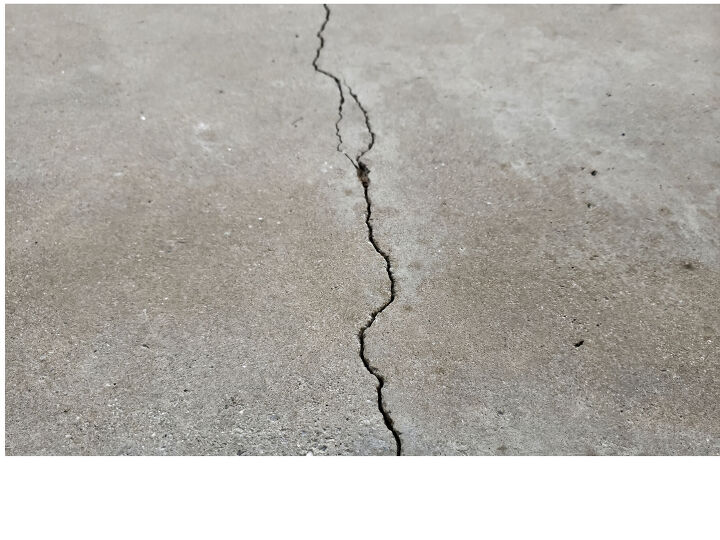
Photo via Shutterstock
Why Does Concrete Crack?
As sturdy of a material as concrete is, it’s still prone to cracking. But why is your concrete cracking, exactly? It could be for a few reasons:
- As concrete settles, it shrinks and might crack to release tension.
- Weather plays a part. Hot weather can cause a concrete slab to expand, pushing against objects and creating a force that might cause cracking. On the flip side, freezing temperatures will cause concrete to shrink and lift, and this movement can cause cracking.
- If concrete settles over an interference beneath the surface, such as a tree root or utility line, it can cause a crack.
- Similarly, if a tree root grows and spreads under concrete, the concrete will eventually crack under force.
- By curing concrete, you’re ensuring that the substance can maintain moisture to prevent early-age cracking. If the concrete wasn’t cured properly loses its moisture too quickly, it’s bound to crack.
How to Fix Small Cracks in a Concrete Patio
There are two different methods you can use when filling small cracks in a concrete patio, or cracks that are an inch wide or less. The first method uses a pre-mixed concrete patch compound to fill in slivers.
Tools and Materials Needed:
- Protective goggles
- Safety mask
- Hammer
- Chisel
- Wire brush
- Shop vac (optional)
- Pre-mixed concrete patch compound
- Wide putty knife
Step 1: Widen and Remove Jagged Edges from the Crack
Wearing protective goggles and a safety mask, use the hammer and chisel to even out and smooth down the cracked concrete. Slightly angle the widened crack. You want to remove jagged edges and loose concrete so the concrete patch material will stick to the concrete.
Step 2: Remove Dust and Debris
Using the wire brush, clean out any loosened debris, dust, and dirt from the crack. You can follow up with a shop vac to remove any remaining debris if needed.
Step 3: Apply the Concrete Patch
Mix the concrete patch according to the manufacturer’s instructions. Using the putty knife, fill the crack with the concrete patch compound. We recommend using a self-bonding formula, which we linked in the materials list above. This eliminates the need for a separate binding product.
Push the patch compound down with the putty knife as you fill the crack. When the crack is filled, smooth the top with the putty knife for even blending.
Step 4: Let the Patch Cure
The curing time for your patch depends on the product you used to patch the crack with. Follow the manufacturer’s instructions and allow the patch to cure fully before using your patio or walkway.
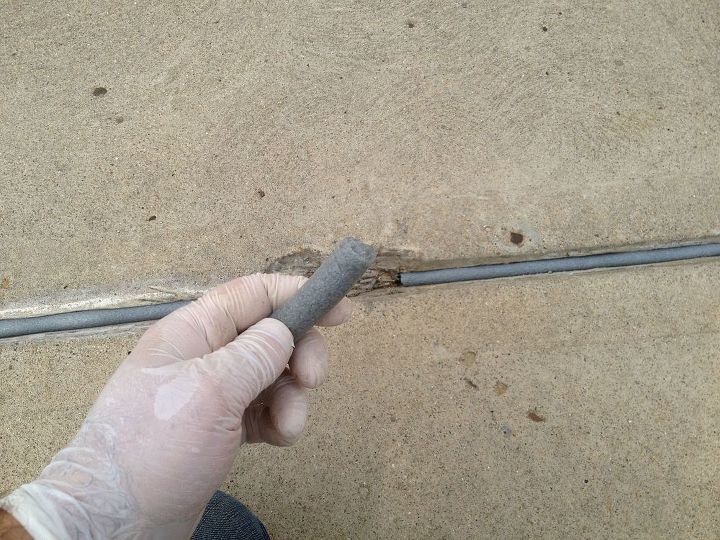
Photo via Home Repair Tutor
The next method uses polyethylene foam tubing, which is commonly used as a foundation joint filler, to fill in concrete cracks. This material is virtually non-absorbent, so it’ll fit nice and snug between concrete cracks without budging. This method works great for cracks under one-inch wide as well as in the joints where two slabs of concrete meet, which can widen over time.
Tools and Materials Needed:
- Protective goggles
- Safety mask
- Hammer
- Chisel
- Wire brush
- Shop vac (optional)
- Polyethylene foam tubing (choose the appropriate width to tightly fill the crack)
- Putty knife
- Crack sealant
- Caulk gun
Step 1: Widen and Remove Jagged Edges from the Crack
Using the same technique as above, you’ll need to smooth any jagged edges and remove loose, broken concrete. Always wear protective goggles and a safety mask. Use the hammer and chisel to even out the cracked concrete and slightly angle the widened crack.
Step 2: Remove Dust and Debris from the Crack
Using the wire brush, clean out any loosened debris, dust, and dirt from the crack. You can follow up with a shop vac to remove any remaining debris if needed.
Step 3: Insert the Caulk Saver as Filler
Use the putty knife to push the foam tubing into the crack, allowing about ¼ inches of space at the top for the crack sealant.
Step 4: Apply Concrete Crack Sealant
Load the sealant into a caulk gun and remove the tip. Use the caulk gun to fill the remaining cavity of the crack to the top with sealant, being careful not to overfill. Smooth with the putty knife to blend into the concrete.
Step 5: Let the Patch Cure
Let the sealant cure according to the manufacturer’s instructions before walking on or using your patio.
How to Fix Large Cracks in a Concrete Patio
This method uses materials like Portland cement (a common general-use cement) and masonry sand for cracks larger than an inch wide, but the initial steps for preparing the concrete to be patched are the same.
Tools and Materials Needed:
- Protective goggles
- Safety mask
- Hammer
- Chisel
- Wire brush
- Shop vac (optional)
- Polymeric sand
- Water
- Bucket
- Portland cement
- Masonry sand
- Wide putty knife
- Plastic drop cloth
Step 1: Widen and Remove Jagged Edges from the Crack
Using the same technique as above, you’ll need to smooth any jagged edges and remove loose, broken concrete. Always wear protective goggles and a safety mask. Use the hammer and chisel to even out the cracked concrete and slightly angle the widened crack.
Step 2: Remove Dust and Debris from the Crack
Using the wire brush, clean any loosened debris, dust, and dirt from the crack. You can follow up with a shop vac to suck up any remaining debris if needed.
Step 3: Pour Sand into the Crack
Pour the polymeric sand into the crack, filling the void to ½ inch from the top of the crack. Slightly moisten the area in and around the crack (do not soak, you want just a bit of moisture to get the sand particles to bond).
Step 4: Mix Mortar
The amount of mortar you use is dependent on the size of the crack in your concrete, so you’ll need to mix it based on the recommended ratios for the product. Take one part Portland cement and mix it with three parts masonry sand in a large bucket. Slowly add water, a little at a time, until a thick paste is formed.
Step 5: Apply the Mortar
Using the putty knife, fill the crack with the mortar mix, pressing firmly so the crack is completely filled.
Step 6: Smooth the Patched Area
Blend the top of the patch with the surrounding concrete using your putty knife.
Step 7: Let the Patch Cure
Let the patch cure for about three hours. Cover the crack with a plastic drop cloth. Slightly moisten the patched area daily until the patch has fully hardened (about three to four days) to cure.
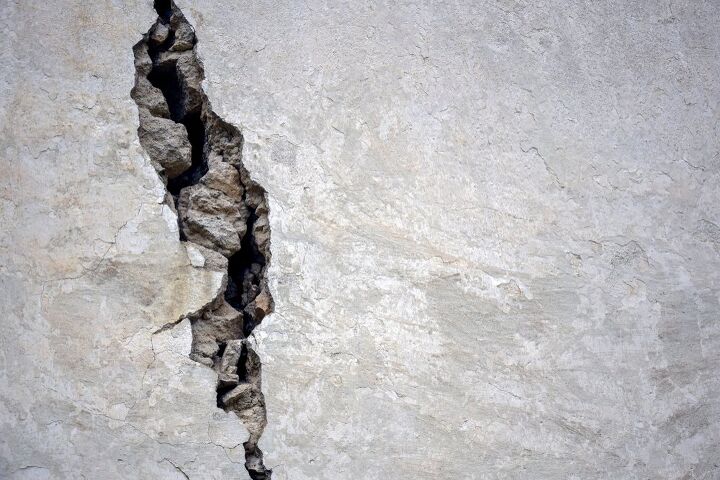
Photo via Shutterstock
When to Call in a Professional
There are times you’ll need to call in a professional to repair cracks in your patio concrete. Depending on the severity of the damage, they may be able to fix the crack in your concrete, and they’ll have the advanced tools and equipment needed to repair or replace the concrete altogether. The following conditions might be a reason to call in professional help:
- Cracks or gaps are wider than two inches. You’d need a lot of material to do it yourself, and attempting to repair a large crack on your own is risky in the strength and longevity of the repair.
- Cracks are deeper than two inches and go all the way to the bottom of the slab. A crack that reaches the bottom of the slab may have disturbed the subgrade, or the material beneath the concrete.
- The cracked concrete was poured over 30 years ago. Concrete deteriorates with time and use. Materials used to pour concrete patios have also improved over the years.
- Cracks are so deep that they affect the foundation of the patio itself. A strong patio foundation is key to the beauty and safety of your patio.
- Substantially raised concrete presents a tripping hazard—even when filled in. This type of repair not only requires removing the concrete but also replacing the subgrade beneath the concrete patio.
- Areas of the concrete are sinking. This is a significant repair that most likely requires total replacement.
- Concrete is raised due to frost heave. If you live in a freezing climate, moisture in the ground freezes and pushes the concrete upwards. A professional can install the correct subgrade for your climate.
- You’re aware or have identified that your concrete patio was installed without footers, installed using poor materials as a subgrade, or installed without proper leveling. DIY repairs would just be a band-aid fix
If you have a concrete patio, has it cracked? Which method will you be using to repair it?


Frequently asked questions
Have a question about this project?