


How To Build A Concrete Paver Patio: In Your Backyard
Expand your outdoor living space and spend more time entertaining with friends!
If you’re looking to build a concrete paver patio at home, the step-by-step instructions below will help you do just that.
Our new home has multiple outdoor spaces that are in need of repair. We plan to be here a long time, so it’s important we do it right when we makeover these outdoor areas.
Here’s what you need to know to build a paver patio.
Why It’s Totally Ok to Buy Concrete Pavers Instead of Making Them
But aren’t you the lady who made her own natural-looking concrete stepping stones? Yep, that’s me.
Let me explain why I didn’t make my own concrete pavers for this patio. It was my original intention because I have made my own stepping stones before and they turned out great AND saved me a ton of money!
So why not this time?
Well, I’m not always an advocate of making everything a DIY project. I mean, if it doesn’t save you money and requires a lot more work –then it may not be reasonable to do.
In a previous article, I discussed buying vs. DIY stepping stones, where I laid out the pros and cons of each.
And though I’m a purist when possible, I’m not going to steer you down the wrong path.
Paver Patio Costs –The Breakdown
When I sat down and added up the math for this particular concrete paver project, it just didn’t make sense economically to make my own.
Especially when you add in the extra labor of making them. I needed 40 paving stones, that’s a lot of pavers to make.
Now let’s break down the costs of how much it would have been to make these pavers, vs the cost of buying them.
To make 40 pieces, I would have needed to purchase 29 bags of mix. It would have been much more productive to use a rapid setting product, which would have cost $400-500 in mix.
If you had all the time in the world, you could go with a less expensive, non-rapid setting mix, but you’d still be looking at almost $200. And then you still need to add in the cost of the materials for the forms.
I paid $200 for all of my concrete pavers. The rest of the materials needed for this project would have been the same, regardless if I made my pavers, or bought them.
So you can see, to go through the labor and time involved in making –in this scenario, I say just buy, rather than DIY.
When researching costs for purchasing patio paver stones and having them installed, estimates ran between $10-$22 per square foot.
Had I chosen that option, I likely would have been looking at over $1,000. My space isn’t a small space, so laying my own pavers was clearly the best way to go.
Deciding On The Patio Design
When it comes to concrete patios, there’s only one option for design because they are concrete slabs. Sure you can color the concrete, or stamp it, but it’s going to be one solid piece.
With pavers, there are different types of pavers so you’ll need to choose among a variety of sizes and shapes.
Pavers can be natural stone or engineered. Concrete pavers are engineered stones. They are used to create patios, paths or walkways.
They can be square or come in natural stone shapes and be laid in a wide variety of patterns.
Popular choices for pavers are:
- Brick pavers
- Flagstone
- Fieldstone
- Cobblestone
- Concrete patio stone
If you want a natural look, you’ll either want a natural stone patio, or go the DIY concrete stepping stone route like I did for this front yard walkway.
With concrete paving stones are a minimum of 1½” thick and can be laid with large or narrow gaps. With large gaps, you have the option of filling them in with decorative stone or moss.
Variables In Installing Pavers –Site Conditions
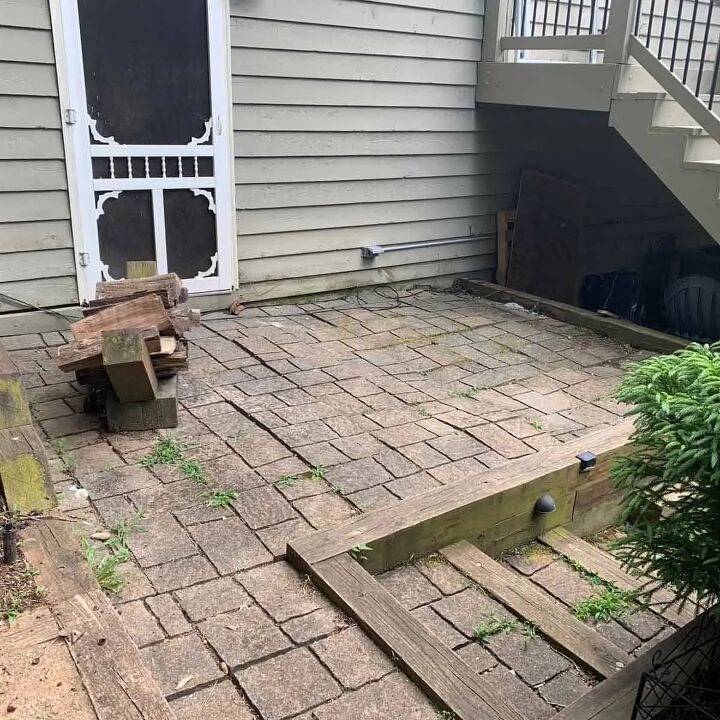
Installing patio pavers will be a little different depending on each situation. Our patio was a little unique because it is surrounded on three sides by timbers and the fourth side is the foundation of the house.
Our area was boxed in on all four sides, and also raised, with the pavers needing to be slightly recessed within the space.
Because of this, we were locked in to very specific spacing, unless we wanted to go through the hassle of cutting the pavers.
Probably the toughest part of installing a concrete paver patio is figuring out the slope you need and then working this out “on-site”.
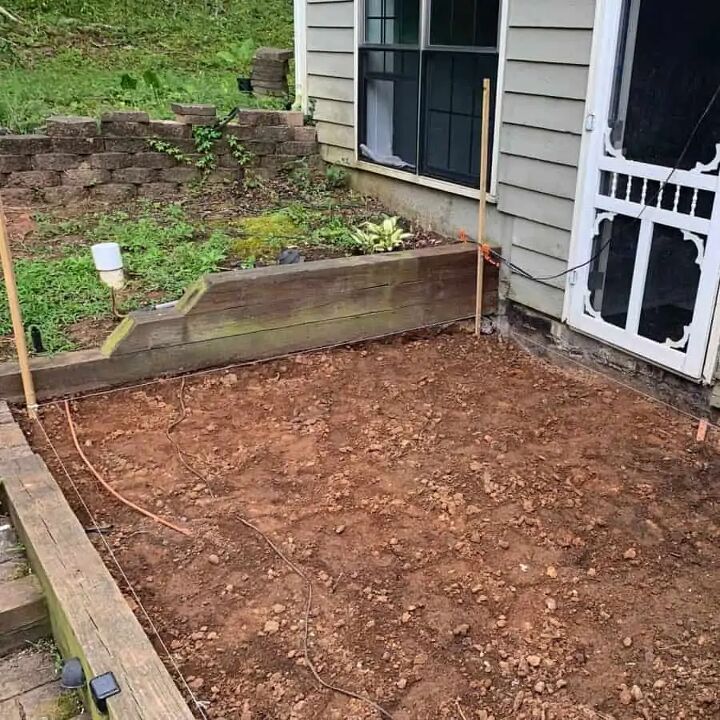
And because of our “boxed-in” site conditions, I wasn’t able to place my stakes and leveling strings outside of the space, as you should be able to.
The reason I mention this is because you’ll see my photos show the stakes inside my space, where I’m recommending you place yours outside.
It’s much more likely your scenario will be one where you can place the stakes outside your space, making this much easier and so that’s how I’m describing the steps in the tutorial.
Also, the amount of prep you’ll need to do will vary depending on what site conditions you have to work with.
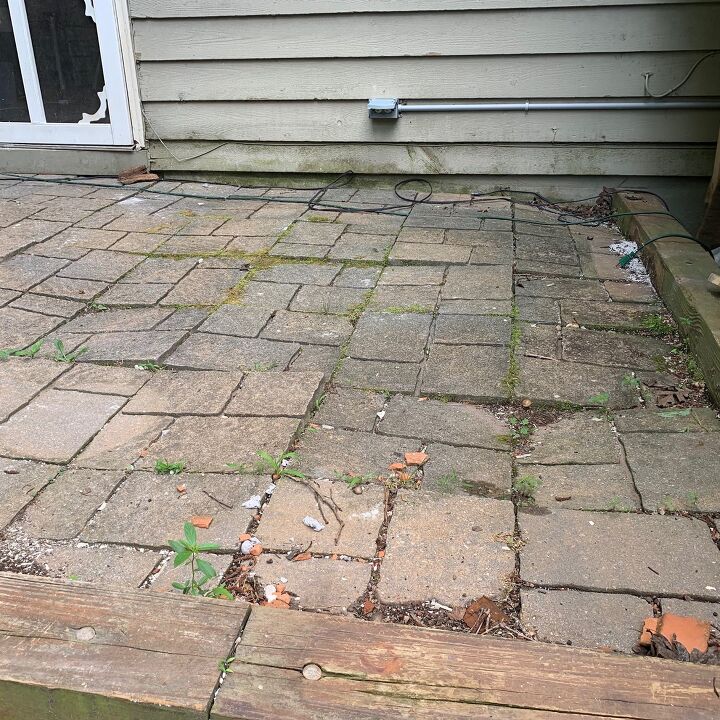
In my case, I was actually re-doing an existing patio with pavers that were literally caving in.
Considerations For Building Your Own Concrete Paver Patio
What Size Joints Should You Make?
You will need to leave at least a small gap between your concrete pavers to allow for expansion and contraction, but you have the option to go wider.
Like I mentioned, I was locked into a specific width of just over 2”, but with your patio space, you likely will have a choice.
Some people prefer tight spacing because of the look, or to avoid dealing with sand or pebbles in between since they can spill out and get kicked around.
If you want wider gaps, the width can be unlimited if you use grass in between. Otherwise I recommend keeping the spacing under 2 ½”.
It’s possible to go wider, but you’ll then want to go with a larger stone which can be more difficult to find and more expensive.
Material Type For Paver Joints
When you’re gathering your supplies, you’ll want to consider the type of material that will fill in the gaps between the concrete pavers.
Here are some of the gap fillers you might want to consider for your project:
- Moss: This can be transplanted from your yard or purchased like sod from a nursery. Here’s how to transplant moss.
- Grass: Let grass grow naturally. The drawback here is you may be end up fighting with weeds
- Decorative Pebbles: Fill the paver joints with your choice of pebbles. These can be a natural stone color, or brightly colored.
- Glass stones: For a really glamorous look, use sanded glass pebbles.
- Sand: Sand is simple and budget-friendly. I recommend using polymeric jointing sand. Polymeric sand will seal and harden the sand so you won’t track it.
When it comes to base layer and top layer materials, a landscape supply company in your area will know the best base material for your patio pavers.
For instance, if you live in an area that has a high amount of clay in the soil, plan on using extra gravel in your base layer. Clay has draining issues and larger gravel will help with this.
In my area, the base layer material is known as crusher run. A crusher run has granite dust and coarse and fine angular aggregate and the gravel is about ½-4” in size.
For my top level, I used paver dust, but in your area, sand may be recommended. Again, trust the guidance of your local supplier.
How to Build A Concrete Paver Patio Step-by-Step
Step 1. Prep The Patio Paver Area
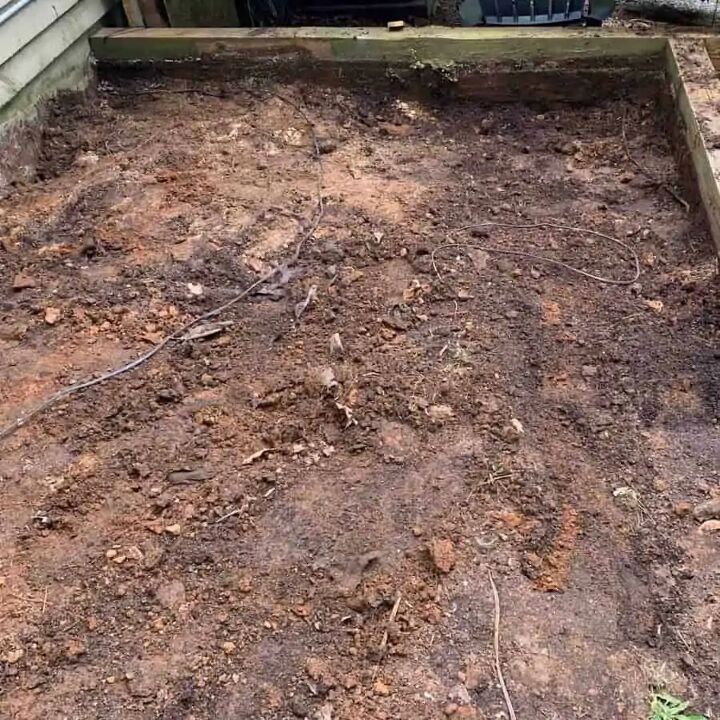
The prep involved will depend on your area, but basically, you will need to use a shovel to dig down at least 6” into the soil.
If you find a lot of larger rocks as you’re digging, I recommend digging several inches deeper in order to remove them.
You’ll also want to make sure you get rid of any tree roots that are impeding into the space you have planned for your patio.
Step 2. Level The Ground For Your Paver Stones
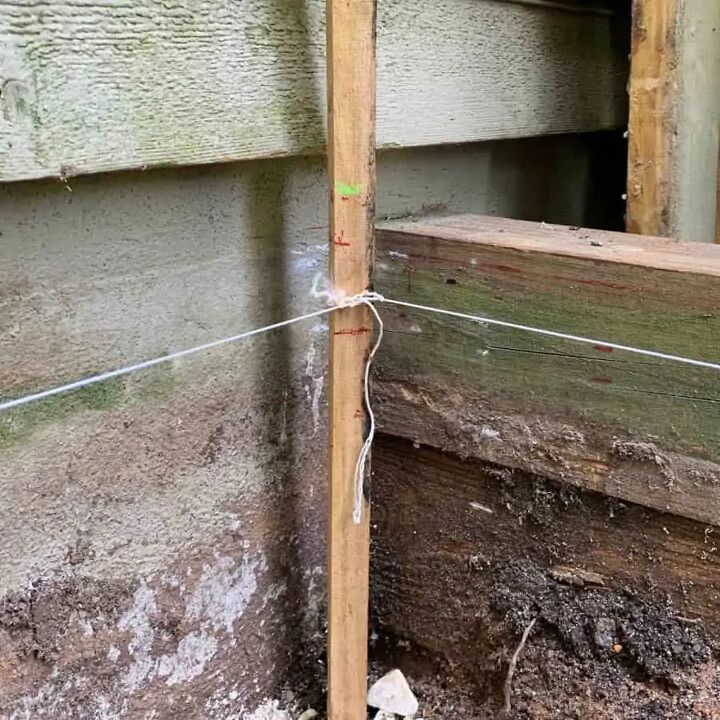
Take the four stakes and hit them into the ground 12” outside of your patio area using the rubber mallet. Hammer them in until they are at least a foot into the earth. They should be nice and tight and not move if you pull at them.
Once they’re secure, measure each stake from the ground up to 4”. Mark this. This will be your level line and also the top of your compacted base layer.
Reminder- due my patio being boxed in on all four sides, my photos show the stakes placed inside the patio area.
Make sure when you put the stakes into the ground, that they are at least a foot down. They should be nice and tight and not move if you pull at them.
Measure from the ground, up the stake to 4” and mark this. This will be your level line and also the top of your compacted base layer.
Take the nylon string and wrap it around the mark you made. How you tie the string is important, so take a moment and read this article that explains how to do this so that you get the proper tension.
Keep the string as one continuous string and repeat this for all four stakes, using the tying method linked above. When you return to the first stake, tie it off and cut the string from the spool.
Step 3. Measure Slope To Allow For Patio Drainage
So that your concrete paver patio drains away from your house, you’ll need to account for the slope of the space.
If your patio is on a hill or against a retaining wall, for instance, you will slope in two directions: away from the house and also away from the wall or the hill.
The angle of slope that allows for proper drainage for your patio is 1” per every 4 feet. For instance, my patio was 9’ deep, so I created a slope of 2¼”.
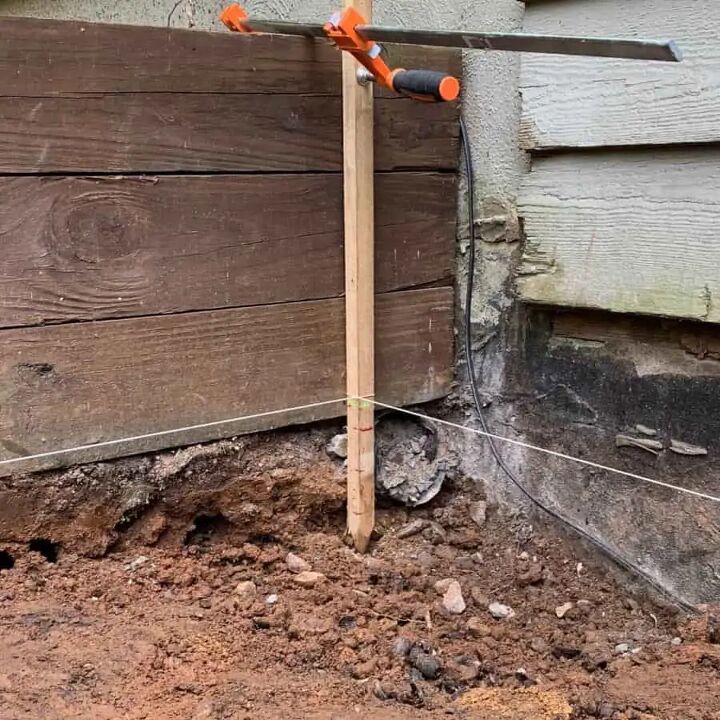
The way to mark the slope is to start at stakes that will be your low end. Take the strings you’ve tied onto those stakes and lower them by the number of inches required to meet the correct slope for your patio base on its depth.
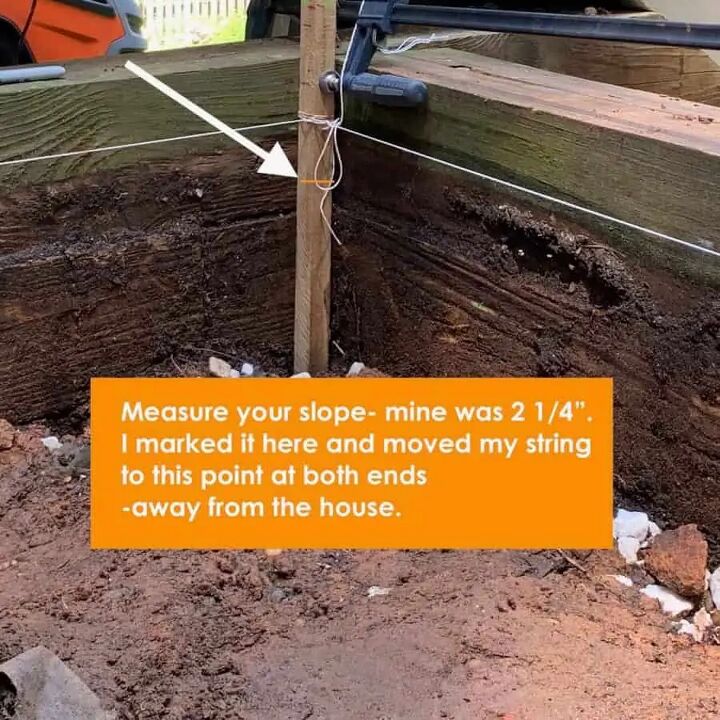
Next, use a marker to mark a line where you pulled the strings to (this will be a backup just in case you do lose a string line –I had one snap on me).
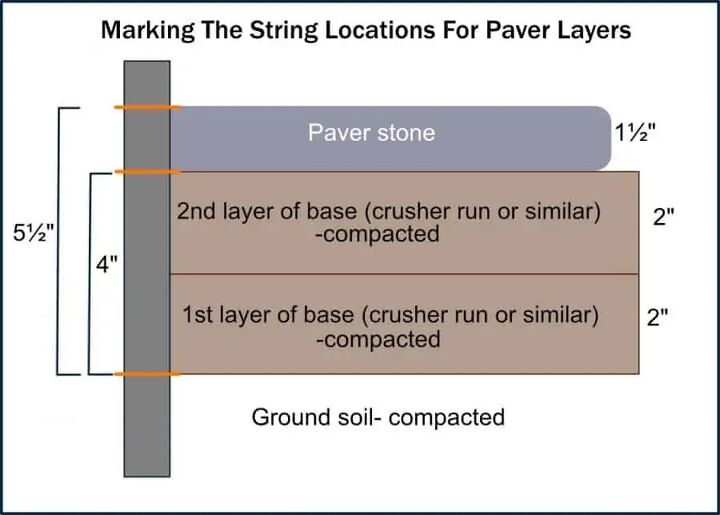
The new string locations now mark the height of the 4” base layer with the slope included.
I also found it helpful to mark the top of where the paver will be. It’s important to note that depending on what your top base layer is made of, it may not actually add any height to your total.
The paver dust I had compacted down to maybe about ¼”. You may want to test yours to see because if yours doesn’t compact like that, you may want to add it into your calculations.
If you are using the same pavers I used, these are just over 1½” thick. If your paver dust/sand compacts to almost nothing, you will want to make your last mark 1½” above the base layer mark just made.
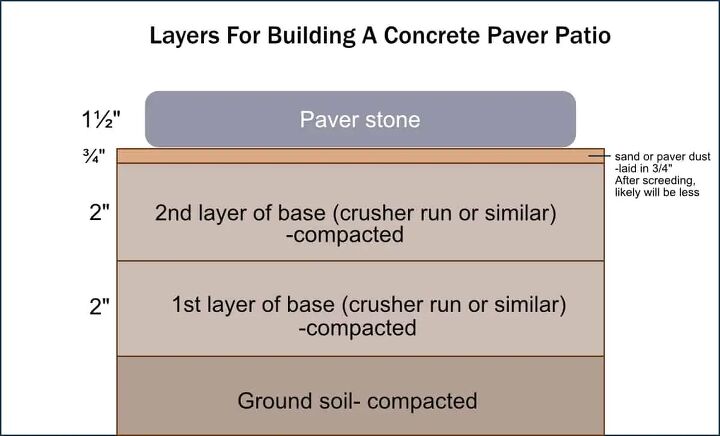
The total height between the bottom of the gravel base layer to the top of the paver will equal about 5½”.
At this point, you should add additional stakes through the middle of the patio. Work front to back and left to right, then tie strings where the other strings meet.
These extra leveling strings will help considerably when you are leveling the inner portion of the patio space.
Step 4. Lay And Compact The Base Layer Of Soil
Even though it sounds like it might be a good idea, you can’t just lay pavers on dirt or sand. Doing so will allow the pavers to move and not allow for proper drainage. It’s also likely that one side of each paver will sink and your patio will be really wonky.
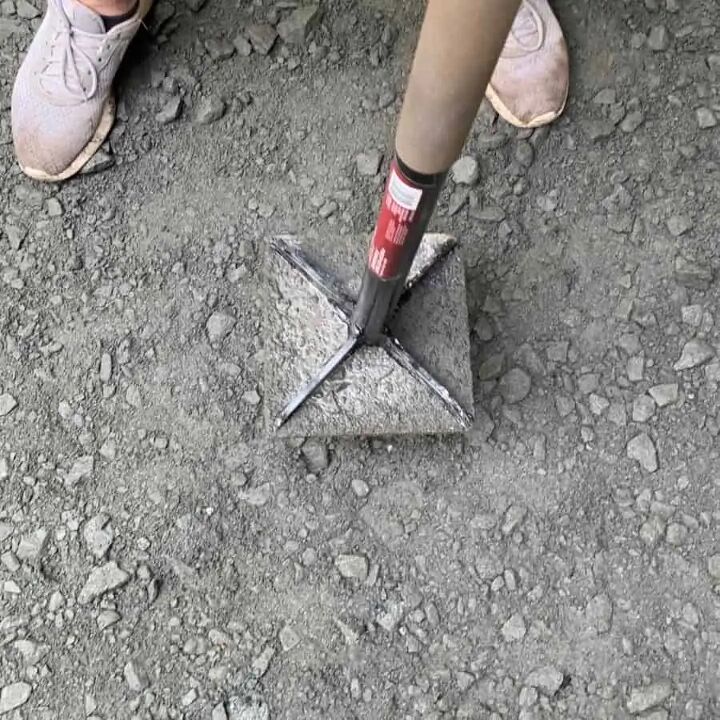
To begin, check if the soil is compacted. If it isn’t, which is likely, use the tamper tool/ plate compactor to tamp down the soil. You can lightly mist the soil to help with this.
(If you have clay soil, use landscape fabric over the clay before placing your base layer. And, regardless of soil type, you should never use plastic under pavers as it wouldn’t allow for drainage.)
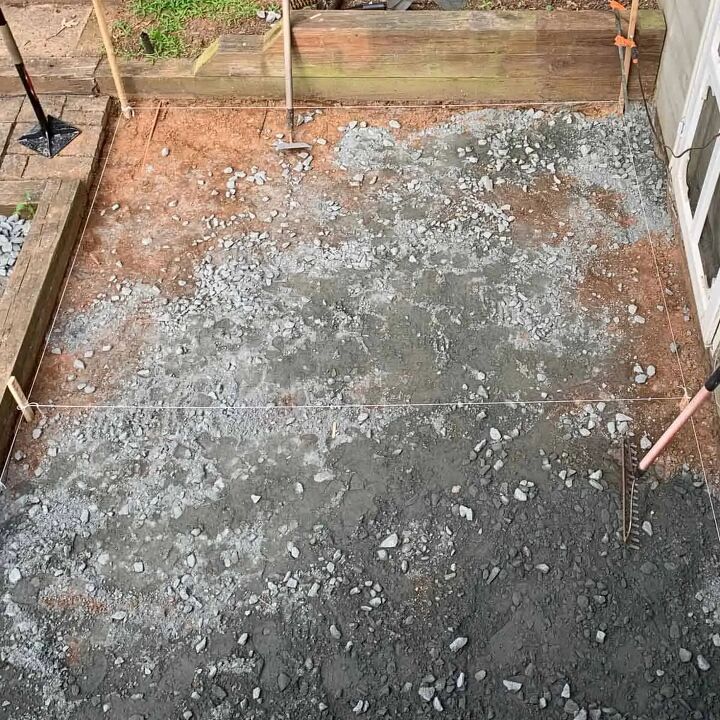
Once your soil is compact, spread only half (2”) of the base layer on top, as you’ll do this in two layers.
If you pile on all 4″ at once, it’s unlikely you’ll be able to compact it properly. It’s best to lay half of the gravel (2″) and compact it first, then to add the second layer (2″) and then compact that.
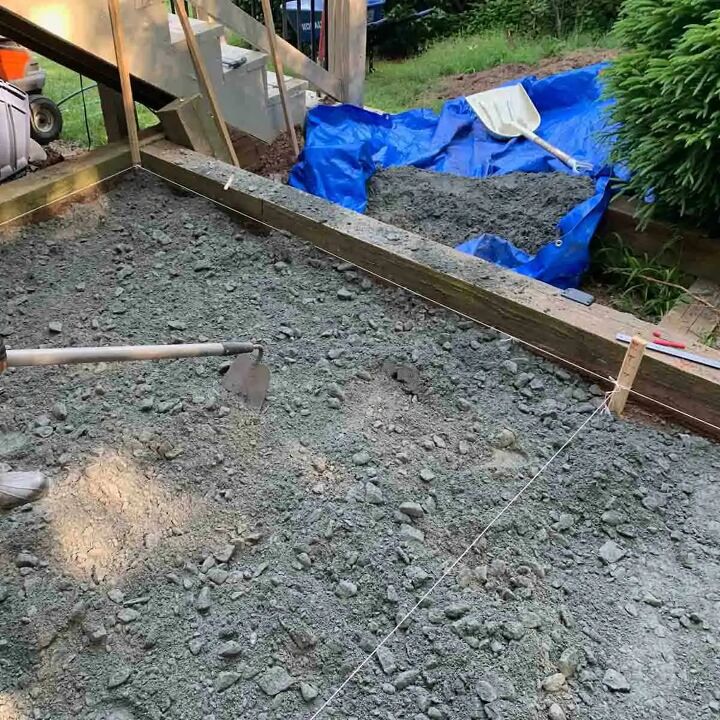
Use the hoe to push and pull the base layer back and forth. If you find that as you get toward the top of the base layer that your gravel is too large, use the bow rake to pull the larger pieces out.
Just lightly rake over the top. This will pull the large pieces into a pile which you can scoop up and toss to the side.
Once you have this layer evened out, use the tamper tool to compact it. To help with the tamping, you can spray a little bit of water on the top of each of the two layers. I used a garden hose with a sprayer head, on a mist setting.
It’s important that the entire base layer is well compacted. If it’s not compacted tightly, the soil will shift and so will your pavers.
Step 5. Plan Out The Order In Which You’ll Lay The Pavers
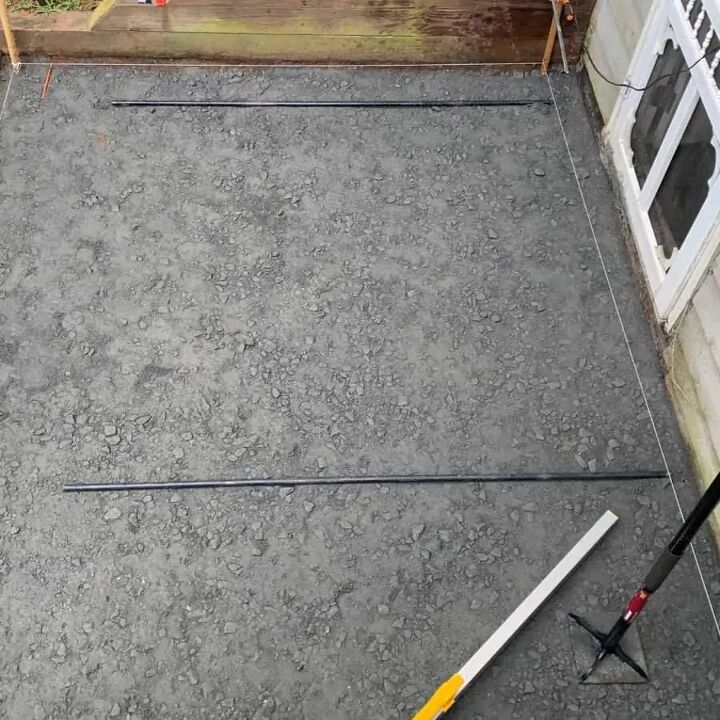
Once you have the 4” of base layer, double check that you have a little more than 1½” from the top of that to the top of the marked paver line.
Take the two black pipes and lie them on top. Set them just in the base layer enough that they don’t roll, but not so much that they are recessed. You can add a little paver dust to help lodge them into place.
Use a level to double check the slope angle that you set up based on your string lines.
Before putting down the concrete pavers, plan how you are going to place the paver stones. Typically you want to start from an outside edge or corner.
Be sure not to box yourself in because you can’t walk on the paver dust one you’ve screeded it. (You can walk on the pavers as you lay them.)
Step 6. Level The Top Layer Of The Concrete Paver Patio Base
Use the square nose shovel to scoop the paver dust and spread it onto the base layer. Do this in a sifting type of motion to get it even.
Don’t tamp the sand before laying the pavers. The screeding will basically have already compacted the sand for you.
I recommend only screeding one section at a time, for two reasons. One is that if it rains before you have placed your pavers, you will need to add more sand and relevel with the screed.
The other is that since you can walk on the pavers as you place them, it will be much easier to get around the patio. You’ll be forced to work outside the patio the whole time if you level the entire space at once. You’ll also benefit by getting a second set of hands for this.
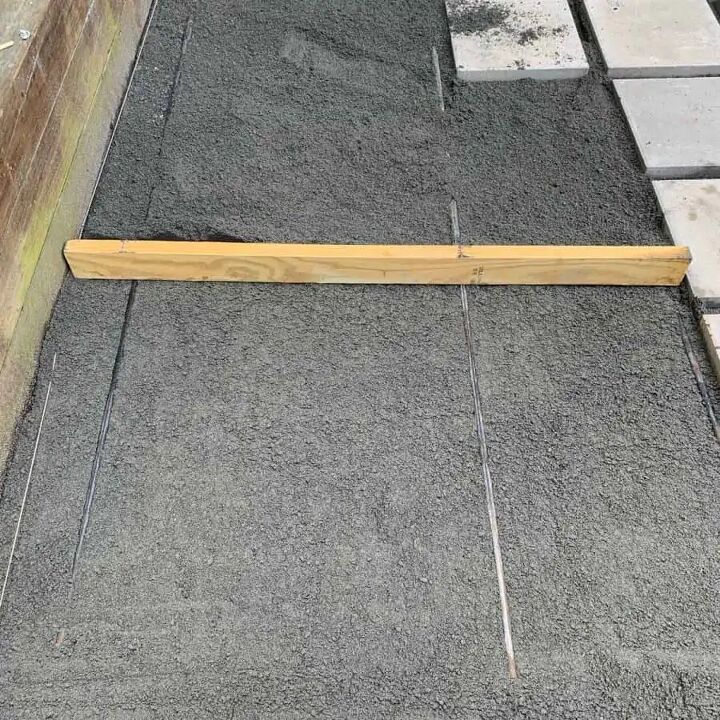
To screed the sand for leveling, start at one end and place the screed (or 2×4’) on top of the pipes.
Hold the screed tight to the pipes and push it across the pipes. Keep the pressure even as you move along.
You may need to slide the screed back and forth (left to right) to help even the sand out.
If you get to the end and you meet a wall, like the foundation of your house, use a mason float to scoop out the additional sand.
You can also use the float if there are any spots that you accidentally pulled a piece of gravel through and it made a divot, or your hand hit.
Step 7. Lay The Concrete Pavers
Cut your spacer down to the size you have planned for your joint width.
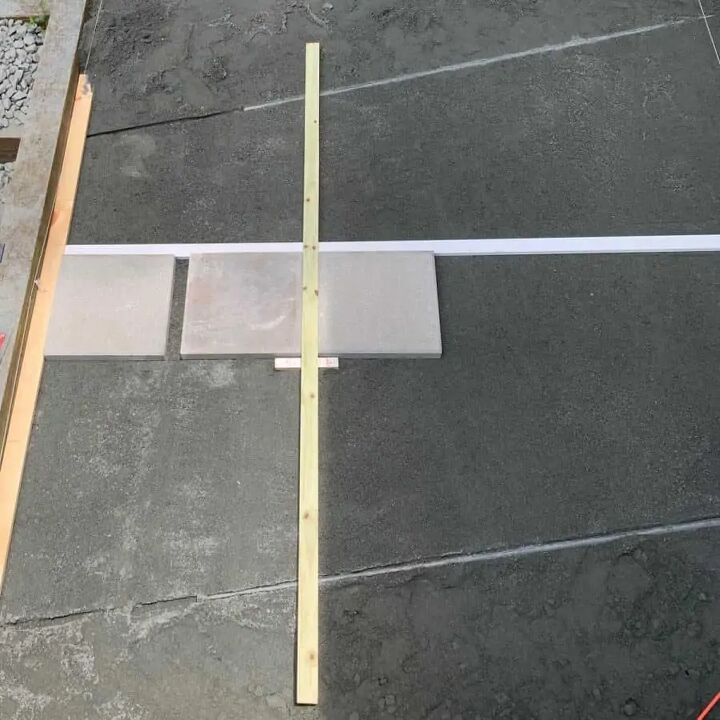
In the photo above, my metal bars are diagonal because I needed to slope my patio in two directions. I thought it would make it easier this way, but I ended up pulling them out and keeping them straight. It was easy enough to follow the slope lines with the strings.
Lay one the first spacer down, and use a squaring tool to lay down a crossing spacer. Then carefully place your first concrete paver against the two spacers.
Repeat, using the spacers to lay more concrete pavers. Remember, you can walk on these as you lay them.
My metal bars are lying diagonally in the photo above because I needed to slope my patio in two directions.
I thought it would make it easier this way, but I ended up pulling them out and keeping them straight. It was easy enough to follow the slope lines with the strings.
Lay one the first spacer down, and use a squaring tool to lay down a crossing spacer. Then go ahead and carefully place your first concrete paver against the two spacers.
Repeat using the spacers to lay more pavers. Remember, you can walk on these as you lay them.
Step 8. Secure The Concrete Pavers In Place And Fill The Gaps
Once you have finished each section and the pavers have all been laid, make sure none of the paver stones wobble. You’ll want to check this before filling the joints.
I had about five that had some wobble and just about every time, the culprit was a raised bit of larger gravel that had been pulled near the surface. The concrete paver stone was resting awkwardly on the raised gravel.
The way to fix this is to gently remove the paver and check for the larger gravel that is raised. Remove it and fill in the hole with sand.
Carefully place the paver back down into position.
If you don’t see any gravel, then something in that spot isn’t level. It could be that there’s a bit of a bump, or just one edge needs a little more sand. Use the float to level it and place the paver back into place.
With all the pavers set as you need them, you can start filling in the gaps. Use the square nosed shovel to scoop the sand or paver dust and place it into the joints, but only add about ½- ¾” of the paver dust/sand.
Try to distribute it evenly between them. You can use a hand spade and/or a broom to help with this.
Then sweep off any excess sand with the broom.
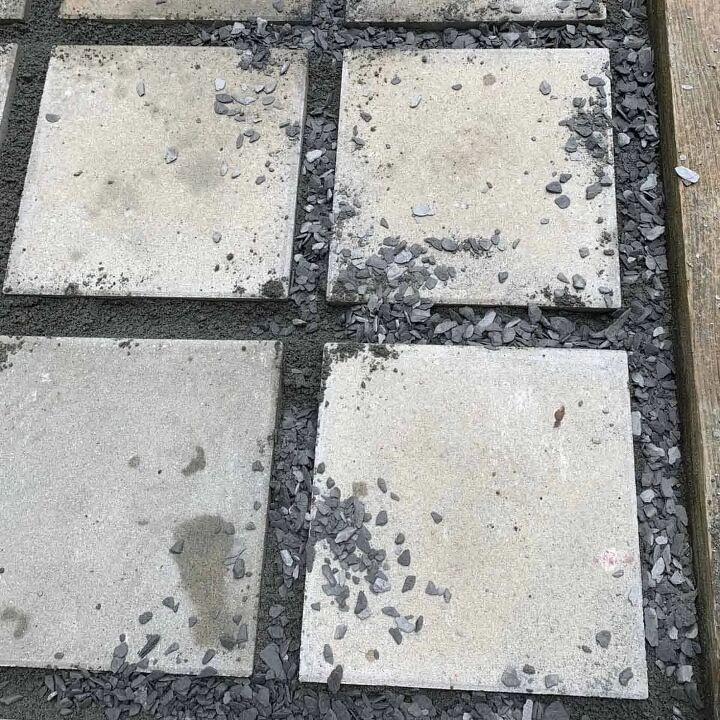
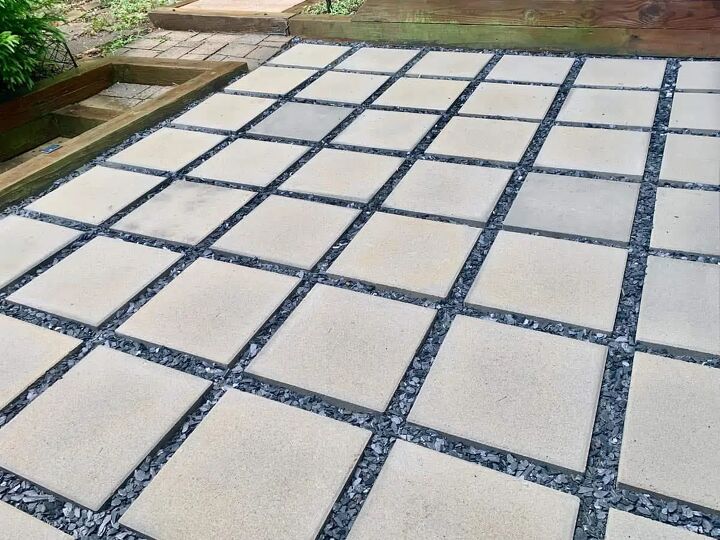
Now finish filling in the gaps with your decorative top layer. I used marble chips.
I wanted marble chips in part for aesthetic reasons, but also because the larger size would be less maintenance than smaller sized filler.
Smaller filler would just stick to people’s feet or get caught in the soles of their shoes.
Spread these evenly throughout, but be sure to leave them recessed about ¼” from the top so you don’t end up with a big mess of overflowing joint filler.
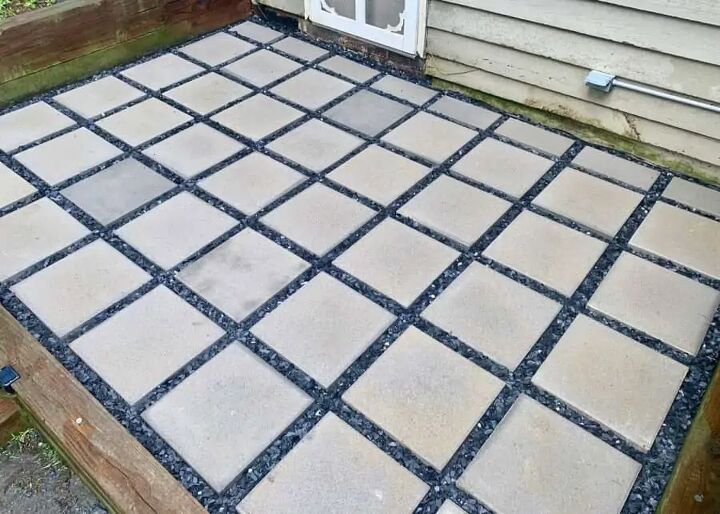
Those are all the steps! Now you’ll be ready to entertain on your new concrete paver patio!
And here is the tutorial on how to make the adjoining gravel garden using some of the same pavers to make it look fully connected! And the custom designed pavers you’ll see were super cheap and easy, and here is that stamped concrete tutorial.
*Some Important Notes About Your Project Materials
A 16 x16 paver is actually 15 ¾” x 15 ¾” and just over 1 ½” thick (not 16 x16). This is important to know when it comes to sketching out your design so it fits the space well.
If you are using larger pavers and installing the patio yourself, you may want to take weight into consideration. I used 16×16 pavers. These larger sizes weighed 36 lbs each! I could carry only one at a time, so this made the project more time consuming.
Instead, you can opt for the 12 x 12 pavers. Or if you have a little four-wheeled wagon and don’t have a hill to go up to, that will make things much easier!
Resources for this project:
See all materials


Comments
Join the conversation
-
Not only did the project turn out great, your very detailed post is great! I especially appreciate the inclusion of adjusting the level lines for the slope - it was a real “why didn’t I ever think of that” moment!

-
I love the “new” look! Sometimes it just works out better. I love old, but the new is a refresher all around! It’s beautiful! Great job! I spun you are gonna throw the old ones away, but I guess since you didn’t put in the project, that you may donate them or reuse them elsewhere, then you waste Lolol. Kudos to you! Did a great job!


Frequently asked questions
Have a question about this project?
Isn't the lip on the timbers a trip hazard? Shouldn't the pavers be flush with these and then you can still undersell the spaces between to help with fill ,displacement/
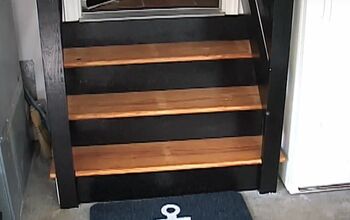
Did you do the steps as well, if so, can you post a picture?
The finished project looks great! But, I wonder why you didn't just clean the original blocks and reuse them? It just seems like such an environmental waste.