How to Remove Popcorn Ceilings in 30 Minutes

by
DIY Fun Ideas
(IC: blogger)
It all started with a great big hole in the ceiling caused by a drain line back up in the central air conditioning system. Luckily, the damage was covered by the AC warranty. So I didn't have to roll up my sleeves for that one.
I did hate the existing popcorn ceiling. So it seemed kind of silly to cover the repaired drywall with more popcorn. The repair guy was only going to charge me about $100 over what the warranty was paying for the repair to remove the popcorn, so I figured why not have him do it. Then I could learn from the professional what the best way is to remove the popcorn ceiling before I take on any of the other rooms.
I'm really glad I did that. Removing the popcorn surprisingly brightens up the room. All those little popcorn nodules create little shadows on the ceiling, making the ceiling and the room look darker than it really is. Now the room has a much cleaner, brighter look to it.
Here's the big hole in the ceiling that we started with...
My repair guy started by covering all the walls and the floor with plastic sheeting. Perhaps I'm a little slow, but I never would have thought to cover the walls with plastic. He used this amazing pre-taped plastic sheeting. I had never heard of the stuff, but what a brilliant idea! Basically, one edge of the plastic sheeting has tape attached, so all you have to do is peel and stick. It took him all of five minutes to put up the plastic and cover every inch of the room. (You can find the pre-taped plastic sheeting here: http://amzn.to/1MoNRcm)
Once you get your plastic up, you need to wet the ceiling. To do this, my repair guy actually used a sprayer filled with water. His sprayer was backpack-style, but you can use any kind of sprayer. And it's way easier than trying to sponge down your ceiling. (Follow the link at the end for more details on the sprayer.)
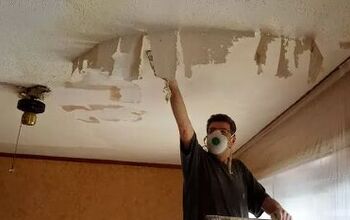
My repair guy used a 6 putty knife to remove the popcorn. To remove the popcorn, glide your putty knife across the surface moving slowly with long strokes in one direction. This will help prevent the corners of the knife from digging in and gouging the drywall. So let me emphasize: If you want to avoid gouging the drywall, use LONG, SLOW, EVEN STROKES. No short back and forth strokes. The popcorn easily peels right off. No need to power into it. It was amazing how easily the popcorn came off. It was like peeling butter off the ceiling.
With these long and even strokes, my guy removed all the popcorn in less than 30 minutes with zero gouges in the drywall.
Also on the blog is how I created that faux silver leaf on the doors using paint and info on color matching the room color to Tiffany Blue.
Enjoyed the project?

Want more details about this and other DIY projects? Check out my blog post!
Published November 29th, 2014 10:45 AM
Comments
Join the conversation
3 of 26 comments
-
 Omega Cantu-Ash
on Mar 05, 2019
Yes, we bought our home, built in 1963. So approximately 95% of our ceiling has POPCORN ceiling. So, DIY, one room a week is our plan. Thank you, this share, gave us hope, that we can do it!
-
-
 Eva Lou Cox
on Sep 01, 2022
I grew up with flat ceilings, flat white paint, and some wallpaper.
The ceilings cracked and turned yellow from smoke. I hated it!
I love my popcorn ceilings. Someone can change it when I die!
-














Frequently asked questions
Have a question about this project?
Once the popcorn ceiling is scraped down what do you do? Wash it? Prime it? I've never painted a ceiling before !! Help!!!
Thanking you in advance
Ann