


How to Trim Out a Window for a Flawless Finish

By Judy Schumer
Adding trim to your window finishes the rough installation and adds a beautiful and functional architectural element to your home’s look. Installing window trim yourself is a doable DIY project, but when buying window trim, it’s important to look for good quality wood trim without warps or splintering. You’ll also need the patience to measure carefully. The old saying “measure twice, cut once” is absolutely true when you’re working with trim.
This guide will first walk you through the important parts of a window, and then teach you how to trim out a window yourself. And if you’re looking to get more decorative with it, we’ll also show you how to trim out a window with moldings like blocks and rosettes.
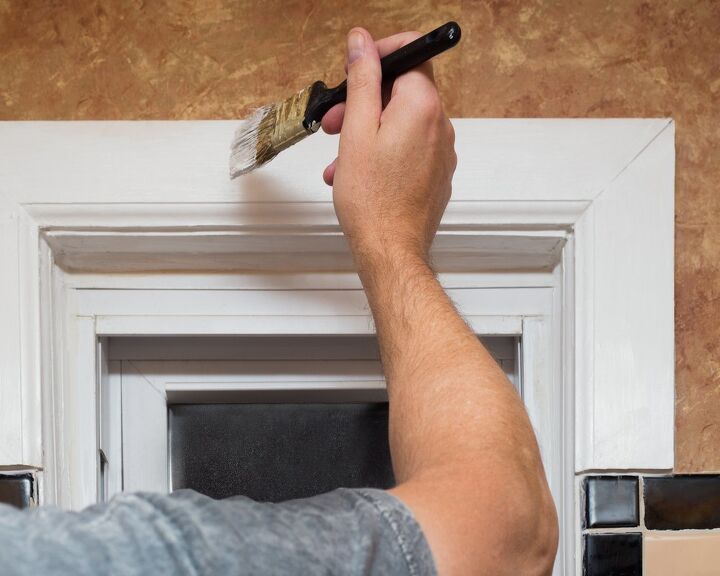
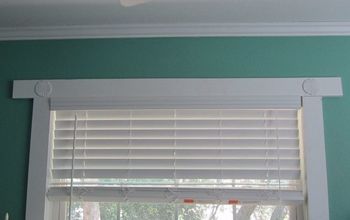
Photo via Shutterstock
Important Parts of a Window Trim
Before getting started on your window trim project, it’s a good idea to familiarize yourself with the important parts of window trim:
- Jamb - The inside section of the window is called the jamb. The top of the jamb is the head jamb; the side is the side jamb.
- Sill - The bottom inside section of the window is called the sill.
Depending on the most common type of trim you choose, your window trim will have the following parts:
- Miter joint - This 45-degree-angle trim cut covers the wood grain as it meets the other sections of trim. It’s a good idea to invest in a quality miter saw for miter joints.
- Rosette - The optional square piece used at each corner to cover the rough ends of the trim.
- Square joint - This cut will be used if you plan to add square rosettes and is a style most common in older homes. The ends of the trim are cut straight across, and space is allowed on each side of the corner for the square rosette to fit snugly.
- Head casing - This is the uppermost piece of the window trim. It covers the rough gap where the window frame butts against the wall.
- Side casing - This is the trim used on each side of the window to cover the gaps where the window frame meets the wall.
- Bottom casing - This trim is the bottommost piece of trim around the window. It meets up with each side casing piece.
How to Prepare for Trimming Out a Window
Before you head to the hardware store to buy new trim, it's important to set aside a few minutes to measure your window and determine what type of trim you want to choose for your window.
How to Measure for Window Trim
Once you’ve decided to trim your window, you’ll need to measure the window to buy the trim. Be sure to write down all your measurements to take to the hardware or home improvement store with you.
Examine Your Window
If your windows have been cleanly installed and the jambs are flush with the wall, you’re ready to trim the window. Remember: measure twice, cut once. To measure your window for trim, do the following:
Measure Horizontally
Measure the distance between the window’s side jambs at the top, middle, and bottom of the window to get three horizontal measurements. Be sure that you are measuring from the outermost corners. Write down your measurements. The smallest of the three measurements is the rough opening width of the window.
Measure Vertically
Measure the distance of the window’s head and bottom jamb on the left, the middle, and the right side of the window to get three vertical measurements. Be sure that you are measuring from the outermost corners. Write down your measurements. The smallest of the three measurements is the rough opening height of the window.
How to Choose Trim
Now that you have your measurements, you know the trim size you need. Your choice of trim style is entirely up to you. If you’d like a more formal colonial look, go with fluted trim and rosettes. Buy standard window trim with clean lines if you want a more modern, blended look.
Whichever style you choose, you’ll save yourself time if you buy pre-primed trim if you are planning on painting the trim. However, if you plan on staining it, stick with raw wood trim.
When you head to the home improvement store with your measurements, add an extra six inches on each piece to allow room for error. For example, if your window width is 36 inches, cut two 42-inch pieces. The same applies to height. It’s also a good idea to buy a couple of extra trim pieces in case you make a mistake cutting once you start trimming out your window.
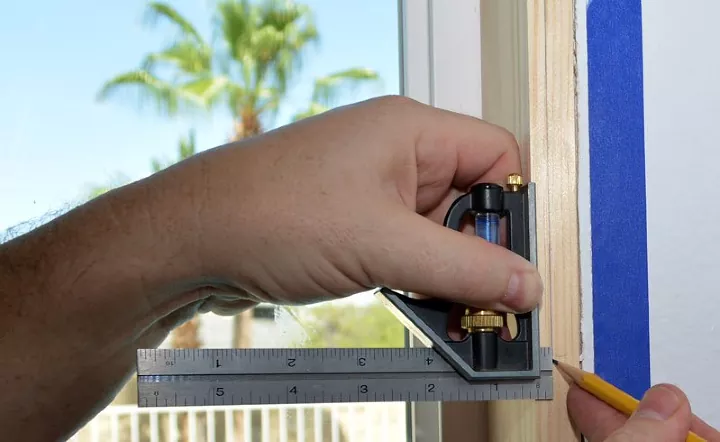
Photo via John @ AZ DIY Guy
How to Trim Out a Window
Now for the fun part: trimming out your window! Each window you trim will take about an hour, but block trimming takes less time because you won’t need to miter the corners.
Here’s how to trim out a window, broken into steps. Before you get started, know that you’ll likely need a partner to help hold the trim in place while fitting and nailing.
Tools and Materials Needed:
- Safety goggles
- Heavy work gloves
- Construction face mask
- Utility knife
- Hammer
- 9-in-1 tool
- Tape measure
- Pencil
- Ladder or step stool (if needed)
- Window trim
- Miter saw
- 3d finish nails and 6d finish nails
- Wood glue
- Primer (if needed)
- Paint and supplies
Step 1: Remove Existing Trim
Put on your safety gear to protect your hands, eyes, and nose because you’ll need to remove any existing trim before attaching new window trim. Do this by running your utility knife around the entire perimeter of the window trim to break the seal between the wall paint and the old trim.
Place the sharp edge of the 9-in-1 tool between the old trim and the wall. Tap the end of the tool with a hammer to loosen the trim and pull the trim away from the window frame. Do the same with the remaining three pieces of trim.
Step 2: Mark Reveal Lines
A window reveal is the material used to attach the window to the wall. The reveal provides support to the frame of the window itself. For this project, you’ll need to mark the reveal lines as a guide for your trim placement.
Use a tape measure and a pencil to mark the jamb ¼ of an inch from the inside edges on all sides so they meet at a 45-degree angle on each corner of the jamb. You will have just created reveal lines.
Step 3: Cut the Top Trim
Use the miter saw to make a 45-degree cut on one end of the trim piece you’ll be using for the top. Have someone help you hold the trim in place as you position the cut piece with the bottom of the angled cut resting on your pencil reveal line.
Use the pencil to mark the other end of the trim, where it meets the reveal line. Change the direction of your saw blade and cut the other side of the trim at a 45-degree angle, beginning the cut an inch or two from where you’ve marked with the pencil. Hold the trim back in place above the window to check the length. Continue to make incremental 45-degree miter cuts as needed until both trim edges meet their respective reveal lines.
Step 4: Nail the Top Trim
Have your project partner hold the bottom edge of the top trim piece on the reveal line you drew at the top of the window. Hammer 3d finish nails 6 inches apart along the trim to hold it in place. Use 6d finish nails for thicker areas on the wall, like studs.
Step 5: Mark the Side Trim
Use the miter saw to make a 45-degree cut in one end of the trim piece you’ll be using for the side casing. Have someone else help you hold the trim in place as you position the cut piece to meet the angle of the top piece of trim.
Make a pencil mark on the trim where it meets the lower reveal line. Use the pencil to mark the other end of the trim, where it meets the reveal line. Change the direction of your saw blade and cut the other side of the trim at a 45-degree angle, beginning the cut an inch or two from where you’ve marked with the pencil. Hold the trim back in place above the window to check the length. Continue to make incremental 45-degree miter cuts as needed until the trim meets the reveal line.
Step 6: Glue the Corner
Apply wood glue to the upper corner piece of trim along the angled edge. Attach the side trim, joining the angled edge of the new trim to the top trim with glue.
Step 7: Nail the Side Trim
Have your buddy hold the side casing on the reveal line you drew. Hammer 3d finish nails 6 inches apart along the trim to hold it in place. Use 6d finish nails for thicker areas, like studs.
Step 8: Repeat Steps 3-7
Repeat steps 3 through 7 to attach the bottom and the other side of the trim.
Step 9: Paint the Trim
If you bought pre-primed trim, half your painting job is done and you can get to painting your desired trim color! If not, prime your trim first before applying two coats of paint.
How to Trim Out a Window with Blocks or Rosettes
If you’ve chosen the more decorative block casing and corner rosettes, you have an easier job because you’ll avoid making miter cuts, which can get tricky. Keep reading to learn how to trim out a window with decorative blocks or rosettes.
Tools and Materials Needed:
- Safety goggles
- Heavy work gloves
- Construction face mask
- Utility knife
- Hammer
- 9-in-1 tool
- Step ladder (if needed)
- Tape measure
- Pencil
- Rosettes and fluted trim
- Construction adhesive (like Loctite)
- Window trim
- Sander or miter saw (if needed)
- 3d finish nails and 6d finish nails
- Level
- Primer (if needed)
- Paint and supplies
Step 1: Remove Existing Trim
You’ll need to remove any existing trim before attaching new window trim, so be sure to wear safety goggles, work gloves, and a construction mask. You can remove the trim by using your utility knife to pierce around the entire perimeter of the window trim, breaking the seal between the wall paint and the old trim.
Place the sharp edge of the 9-in-1 tool between the old trim and the wall. Tap the end of the tool with a hammer to loosen the trim and pull the trim away from the window frame. Do the same with the remaining three pieces of trim.
Step 2: Mark Reveal Lines
Use a tape measure and a pencil to mark the jamb ¼ of an inch from the inside edges on all sides so they meet at a 45-degree angle on each corner of the jamb. These are your reveal lines.
Step 3: Attach the Rosettes
Place a dot of construction adhesive in the back of a rosette. Place it on the wall at the corner of the reveal lines. Hold tightly and hammer a 6d nail through the center. Check the top of the rosette with a level and reposition if necessary before the adhesive dries. Repeat for each corner of the window.
Step 4: Cut the Casings
Measure the space between rosettes and cut four trim pieces to fit in between each rosette. Allow an extra ¼ inch on each side and sand down or use a miter saw to cut to fit as needed.
Step 5: Nail the Trim in Place
Hammer 3d finish nails 6 inches apart along the trim to hold it in place. Use 6d finish nails for thicker areas, like studs. Repeat Steps 4-5 until all four sides are done.
Step 6: Paint the Trim
If you bought pre-primed trim, go ahead and paint two coats of your desired trim color. If the trim is bare, coat your trim in primer before applying two coats of your paint of choice.
Tips and Hacks for Difficult Cases
Trimming out a window should be a relatively easy task for the average DIYer. Even with that said, some situations will require a call for help. Contact a professional contractor if you’re facing any of the following dilemmas—they can fix installation problems before you attempt to trim out a window.
- You have significant gaps between the drywall and the window: Your drywall may need to be replaced to fit snugly around the window.
- The jambs are not flush with the wall: The fix for this is extending the jambs by adding wood or planing the jambs to make them flush. Again, this should probably be handled by a professional since the jambs are a core component of the window frame.
- Your window is not level: Place a level in the sill of the window. If the window is not level, you may need to have it reinstalled. Trim may only make the flaw more noticeable.
Have you trimmed out your windows? What style of trim did you go with?


Frequently asked questions
Have a question about this project?