DIY Fancy Window Trim the Lazy Girl Way

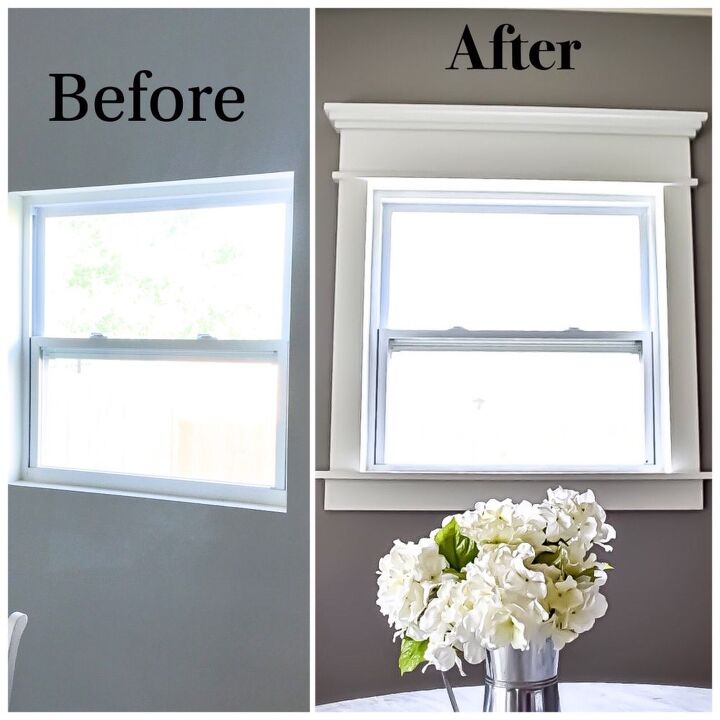
Make your builder grade windows pop with this budget savvy window trim project! Create a craftsman look with this super simple tutorial.
Before & After
1) Start by cutting the 1×6 for the sill, cut it to the size of your window plus 10 inches so that you will have 5 inches of overhang ledge on each side
2) Next, take your 1×6 and mark 5 inches from each end and the width of your window sill. It should look similar to this.
3) Use your jigsaw to cut these two sections out
BIG TIP: After I made each cut I sanded the piece, wiped it down, and painted the edges that will be visible. I did this so I wouldn’t have to touch up my kitchen wall color because I knew I wouldn’t have been able to keep the white paint just on the wood to save my life.
4) Nail down the new ledge/sill
5) Next, cut your 1×4 for the apron. Cut it the width of the window plus 8 inches so that it will sit under the two outside pieces once they are up
6) Then, you’ll want to nail the apron under the sill
7) Now, its time to cut the (2) 1×4 pieces, for this measurement place each 1×4 vertically on top of the sill piece and mark where it meets the top of the window
8) When I got ready to nail these pieces down I used a level to make sure that they were straight because my boards were a little wonky and would not sit flush with both the sill and edge of my window, but again no worries because CAULK!
9) After the sides were nailed down I cut my (2) 1x2s to the width of my window plus 9 inches because I wanted them to stick out 1/2 an inch on each side over my 1x4s. *This is just preference*
10) I nailed my first 1×2 onto the wall directly above my two side pieces
11) Next, I cut my 1×6 for the header, I made it the exact same size as the apron (width of the window plus 8in)
12) Once my header was nailed into place I started on my fancy top pieces. I nailed these 3 pieces of wood together before attaching them to the header. My 1×2 was already cut to size from step 9, I made my 1×3 1 inch longer than the 1×2 (1/2 an inch stick out on both sides) & my 1×4 1 inch longer than the 1×3. Again this part is just preference!
13) After my (3) pieces were cut I nailed them together using my nail gun. I marked with a pencil where I nailed them so that when I nailed the piece to the wall I wouldn’t accidentally hit the nails holding the pieces together
14) Then, I applied some liquid nails to the back of the piece, set it on top of the header making sure I had an equal stick out on both sides, & nailed it into place
I paused here & did a little happy dance because it looked so good!
15) After a brief recovery from the dance (cardio & I clearly don’t spend enough time together), I got to caulking all the not so perfect areas + the nail holes
16) Finally, once the caulk dried I sanded, wiped off, and painted my new trim!
Enjoyed the project?
Resources for this project:
See all materials
Comments
Join the conversation
-
-
 Lia with Southern Yankee DIY
on Aug 01, 2020
Thanks so much Mary!
-
-
-
 Patrick Galvin
on Apr 14, 2021
Very nice and very simple. Consider spackle instead of caulk for nail holes. Caulk will shrink and telegraph those holes to all the admirers of your work.
-
 Lia with Southern Yankee DIY
on Apr 23, 2021
Thats a good idea also Patrick!
-
-


Frequently asked questions
Have a question about this project?
Fantastic! Will be doing this in my living room pronto! Was thinking of adding shutters as well, what are your thoughts? Curtains are always in the way and manage to get hair on them from my big fluffy white dog!
I know this is just a preference question, but would you recommend using a skill saw or table saw for the sill cuts?