


Beyond the Garden: 12 Fun Tomato Cage Crafts & Decorations

Unleash the hidden potential of your tomato cages! This collection of easy tomato cage crafts and DIY tomato cage decorations demonstrates how to transform these humble garden tools into a surprising range of functional and festive objects.
From colorful plant stands to themed party tables, discover how to use tomato cages in ways you really wouldn't expect. So grab your tomato cages and get ready to be amazed by these crafty tomato cage ideas!
Tomato cage crafts and decorations
- 1. Tomato cage plant stands
- 2. Tomato cage chandelier
- 3. Tomato cage tables
- 4. Tomato cage frisbee golf
- 5. Gourd topiary
- 6. Fall leaf topiary
- 7. Tomato cage fall topiary
- 8. Tomato cage ghost
- 9. Halloween tomato cage gnome
- 10. Christmas tomato cage gnome
- 11. Tomato cage angel
- 12. Tomato cage snowman
- Tomato cages as... tomato cages
- More tomato cage crafts and decorations
Disclaimer: Hometalk may receive a small affiliate commission from purchases made via Amazon links in this article but at no cost to you.
LEOBRO Tomato Cage, 2 Pack

1. Tomato cage plant stands
To start, this tutorial by Love & Renovations shows you how to create cheap and colorful plant stands from tomato cages in just a few steps.

- Find a tomato cage (unpainted is recommended).
- Cut off the bottom with bolt cutters and smooth the edges with a metal file.
- Paint the cage in your desired color.
- Place a pot inside the smallest opening of the colored tomato cages.
These stands work best in grassy areas where the base can grip the soil for stability.
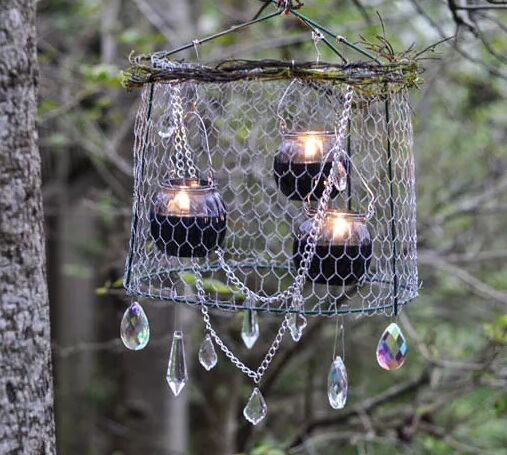
2. Tomato cage chandelier
This tutorial by Tara @ Suburble creates beautiful and customizable tomato cage chandeliers perfect for your next patio party.
Tools and materials:
- Tomato cage
- Chicken wire
- Tin snips
- Craft wire
- Citronella candles
- Decorations (grassy vine, crystals, etc.)

Steps:
- Trim the bottom rung of the tomato cage to create three legs for the lampshade.
- Wrap the cage with chicken wire and trim any excess.
- Decorate the lampshade with your chosen materials.
- Hang the chandelier and use craft wire to suspend citronella candles inside.
- Add crystals for extra bling.
Where to buy tomato cages
Tomato cages are readily available at most hardware store, home improvement stores, and garden centers, such as Home Depot, Lowe's, and Walmart. You can also find them online at retailers like Amazon (see below).
Small, large, square, heavy-duty, wooden, folding, and even colored tomato cages are available, depending on your gardening and crafting needs.
To buy tomato cages in bulk, wholesale retailers and agricultural supply stores are good places to look.
1. Tomato cage plant stands
To start, this tutorial by Love & Renovations shows you how to create cheap and colorful plant stands from tomato cages in just a few steps.

- Find a tomato cage (unpainted is recommended).
- Cut off the bottom with bolt cutters and smooth the edges with a metal file.
- Paint the cage in your desired color.
- Place a pot inside the smallest opening of the colored tomato cages.
These stands work best in grassy areas where the base can grip the soil for stability.
2. Tomato cage chandelier
This tutorial by Tara @ Suburble creates beautiful and customizable tomato cage chandeliers perfect for your next patio party.
Tools and materials:
- Tomato cage
- Chicken wire
- Tin snips
- Craft wire
- Citronella candles
- Decorations (grassy vine, crystals, etc.)
Steps:
- Trim the bottom rung of the tomato cage to create three legs for the lampshade.
- Wrap the cage with chicken wire and trim any excess.
- Decorate the lampshade with your chosen materials.
- Hang the chandelier and use craft wire to suspend citronella candles inside.
- Add crystals for extra bling.
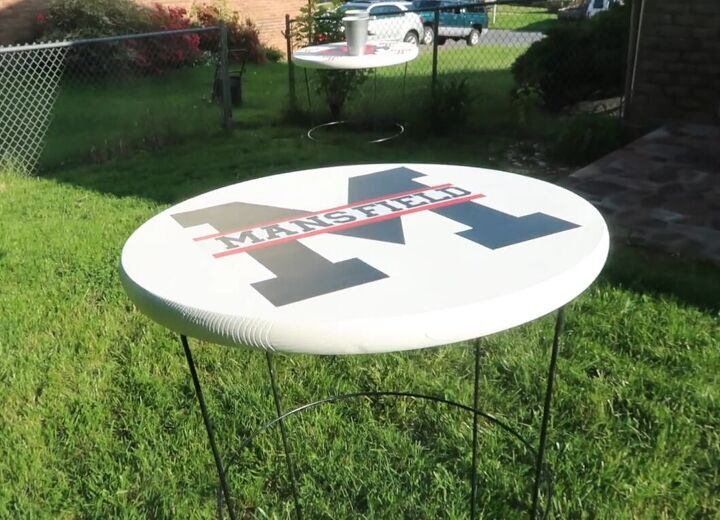
3. Tomato cage tables
This tutorial by Alicia W creates sturdy and customizable party tables from tomato cages and wooden circles, perfect for outdoor gatherings.
Tools and materials:
- Tomato cages (as many as you need)
- 1" x 18" x 18" round pine boards (equal number to tomato cages)
- Sandpaper
- Paint
- Paintbrush
- Vinyl decals (or stencils, craft paint)
- Poultry net staples
- Clear sealant

Steps:
- Sand and paint the round wooden boards.
- Design and decorate the tabletops using vinyl decals, stencils, or craft paint.
- Flip the boards over and center the tomato cages on the back.
- Secure the tomato cages to the boards using poultry net staples.
- Apply a clear sealer to the entire table.
- Stick the legs of the tomato cages into the ground for a stable outdoor table.
4. Tomato cage frisbee golf
This fun tutorial by Chas' Crazy Creations shows you how to create a fun and affordable frisbee golf course in your backyard using just tomato cages and laundry baskets!
Tools and materials:
- Tomato cages (as many as you want)
- Dollar Tree laundry baskets (equal number to tomato cages)
- Frisbees or beach balls (optional)

Simply stick the tomato cages in the ground and place a laundry basket in the center of each one. Scatter the completed "goals" around your yard for a customizable course.
Play with frisbees for a classic game or use beach balls for younger children. When you're done, the entire course packs up easily for storage.
5. Gourd topiary
Next, this tutorial by Alicia W gives your leftover tomato cages a fall makeover by turning them into a gourd topiary!
This fall decor idea is simple and the gourds look really effective.
Tools and materials:
- Tomato cage
- Chicken wire
- Wire cutters
- Container
- Rocks
- Potting soil
- Gourds

Steps:
- Wrap and secure chicken wire around the tomato cage to create a base.
- Make a smaller chicken wire cylinder to fill the center of the cage.
- Plant the tomato cage (upside down) in a pot with rocks and soil for stability.
- Place the chicken wire cylinder inside the inverted tomato cage.
- Arrange gourds inside the cage, filling the space and hiding the chicken wire.
- Top off the topiary with a single gourd secured by the cage's prongs and wire.
6. Fall leaf topiary
This tutorial by Thrifty Artsy Girl shows you how to create fall topiary trees from tomato cages and dollar-store finds for under $20 each.
Tools and materials:
- Tomato cage (or 2)
- Fall leaf garland (enough to cover your cage)
- Urn planter (or 2)
- Clear Christmas lights (optional)

Steps:
- Adjust the tomato cage height by bending or removing the bottom hoop if needed. Bend the top spokes together to create a tree shape.
- Wrap the fall leaf garland around the tomato cage, tucking in the ends.
- Wrap clear Christmas lights around the topiary, tucking them under the leaves for a softer look (optional).
Enjoy your festive and affordable fall topiary trees!
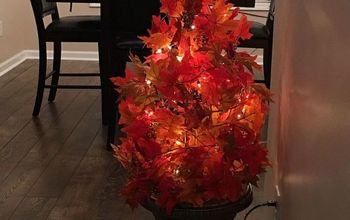
7. Tomato cage fall topiary
This tutorial by Rob & Courtney M creates colorful fall topiaries for your living room using tomato cages in under 30 minutes!
Tool and materials:
- Tomato cages (2)
- Planter pots (2)
- Bolt cutters
- Fall leaf garland (enough to cover your cages)
- Christmas light strands (2)
- Rubber bands (2) (optional: zip ties, bread ties)
Steps:
- Cut the tomato cages to your desired height with bolt cutters.
- Place the tomato cages upside down on the planters.
- Secure the tops of the inverted tomato cages together with a rubber band (or zip tie).
- Wrap the fall leaf garland around the cage, attaching the ends with the plastic loops or using ties.
- Wrap Christmas lights around the topiary, tucking leaves over the green cord for a cohesive look.
Enjoy your festive fall topiaries! You can easily swap out the fall decor to make Christmas tree topiaries later in the season:
8. Tomato cage ghost
If you're looking for a cool DIY Halloween decor idea, this tutorial by Doodle T and Me! chills your garden with an 8-foot ghost made from tomato cages, plastic bags, and netting!
This ghost is perfect for a front or backyard and is sure to impress your neighbors.
Tools and materials:
- 4 Tomato cages
- 6 White plastic garbage bags
- Paint roller with extension pole
- Duct tape
- 3 Paper plates
- 2 Battery-operated candles (with timer)
- 1 Ikea netting drapery panel

Follow these steps:
- Stake two tomato cages upright and secure them to the other two cages at the top, forming the ghost's body.
- Tape the cage rings together for stability and create a base for the lights.
- Secure paper plates to the base and place battery-operated candles on top for an eerie glow.
- Thread the paint roller extension pole through the cages to create the ghost's arms.
- Drape white plastic bags over the tomato cage frame for the ghostly body.
- Make a ghost face by drawing eyes and a mouth on a paper plate and attaching it to the top of the cage.
- Thread a cord through the netting panel and drape it over the ghost form for an ethereal look.
At night, with the candles flickering, your spooky garden ghost will come alive!
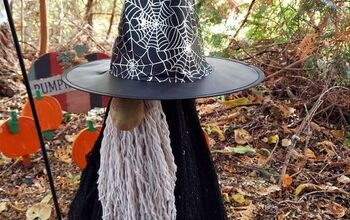
9. Halloween tomato cage gnome
This tutorial by Kelly-n-Tony shows you how to make a spooky Halloween gnome in under 30 minutes using mostly Dollar Tree items.
Check out more Halloween gnomes here.
Tools and materials:
- Tomato cage
- Black vinyl tablecloth
- "Creepy black cloth"
- Witch/wizard hat
- String mop
- Potato
- Wire coat hanger
- Zip ties (optional)
- Stakes or bricks (optional)
- Spiderweb decorations (optional)

Simply zip-tie the tomato cage prongs together, drape the cloths over it, and hang a potato nose with a wire hanger. Dismantle a string mop and attach the strings as a beard. Top it off with a hat and decorate as desired.
10. Christmas tomato cage gnome
This tutorial by Kelly-n-Tony transforms your garden into a winter wonderland with a charming Christmas gnome made from everyday items!
Check out more Christmas gnomes here.
Tools and materials:
- Tomato cage
- Branches
- Toddler mittens
- Leggings or sweater scraps
- Potato
- Wire coat hanger
- Zip ties
- String or ribbon
- Pruning shears
- Wire cutters (optional)
- Stakes or bricks (optional)

Steps:
- Flip the tomato cage upside down.
- Cut branches and secure them to the cage with zip ties, forming the gnome's body.
- Craft a hat from leggings or a sweater, using a wire hanger to create a droopy effect.
- Attach mittens and a potato nose using wire.
- Secure the gnome outdoors with stakes or bricks (optional).
11. Tomato cage angel
For another DIY Christmas decor idea, this tutorial by Selena75 guides you on creating a lighted angel for your yard using a tomato cage and dollar store finds.
Tools and materials:
- Tomato cage
- String lights (outdoor rated)
- Floral mesh
- Zip ties
- Hot glue gun and clothespins
Optional: feathers, garland, floral wire, ornament, shimmery pipe cleaner, flowers, boas, tent stakes

Steps:
- Wrap the tomato cage with string lights, secured with clothespins.
- Create a dress with floral mesh, using clothespins for positioning and gluing.
- Design wings with feathers, garland, or other materials. Attach them with glue and zip ties.
- Add a head using a large ornament or painted foam ball (weatherproof if outdoors).
- Make a halo with pipe cleaner or floral wire, attach it to the head with a floral wire tripod secured to the wings.
- Personalize your angel with flowers, boas, or other accessories.
- Secure the angel outdoors with tent stakes and enjoy your one-of-a-kind creation!
12. Tomato cage snowman
This tutorial by ParsnippidyMoment Plus details how to create a decorative snowman for your home using tomato cages, a glass globe, and deco ribbon.
Check out more snowman crafts here.
Here's the breakdown:
Tools and materials:
- Two tomato cages
- Glass light globe
- Deco ribbon
- White paint
- Wire
- Ornaments (for buttons)
- Plant urn (optional, for height)

Steps:
- Paint the glass globe white to resemble a snowman's head.
- Secure the head to the tomato cages using wire.
- Wrap the snowman's body with deco ribbon.
- Paint snowflakes on ornaments and attach them as buttons.
- (Optional) Place the snowman in a plant urn for added height.
Tomato cages as... tomato cages!
Of course, tomato cages have uses beyond crafts and decorations! This tutorial by Chris J provides a DIY watering system for tomato plants using tomato cages and PVC piping:
Watering System:
- 10ft of 3" PVC pipe
- 3 caps
- Drill with 1/8" bit
Steps:
- Cut PVC into 3ft sections and cap one end.
- Drill 3 angled holes near the capped end for slow water release.
- Place each tube in a tomato cage and fill it with water.

Benefits:
- Waters directly at the plant base.
- Avoids wetting leaves and reduces fungus risk.

More tomato cage crafts and decorations
With a little creativity and these inspiring ideas for tomato cages, they can become the stars of your garden, party space, or even your holiday decor!
From functional plant stands to whimsical ghosts and gnomes, tomato cage Christmas decorations, and more... there's a project here to spark your imagination.
So, next time you're cleaning up the garden shed, don't toss those tomato cages – unleash their hidden potential and create something truly unique!


Frequently asked questions
Have a question about this project?