


DIY Chalkboard Frame From Hello I Live Here
$0.00
30 Minutes
Easy
DIY Chalkboard
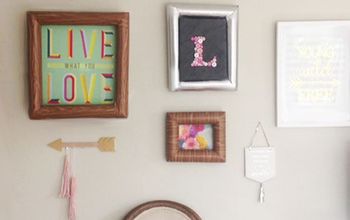
Hello everyone – our post today – DIY Chalkboard from OldFrames. That’s right we all know we haveloads upon loads of old frames large and small laying in our basements justbegging to be loved again. How can youuse it you ask? DIY Chalkboard from OldFrames is a great way to reuse those old forgotten pieces.
This frame was an old print that hung in our over-sized wineroom in our other home. Knowing we wouldnever use it here in the new Villa, we decided to store it for a day I neededan upcycle project on a bad weather day. Well, you all know we have had 6 long, long months of winter and somedays to harsh to work even in the shop with heat. Guess what – we had two 80 degree days in arow, and last night after completing the china hutch part III with the Old TownPaint (oops new post alert of a great new product J ) – the threat of snow…yep snow…yet again hit StLouis and we dropped to 29 degrees in hours!!!! This cold weather is totally cutting into my shop time and make me avery surly person – warning for Mother Nature J.
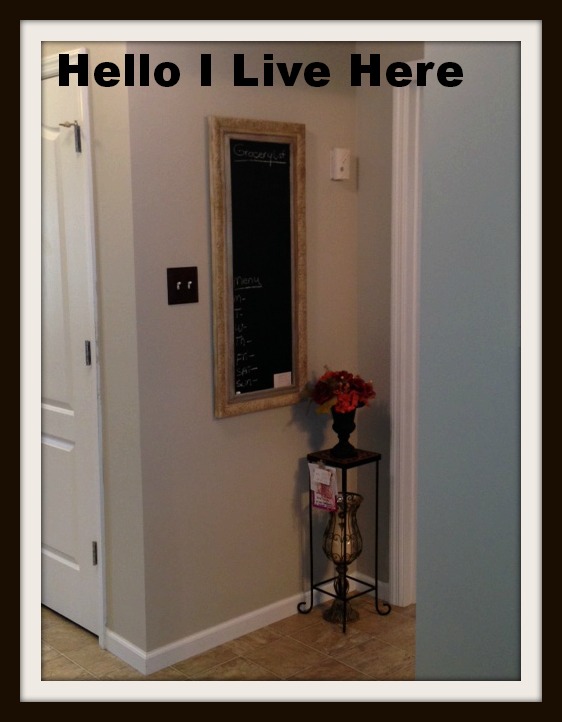
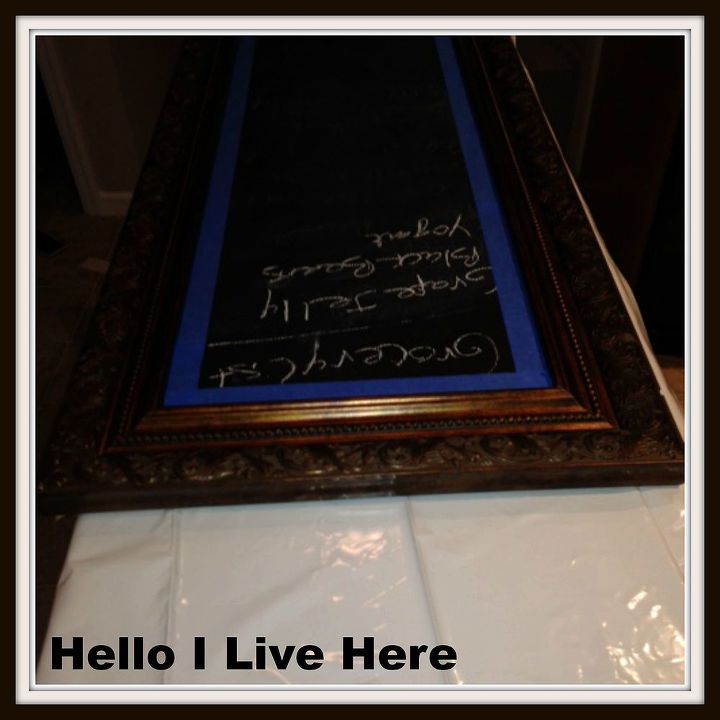
What’s a girl to do today? An inside project of course - Awhile back I had painted the inside ofthis frame with Chalkboard paint and stuck it on the wall. The DIY Chalkboard is it’s used daily and welove the board. The frame matched greatwith the old decor, but now that we have gone cottage and grey, the frame wouldnever do. Being locked up yet anotherday with cold weather I was trotting past the wall talking to my sister on thephone when I ripped this DIY Chalkboard from Old Frames down from the wall andup-cycled that old frame to match my new decor.
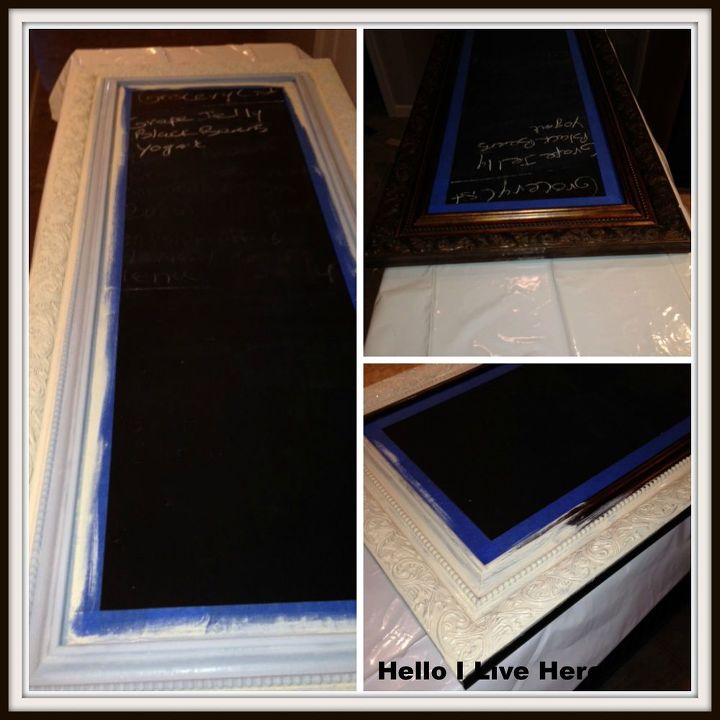
I whipped out some left over Annie Sloan Old Ochre paintleft in the bottom of the old can and whipped it on to this DIY Chalkboard fromOld Frames hanging on the wall. I thentook what I had mixed for a cute pair of side tables (Annie Sloan Paris Greyand Louis Blue) and added that to the inside of the frame giving that littlebit of pop I wanted for this piece.
Once done drying, I added clear wax, let set for a bit, thenfollowed that by dark wax, let dry and added clear over.
After both dried, I added another coat of clear wax, buffedand returned to the wall. How cute is itnow? And it now drives me less nutslocked in here from the cold when I walk past and see how it matches my newdecor – you can’t beat that for a quick DIY Chalkboard project.
Starting tomorrow we are to have nice weather here in StLouis. Our next few weeks of our blogare going to be dedicated to new products we are trying. I think you will love them all - I hope youlove the new products we are about to show you – they are all wonderful andgive a girl options when she’s tired of using the same old same old. I will introduce each product to you, giveyou background on it, how to order it, and my experience with the product. I will be keeping them all a secret until Istart using their product as I want each product to have its own platform as Iintroduce them.
First up will start tomorrow as we complete Part III finalof our China Hutch Redo – That’s right – it’s finally done. Until tomorrow’s post, have a wonderfulevening and stay WARM. J
Linda
Hello everyone – our post today – DIY Chalkboard from OldFrames. That’s right we all know we haveloads upon loads of old frames large and small laying in our basements justbegging to be loved again. How can youuse it you ask? DIY Chalkboard from OldFrames is a great way to reuse those old forgotten pieces.
This frame was an old print that hung in our over-sized wineroom in our other home. Knowing we wouldnever use it here in the new Villa, we decided to store it for a day I neededan upcycle project on a bad weather day. Well, you all know we have had 6 long, long months of winter and somedays to harsh to work even in the shop with heat. Guess what – we had two 80 degree days in arow, and last night after completing the china hutch part III with the Old TownPaint (oops new post alert of a great new product J ) – the threat of snow…yep snow…yet again hit StLouis and we dropped to 29 degrees in hours!!!! This cold weather is totally cutting into my shop time and make me avery surly person – warning for Mother Nature J.
What’s a girl to do today? An inside project of course - Awhile back I had painted the inside ofthis frame with Chalkboard paint and stuck it on the wall. The DIY Chalkboard is it’s used daily and welove the board. The frame matched greatwith the old decor, but now that we have gone cottage and grey, the frame wouldnever do. Being locked up yet anotherday with cold weather I was trotting past the wall talking to my sister on thephone when I ripped this DIY Chalkboard from Old Frames down from the wall andup-cycled that old frame to match my new decor.
I whipped out some left over Annie Sloan Old Ochre paintleft in the bottom of the old can and whipped it on to this DIY Chalkboard fromOld Frames hanging on the wall. I thentook what I had mixed for a cute pair of side tables (Annie Sloan Paris Greyand Louis Blue) and added that to the inside of the frame giving that littlebit of pop I wanted for this piece.
Once done drying, I added clear wax, let set for a bit, thenfollowed that by dark wax, let dry and added clear over.
After both dried, I added another coat of clear wax, buffedand returned to the wall. How cute is itnow? And it now drives me less nutslocked in here from the cold when I walk past and see how it matches my newdecor – you can’t beat that for a quick DIY Chalkboard project.
Starting tomorrow we are to have nice weather here in StLouis. Our next few weeks of our blogare going to be dedicated to new products we are trying. I think you will love them all - I hope youlove the new products we are about to show you – they are all wonderful andgive a girl options when she’s tired of using the same old same old. I will introduce each product to you, giveyou background on it, how to order it, and my experience with the product. I will be keeping them all a secret until Istart using their product as I want each product to have its own platform as Iintroduce them.
First up will start tomorrow as we complete Part III finalof our China Hutch Redo – That’s right – it’s finally done. Until tomorrow’s post, have a wonderfulevening and stay WARM. J
Linda
Re-cycled frame painted to DIY Chalkboard from Hello I Live Here - find us on Facebook and like our page :-)
Old framed photo painted with Chalkboard paint - getting ready to Chalk paint frame.
Frame being chalk painted.

Want more details about this and other DIY projects? Check out my blog post!


Frequently asked questions
Have a question about this project?