


5 Tips to Create the Perfect Gallery Wall

by
Heather
4 Materials
$25
1 Day
Easy
I have a large wall in our open concept main living space. It needed some personality...bad! I chose to go with the timeless, versatile gallery wall. Here are the 5 tips you'll need and how I created the perfect gallery on a budget!
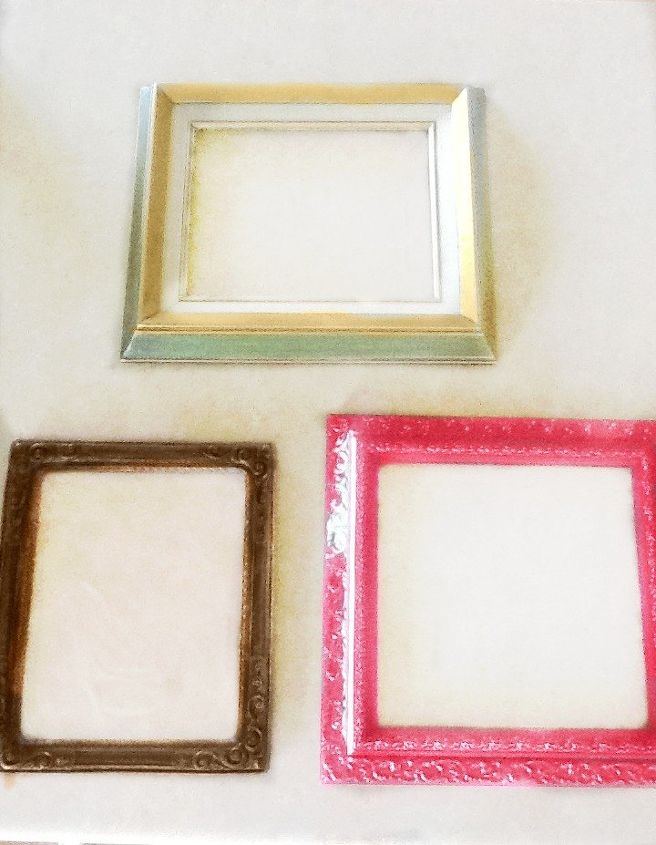
A few old frames I had laying around.
Tip One-Use What You Already Have
One of the things I love to do is use items I already have laying around. Since my decorating style seems to change as frequently as the seasons, I like to save as much money on decorating as I can! What better way to save some cash than to use whats already there?! I happened to have a bunch of different picture frames, artwork and random wall accents that were collecting dust just waiting to become the perfect pieces for my gallery wall! (designer tip: consider adding some interest to your wall...empty frames, mirrors, single letters, words, tapestries etc.)
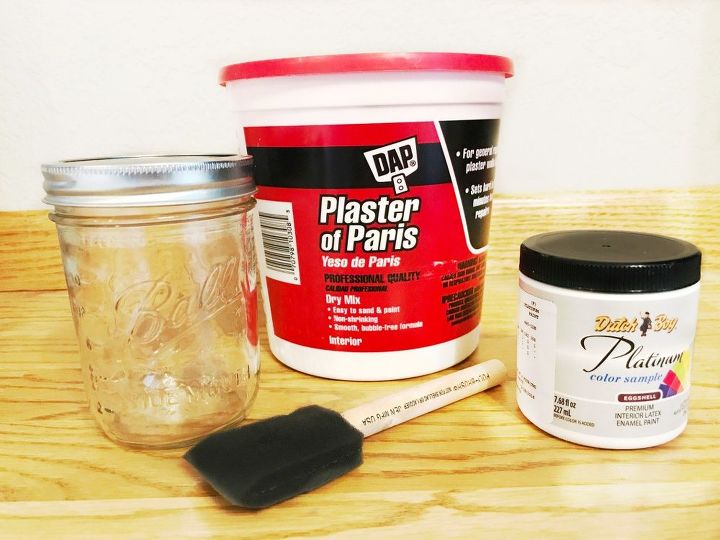
Materials for homemade 'chalk paint.'
Tip Two-If Matching is the Look You Want, Grab Some Paint
Different color wood and/or materials are not necessarily a bad thing, especially if the look you're going for is "miss-matched." (Is that even a legit term?) However, for this particular project I wanted a more monochromatic wall, which is an easy fix with a little bit of time and left over paint!
Farmhouse style was the muse for my look. (SO popular right now...thank you, Joanna Gains...swoon!) And the easy way to achieve that? Chalk paint! Its easy to use, it dries quickly and clean up is a snap with soap and water! Chalk paint has gotten easier to find than it used to be, they now carry it at the local hardware store, but why buy more paint when you can make your own chalk paint from left over paint you have at home?! (Refer to Tip One-Use What You Already Have! Insert smiley face!)
For my homemade concoction, I use equal parts Plaster of Paris, paint (any color you fancy) and water. Use a glass jar for mixing. (designer tip: if you use a jar with a lid, like the one pictured below, unused chalk paint will keep for months if kept in a cool, dry spot) Dissolve the Plaster of Paris in warm water, add the paint, and stir. That's it! Whether you chose to buy chalk paint off of your local hardware shelf or mix up your own, it's time to round up some frames and get to work!
(designer tip: the lacquered paint look is IN right now, for entire walls even! If you're not brave enough to paint your living room walls in cobalt blue lacquer paint then try the lacquered look on your gallery wall frames! Now I'm contemplating changing my wall...UGH!)
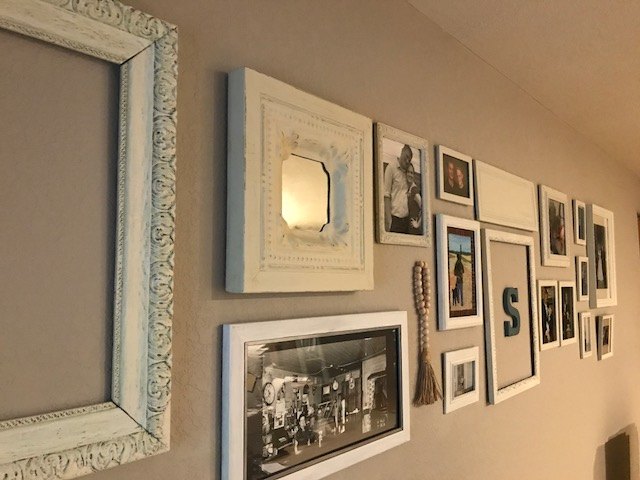
My wall layout
Tip Three-Choose the Layout You Want
Now that you've got your items you'll be using in your gallery and you've got them all painted up (if you've chosen to do so) it's time to start planning your wall. Decide the look you want. Download my free 'Gallery Wall Layout Ideas' for some inspiration or come up with your own, you really can't go wrong with a gallery wall. The following are a couple of different ideas and the possibilities are endless when it comes to styling your wall! Go with the look you love, there isn't a wrong way to design your gallery.
Tip Four-Lay Out the Items on the Floor Before Putting Nails in the Wall
Got your look?! Now lay out the frames/pictures/items you're going to use on the floor. Are you spacing your frames equally like the first photo above? Then chose where you want the center to be and work your way out. Make sure to measure and use a level if this is the look you are hoping to achieve.
If you're doing a mixture of frames, artwork, items and textures I recommend choosing your anchor pieces first. (I consider the anchor pieces to be the items that will sit on either end of your gallery.) Once you have the anchor pieces picked, choose a "center" piece (this step isn't necessary if you are working with a small wall.) This step cuts your gallery wall in half, which makes balancing the wall a little easier. After the center is set, it's time to fill in both sides until a nice balance is achieved. It's up to you if you want the "top" of your gallery even or if you want it staggered. (I recommend using a level if the "even look" is your style.)
Now that you have your items laid out how you want, it's time to put that hammer to work and get to hanging! You may want to make paper cut outs sized to the items you'll be hanging. Then place the paper patterns on the wall with tape in the design you've laid out on the floor. This will give you a better idea how the gallery wall will look once its all put together before putting a bunch of nail holes in your wall! (It also makes for another step...I like to take chances though and dive right in!)
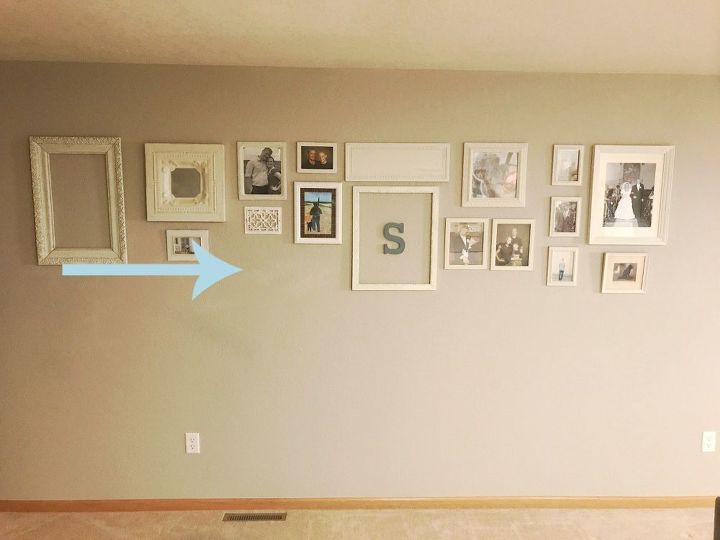
Tip Five-Give Yourself a Few Days to Sit Back and Enjoy Your Masterpiece~You May Need to Perform a Tweak or Two
Above is what my wall looked like...for months...but something wasn't right with it. Something felt "off."
After looking at and living with it for awhile, I finally figured out what it was! It wasn't quite balanced. See the photo and arrow above. (I'll go ahead and pat myself on the back for figuring that one out 'somewhat' quickly!) Easy fix, I just needed to find another piece to make it just right! That is one of the beautiful things about a gallery wall, you can constantly change and evolve it as your decor tastes change! (Or am I the only one who changes decor styles frequently?)
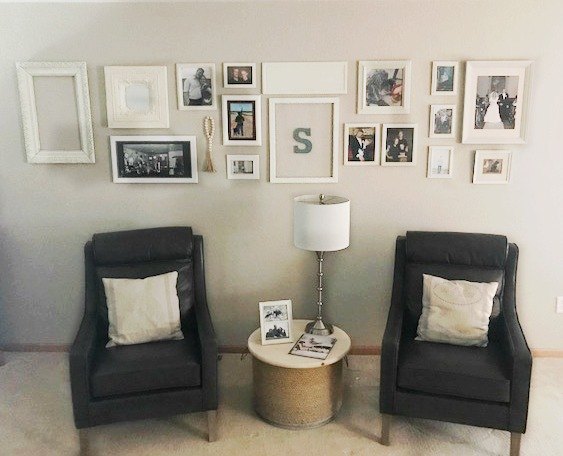
Here it is! The wall is nice and balanced now which means it's time for me to move on to my next decorating project! Above is the finished product! I'm really happy with how my gallery wall turned out! I hope you enjoyed this post and felt inspired! Please feel free to share photos of your gallery wall(s) and/or comment(s)! I love hearing from you!
I estimated the cost of this project at $25.00, it's really hard to put a price on this because I did reuse/have most of the items. If you need cheap frames that work well for chalk paint I recommend the Dollar Store or Ikea.
I also estimated the time it took me 1 day to complete. It took a bit longer than that to decide if I liked the first layout of my gallery, as you read I didn't, so I ended up changing it. If you know what you want and have all of your items ready to go this project shouldn't even take a day to finish.
You can access the entire blog post using the link below to my website,
Days and a Wake Up!
Want more details about this and other DIY projects? Check out my blog post!


Frequently asked questions
Have a question about this project?