


Dollar Tree Frame Craft - Valentine's Decor
Trans form a Dollar Tree frame into rustic decor for Valentine's Day.

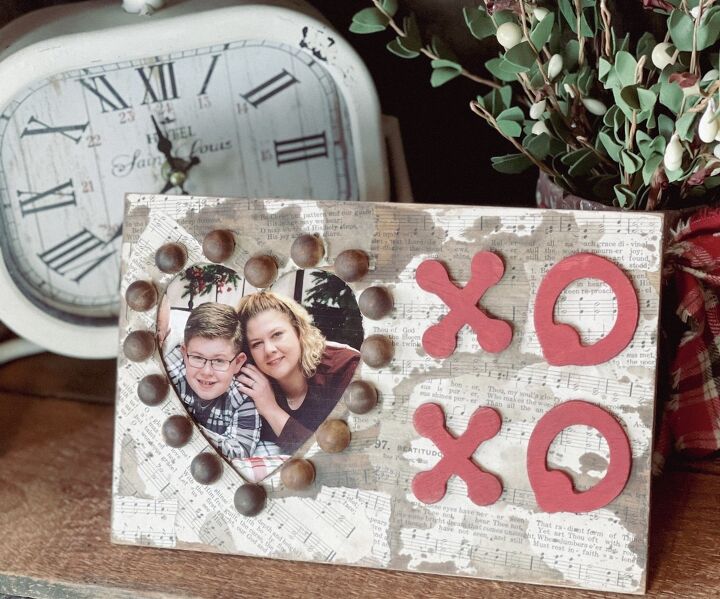
Have you ever wondered, “What can I do with a dollar store frame? Today, I am thrilled to share with you how to transform a Dollar Tree frame into rustic Valentine’s Day décor. This cute wood heart picture frame from the Dollar Tree transformed into a beautiful, rustic Valentine’s décor. However, this adorable heart picture frame DIY could certainly be left out throughout the year. I love transforming Dollar Tree finds into beautiful DIY projects. This cute Valentine’s Day DIY picture frame was such a creative, budget-friendly DIY. How cute would this rustic heart picture frame DIY be as a Valentine’s Day gift for your loved ones?!
Materials needed:
- Dollar Tree heart frame
- old hymnals or any type of paper with writing on it
- stain – Minwax, Dark Walnut
- Mod podge
- red paint
- old rag & gloves for staining
- small half beads – Snag them HERE
- XOXO letters
- picture
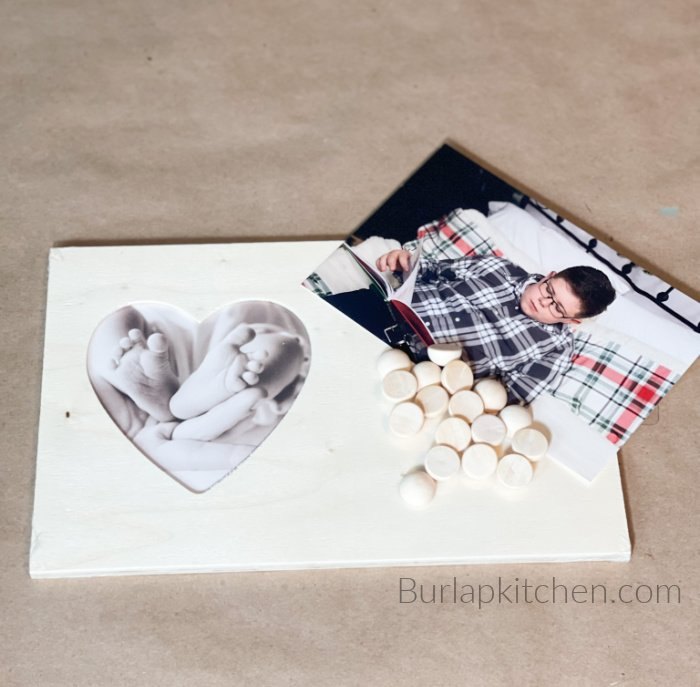
Step 1. Purchase a wood heart picture frame from the Dollar Tree.
Step 2. Find a picture of your liking. Use the heart insert that came with the picture frame as a pattern/guide to cut out your picture so that it is the same heart shape as the insert and so that is will fit inside of the wood heart of the picture frame.

Step 3. Using Minwax stain in the color “dark walnut,” stain the entire wood heart picture frame. Then, use an old cloth to wipe off the stain. Allow the stain to dry completely, it may be best to allow the stain to dry overnight.
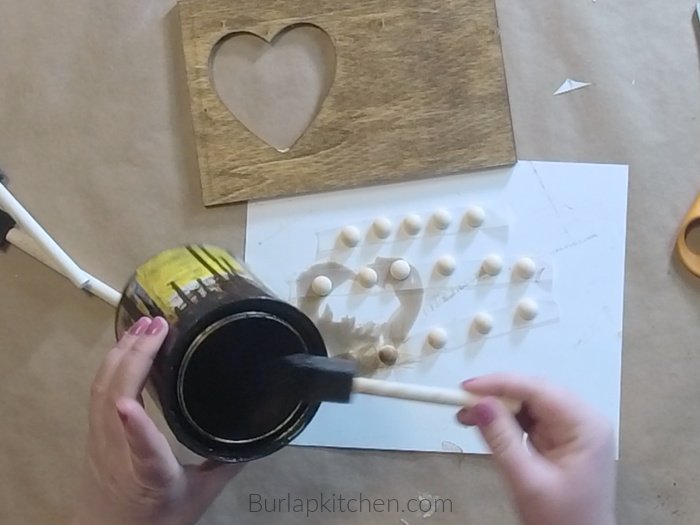
Step 4. Once the stained picture frame is dry, take some half wood beads, you will need enough half wood beads to go around the perimeter of the wood heart cutout on your picture frame, and stain them using the same stain as your picture frame. To make this process easier, it may be best to lay your half wood beads down onto a piece of tape first and then apply the stain to them. Use an old cloth to wipe the stain off of the half wood beads. Allow to dry completely.
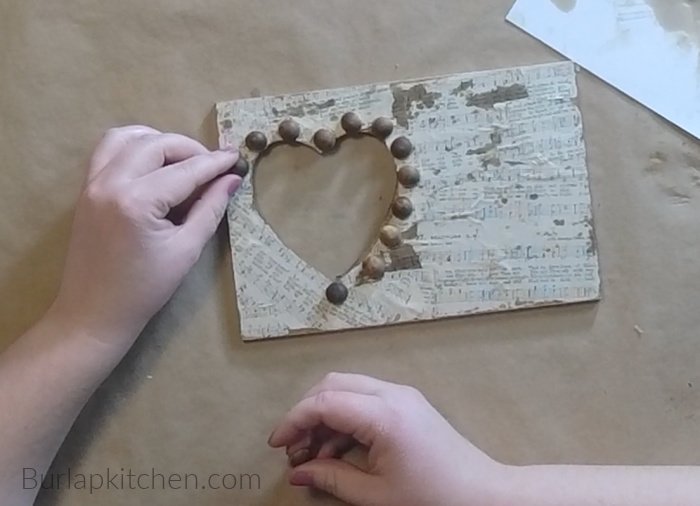
Step 5. Using some music sheets sent to me by one of my sweet followers, take the music sheets and just tear them into different sized pieces so they fit onto the front of your picture frame. Then, Mod Podge the pieces of sheet music onto the front of your picture frame, working around the wood heart cutout. Next, place some more Mod Podge over top of the music sheet pieces to secure them into place even more. Allow to dry.

Step 6. Take a sanding block and sand over the music sheets adhered to the picture frame to create a more rustic look. Apply more Mod Podge in spots, if needed. Allow to dry.
Step 7. Starting at the top and bottom outer corners of the heart shape of the picture frame, place one stained half bead at the top corner, and then one stained half bead at the bottom corner of the heart. Then, fill in the rest of the perimeter of the heart shape with the other stained half beads. Starting at the corners of the heart will help you to get even spacing between each half wood bead going around the perimeter of the heart shape on the picture frame. Once your beads are spaced evenly, and to your liking, secure them into place using hot glue. This will form a stained half wood bead border going around the heart shape on your picture frame. Allow to dry.
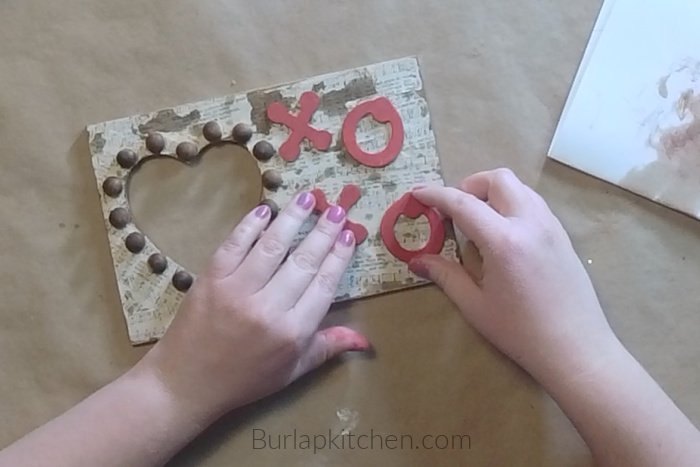
Step 8. Next, using two X and two O wood cutout letters, paint the letters red. Dry the letters. Go over the letters with a sanding block. Then, use a foam brush and gently apply some Minwax stain in the color “dark walnut” over top of the letters. Use an old cloth to wipe some of the stain off of the letters. Allow to dry.
Step 9. Use hot glue and hot glue the XOXO letters onto the picture frame. You can hot glue them onto the frame any way you prefer. You could also use any wood letters you prefer for this, such as “LOVE.”
Step 10. Place the picture you cut out earlier into a heart shape inside of the heart of the picture frame. Place the original heart shaped insert that came with the picture frame as a backing for your picture for extra stability. Enjoy!
Looking for more Dollar Tree frame craft ideas? Give these a try!
how to make a wood mason jar farmhouse frame
Fabric Carrot Frame
If you decide to make this DIY I’d love to hear from ya! You can drop a comment below or message me on any of my social media pages. Hope you have a blessed weekend and as always remember to keep it simple. Catch ya next week my friends! Facebook, Twitter, Pinterest, Instagram, youtube
.


Frequently asked questions
Have a question about this project?