


Christmas Gift Tag Tree Ornaments

These easy to make cuties are a 2-in-1 treat! They double up as both a name tag for a gift and a keep-sake tree ornament once detatched.
This idea sort of came from my 'mild dislike' of the disposable elements of Christmas...
I wanted these name tags to avoid that 'straight-to-the-bin' whiff and live on for many Christmases to come and without being one of those things that you could also do without. Everyone needs tags and everyone needs tree ornaments so here we are 🤷🏼♀️😂
As usual, I've created a YouTube video to go along with this project so make sure you check that out if you prefer. Link and further details to follow.
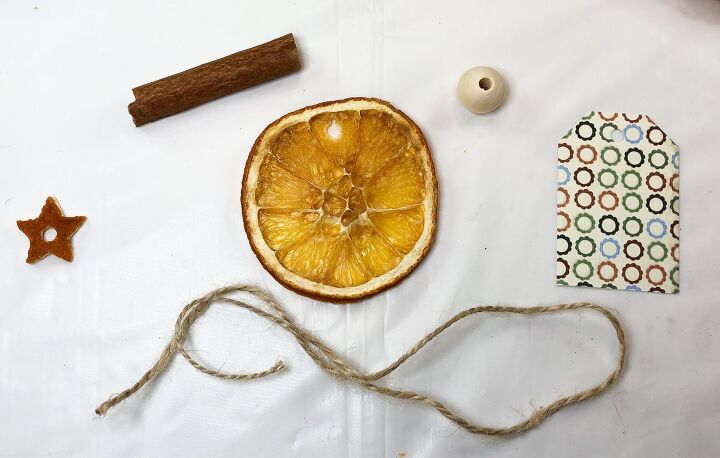
WHAT YOU'LL NEED
- Oranges
- Cookie cutters
- Cinnamon sticks
- Twine
- Beads
- Patterned paper/card
I've linked all the actual products I've used in this project down in the description of my YouTube video. I'm aware that sometimes Hometalk don't link the exact items so if you're looking for them, that's where they'll definitely be.
STEP ONE - YOUTUBE TUTORIAL
As I mentioned above, I have this exact project in video form up on my YouTube channel now. Click the video link above to watch.
If you enjoy this video then please remember to give it a 'thumbs up' and also consider subscribing to my channel. I post loads of crafty content, some of which doesn't always feature on Hometalk, so there's lots of extra crafty projects to be enjoyed over there 👍🏻
STEP TWO - PREPARING THE ORANGES
To continue with the written tutorial, keep reading ☺️
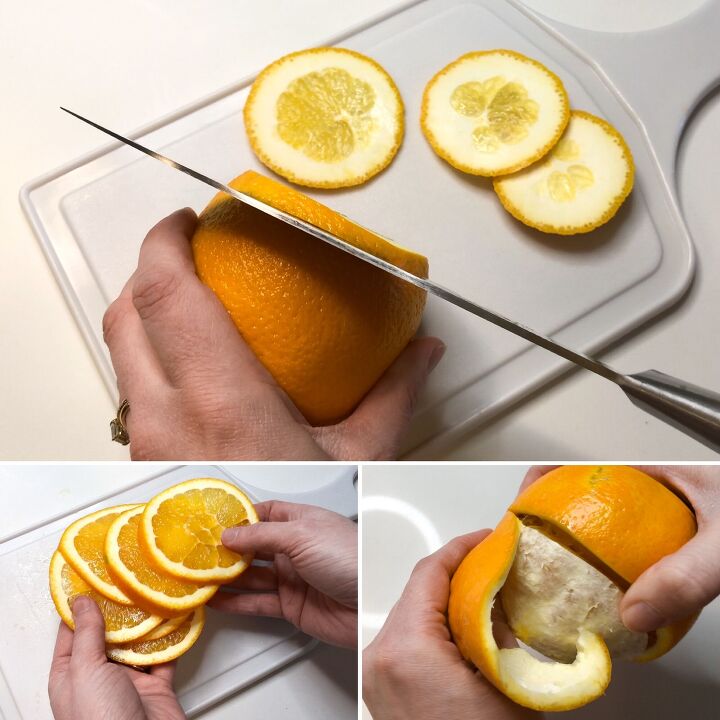
First, thinly slice some large oranges. You can make as many or as few as you like. I sliced up 2 oranges.
Then peel an orange. I did a spiral cut down my orange with a knife first and then peeled the skin off to make things a bit easier for myself. I only peeled 1 orange.
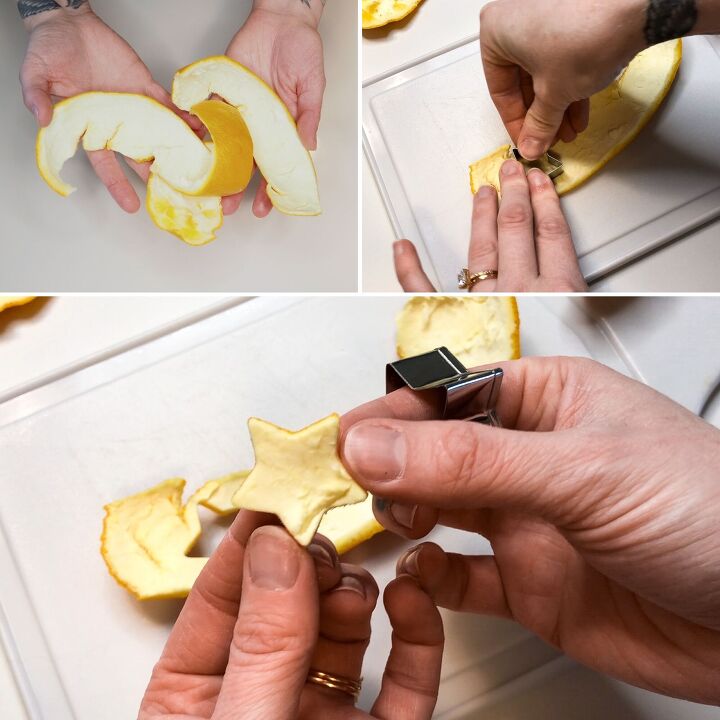
Using the orange peel, cut out little shapes using cookie cutters. You can also use scissors if you don't have cookie cutters and don't want to buy any. Again, I've added all the product links for this project in the description of my YouTube video (linked above).
I make little stars from my peel, as many as one orange would give me which I found was plenty.

STEP THREE - FINISHING THE ORANGES
Once your slices and peel shapes are made, lay them out on a baking tray lined with parchment paper and bake at 200F.
The timing instructions I found on the internet said bake the peel for 1.5 hours and the slices for 2 hours. Maybe it's due to me living at high altitude but this wasn't nearly long enough for me.
I think in the end, I baked my peel pieces for about 2.5 to 3 hours and my slices for about 3.5 to 4 hours. I kinda lost track of time as I expected them to be done within 2 hours and I didn't look at the time when I started 🤦🏼♀️. So just judge this for yourself at the time and be mindful that our timings may vary.
Check on them every 15 mins and turned them over periodically too.
Once golden-brown and crisp, remove them from the oven and let them cool before drilling holes through them all. I know drilling sounds a little OTT but it gives lovely neat circles.
STEP FOUR - MAKING THE NAME TAG
Maybe you already have some name tag shaped card pieces from a craft shop or you may have a tag hole-punch, both of which will save you lots of time and will work perfectly for this step.
However, if you don't have either of these, then just make your own like I did, it's very easy!
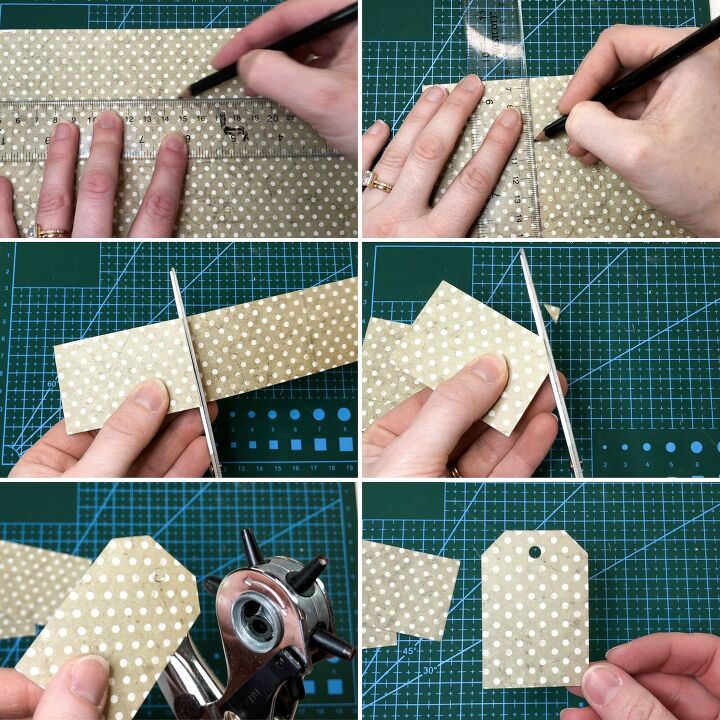
Using a ruler or a little craft mat (like in my pic), measure out the size of the tags you want onto your card/paper. I measured a 4cm thick strip across my paper and then divided this into 6cm blocks to get my rectangular starting shapes.
Measure 1cm in/across from a corner and then 1cm down from the same corner and draw a line between the 2 points. Repeat this step on the opposite (short) side. Snip along both lines to create your tag shoulders.
Lastly, punch a small hole between the shoulders approx 1cm in from the top edge.
STEP FIVE - ASSEMBLY
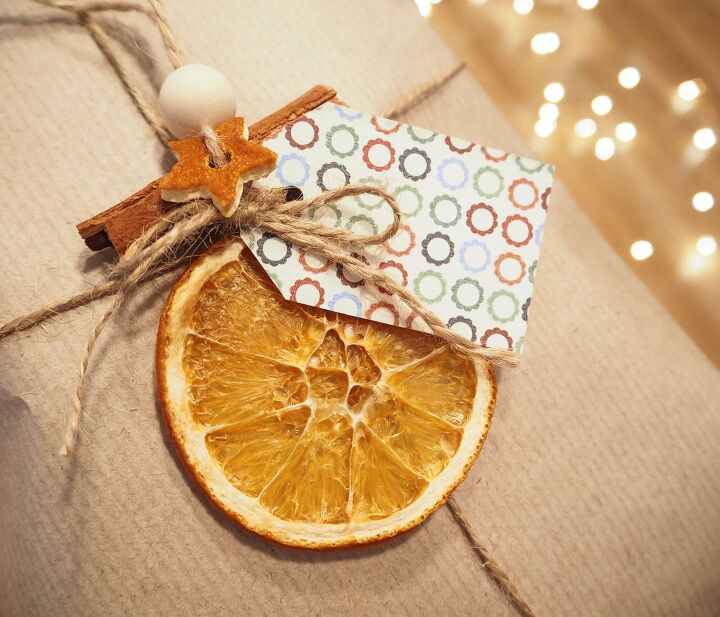
For 1 tag/ornament, I use 1 orange slice, 1 peel shape, a cinnamon stick (snapped in half because mine were a bit too long to start with), a wooden bead, a DIY name tag and a piece of twine.
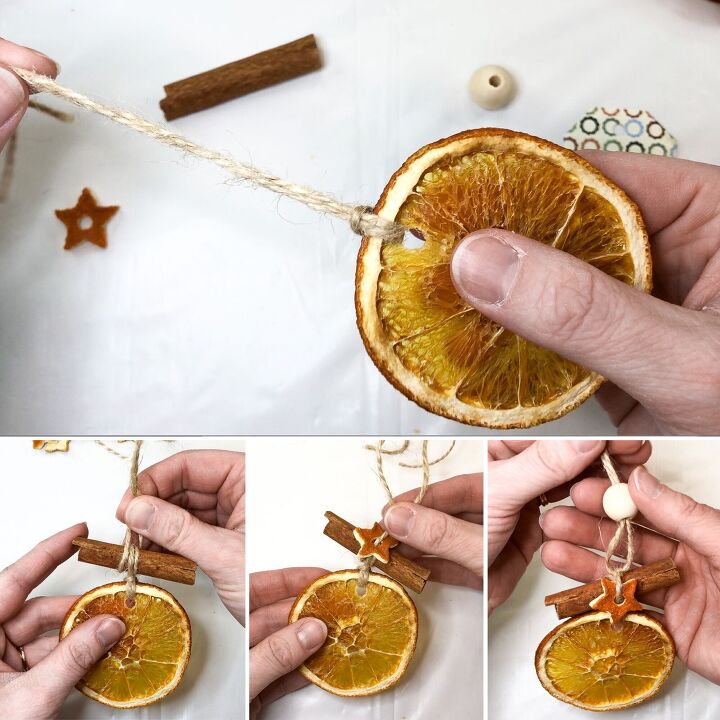
Make sure your twin piece is pretty long to start with because it'll lose some of it's length when wrapped around the cinnamon stick.
First, fold the twin in half and push the looped end through the hole in the orange slice. Pull the 2 end pieces of twine through the loop and tighten.
Place the cinnamon stick between the 2 pieces of twine and push this right up to the 'knot'. Wrap one end of the twine around the stick once. Do the same with the other end of twine but in the opposite direction. Pinch the 2 ends together at the top of the cinnamon stick. This will keep the stick facing forwards and parallel with the orange slice.
Now, slip the peel shape onto one of the twine ends and slide this all the way along until it sits nicely against the cinnamon stick and then tie a double knot to secure the 2 in place.
Lastly, slip a wooden bead on and then tie a knot at the end of the twine pieces to create a loop for hanging on the tree.

The paper name tag will be added during the next step so don't worry, I haven't forgotten it ☺️
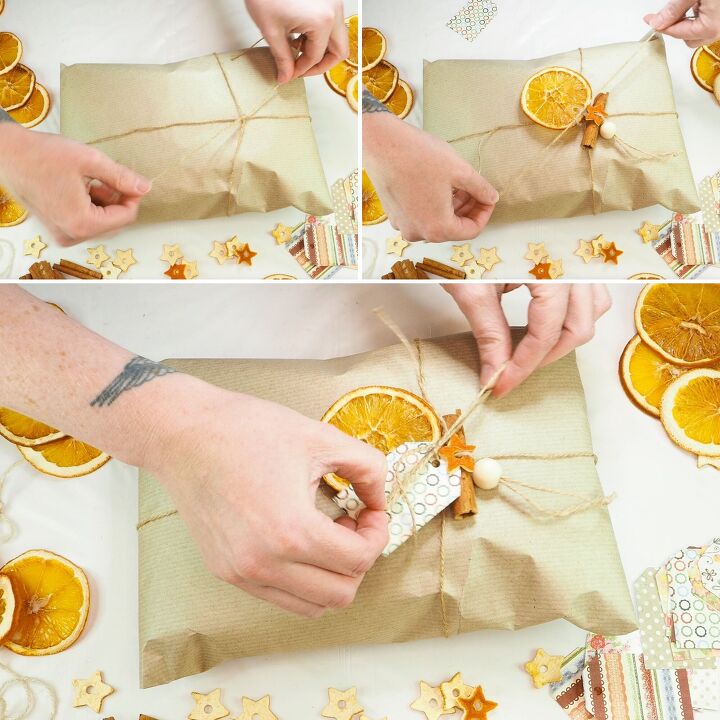
STEP SIX - GIFTING
To add the tree ornament and name tag to a gift, first wrap twine or ribbon around a present in the traditional cross-like fashion.
With the excess twine, attach the tree ornament with a single knot so it's not hard to undo. Then slide the name tag down one end of the twine and finally secure with a bow.
Now when someone opens your gift, they can remove the tag separately and then lift the tree ornament away as a separate gift 🎄
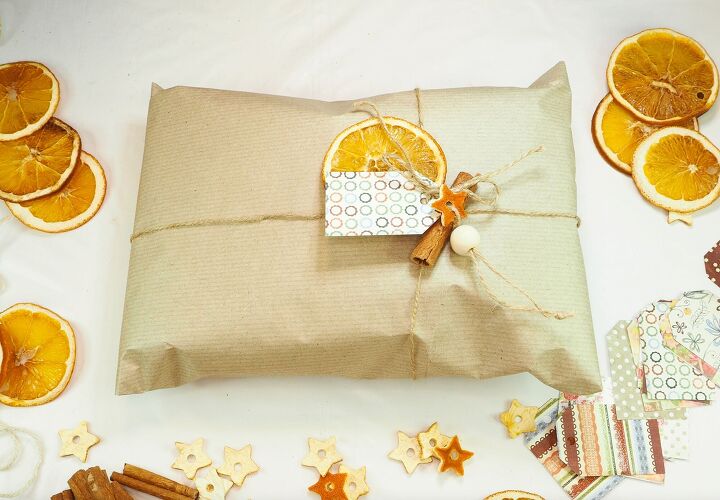
Done!
Making these gift tags made my art space smell soooooooo good 🤤🍊 It's honestly worth making just for that!
What do you think? Do you reckon you'd give this craft a go?
Let me know what you think down below in the comments, I'd love to hear from you!
Please remember to check out my YouTube channel, it would be awesome if you could show me some love over on there and if you want to follow me on instagram too then it's @hscraftytutorials 👍🏻
I also have an Etsy Store where I sell or sorts of handmade goodies. click this link to go check that out AND just because I like you, use my special coupon code HOMETALK10 for 10% off anything in my store 🤭
Thanks so much for stopping by and until next time,
Happy crafting! x
💙
Resources for this project:
See all materials


Comments
Join the conversation
-
I love this! So creative. And I bet it smells divine.
-
If I use this as a tree ornament, do you think it will keep the cats out of my tree?


Frequently asked questions
Have a question about this project?
Can these ornaments be stored and used from year to year?
Next years gift tags! This year, I used tulle and all the old earring singles I have been saving for years as a center. But I like this much better as it can be used twice as the tag and an ornament. Do you think it will store for another Christmas or will it be a one and done ornament?