


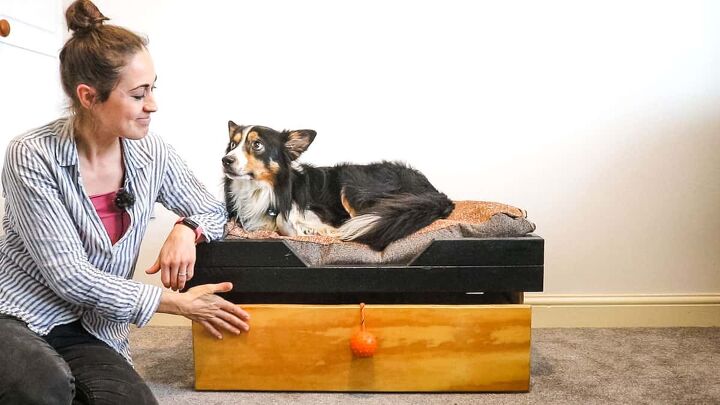
DIY Wooden Dog Bed With Storage Drawer
Here's how I created a DIY wooden dog bed with storage drawer from recycled wood and salvaged euro slide runners. It cost me almost NOTHING! I'll talk about what tools you can make it with, including a how-to video you can follow along with here.
As long as you have offcuts and your own cushion, you won't need a dog bed pattern or free plans. Just follow these steps and you'll have something unique!
Do your dog toys end up everywhere in the house?
All of the above was us. Plus, having a basket of toys sat NEXT to a bed wasn't good value for space.
So I designed this solution, which has worked well for us. It's a DIY large dog bed with an easy drawer underneath. Try not to be intimidated by it. If I can do it, so can you! *Especially since I've broken it all down for you and how to work out your measurements!

Please note that in this DIY elevated dog bed for large breeds tutorial, I am Amazon Associate, I earn from qualifying purchases made through links.
- Dog cushion of your choice - Or why not YouTube cute dog bed sewing pattern?
- Dowel jig + accessories*
- Combi drill
- Impact driver
- Trend pocket hole jig
- Pocket hole screws*
- Wooden mallet
- Tape measure
- Wood glue
- Speed square
- Hand saw
- Clamps
- Sash clamps
- Mitre saw
- Mitre saw stand
- Knee pads
- Circular saw
- Spirit level
- Sawhorses
- Palm router
- Router bits
- Combination square
- Orbital sander
- Matt black paint
- Dust mask
- Bradawl
- Euro slide drawer runners (450mm)* mine were recycled from IKEA furniture
- Hammer
- Teak oil
- Safety rigger boots
- Ball on a rope

*These are optional. If you want to make it SUPER easy, just predrill, screw and paint. I just wanted to challenge myself with dowel joinery for fun because scrap wood projects are great for learning on! You may also be fine with a basic shelf and no drawer for a basket of toys.
- 2 x lengths 63mm x 38mm CLS structural timber
- Offcuts of 12mm plywood (and 12mm or thicker of any type will work!)
- And more scraps for bed slats and drawer slats

The first easy step is to create a box shape around your dog cushion. I coincidentally already had a box shape at the right depth as this was from my old treadmill desk. But the length was too long.
I unscrewed the end, moved it closer to the cushion, then screwed it back with pocket hole screws. Again, they already had the holes drilled, then hand sewed the excess off.
If you don't have a pocket hole jig, then no problem! Simply cut down two lengths to the longest end of your cushion. Then two shorter pieces for the sides and predrill and screw the corners together.
If you don't want the screw heads to be seen, then countersink them first, so you can fill and paint over them later. You'll find pocket holes leave lots of scars anyway.

Once you have your first box frame, you'll need to make it square so it won't look uneven later.
To do this, measure from each corner diagonally. The biggest measurement is the one that needs tapping with a hammer to get even. After tapping, repeat your measurements. To keep it square, you can screw or nail some corner plywood pieces temporarily.
Once you have one square, you'll need to make another one identical. I did this by clamping my next frame on top of the first while I screwed them together.

To make it easier for my dog to step on his bed, I created an opening on the front. Using a speed square, I measured and marked 10" from either side on one of the box frames.
Then lined up my square with the 10" mark and drew a mitred mark, which I cut.
I cut one with my mitre saw, but it was awkward to flip over and repeat. So I instead hand sawed. You could absolutely handsaw both if you wish before sanding any sharp edges smooth.

To screw my two box frames, I made pocket holes around my top frame. ACTUALLY, it's just dawned on me, they would have been less visible if I did these on the bottom piece as the cushion would hide them!
Or, you could predrill and screw them together from underneath so they're not visible. It didn't matter that much to me as it's a scrap wood dog bed. It had old pocket holes all over it anyway!
Then glue and clamp the top two frames together.

I then used my circular saw to cut two side pieces that would prop up the upper dog bed frame.
A hand saw or jigsaw is fine for this as the top edge will be hidden and the bottom edge may be hidden by carpet. If you have a wooden floor, try to make sure the bottom cut is the best you can!
Height (shortest end): If it helps, I cut these to 10.5" tall. By the time I screwed these to the bed frame, it later became 14.5" tall.
Width (longest end): I cut mine to the internal depth of my box, so yours will probably be different.

You'll need to leave yourself a lip that tucks inside the bed frame to allow you to screw it. I made mine 30mm, but 1" or 1 & ¼ will be fine.
Then predrill holes within these top sections - the more the better in case your dog is very large!
Then slot inside the frame and line up the pencil marks with the bottom of the frame so you can screw it inside. Although, if using dowel joinery, you'll need to unscrew these later. But this is how it should look:

Firstly, ignore the basket. I was going to work around it initially, but ended up disregarding it. But I've kept it here to give you an idea what you could do.
Now that I had to side sections to create my raised dog bed DIY, I then took another internal measurement for my shelf.
Tip:
To measure, take the longest edge at the top, between the area your screw holes are. Don't take it at the bottom as it's likely to be bowing.
Again, I clamped an old scrap piece of wood to sawhorses and cut with my circular saw.

OK, so this is where you need to decide:
- Do you want to create a basic shelf for a basket(s) or storage boxes?
- Or create a drawer?
Either way, you can measure and mark where you want your bottom shelf to go. You could:
- Predrill, glue and screw it
- Use invisble pocket holes from underneath
- Biscuit joinery (if mounting along the bottom)
- Or dowel joinery (as I'm about to)

Using a combination square, I drew a straight line from the bottom of each side piece.
This will be where my dowel holes will go. You may prefer your shelf at the very bottom instead, or further up.

If you want to challenge yourself as I did, dowel joinery is a lot of fun. It's also cheap and the dowels cost pennies.
Here, you can find a really easy to understand dowel jig basics video from Peter Millard at the 10 Minute Workshop.
But here are some quick tips and I used the same cheap jig he recommended as it came with lots of extras:
- I lined up the jig's depth to half the thickness of my ply (6mm deep in my case)
- Make sure you drill the holes slightly deeper so you don't have problems nipping the wood together
- Avoid a tipped edge drill bit as it can poke through the good side
- Set your drill bit up with the collar (comes with the jig)
- Use a clamp to keep the jig steady
- Practice on offcuts!
- It might look intimidating, but it's easy to use
- Seriously, watch the video if you want a helping hand!
Add the 6mm dowels in the holes for now without glue.

You'll now need to unscrew the two side pieces.
- Then rest the shelf on top of the side piece
- Slot the jig's 6mm dowel slot over the dowel
- Line up the jig's correct dowel hole size with your pencil line
- And the sides of the wood and clamp
- Now you can drill your dowel holes
- MAKE SURE you've adjusted the drill's depth to prevent it from poking through the face of the wood
- Remove the dowels to do your proper fit

Now, you can glue the shelf's edge and all dowel holes. Next, insert the dowel holes back, then using sash clamps, tighten it all together.
Ignore the shelf's holes in the centre! These won't be seen when the drawer in slotted in. I'm just reusing old wood and this was the only suitable piece!
To prevent any bowing during glue up, I placed some planks of wood on my sawhorses, then the shelf upsight down on it to try and keep it straight. I also used quick clamps to these two to straighten it as best as I could.
Then moved on to black paint touch ups on the DIY elevated dog bed rame while I waited for this to set.

Once the glue had set enough, I ripped down a strip for each back and front, and glued underneath the shelf for a support.
I clamped it up and left it overnight. I'll also use a nail finished to make it extra strong. This step isn't really vital. It just finishes it off.
And once dried, I removed the clamps and screwed the bottom section back to the top of the bed.

To get your drawer measurements, here's how I did it.
- Take your internal width's measurement from around the bottom
Then deduct:
- 2 x side rails (25mm in my case)
- 2 x sides of your drawer's thickness
- This equals the width of my front and back of my drawer
Also note, the side lengths of your drawer should be the length of your runner. I used 450mm drawer slides, so my side lengths were the same.
Additionally, as I'm using offcuts, I didn't give two hoots whether the heights of them all matched to perfection as this isn't for a customer. And, I could only use what I had.

One thing you'll need to check is whether the euro slide part that fixes to the drawer has a lip or an L-shape.
The lipped part will require a rebate groove with a router around the inside of your drawer to slot a base in. OR, you can screw a base INSIDE your drawer further up.
The l shape version is easier as you can simply screw a base underneath, then screw the l-shape on the base.
Luckily, I had the L shape as I didn't want to faff with a rebate as it's easier with a router table, which I don't have.

I could have fixed all sides together with dowel joinery. But with this being my first time using drawer slides, I drilled and screwed instead.
I didn't even use glue as I wanted to check things as I went in case I needed to make adjustments.
Above, you can also see that I don't have corner clamp guides. So instead, I clamped another offcut to create a protruding edge to temporarily butt it up to.
If you needed to create a rebate, you'll probably know that you'll need to slot this in and THEN screw the drawer together.
I didn't get it on camera, but I also squared the drawer before later adding the bottom base.

The mounting slides come in pairs. One for the left, one for the right.
- First, I used a combination square and marked 2mm from the front edge.
- Then propped up the runner with a shim (offcut) and drew where the screw holes were* (see note below)
- Then only added two screws per runner when mounting to the side if I needed to adjust them later.
*= I've since learnt that above is NOT the best method. By drawing screw hole circles and finding the centre point with a bradawl, there is room for error.
Next time, I'll mark the height, then use a framing square to draw a line. THEN hold my runners against it and draw the circles to get the exact centre.

As I'm using offcuts only, I nailed a strip either on the bottom of the drawer, then screwed the runner directly on top of it.
That allowed me to quickly check if my drawer opened before continuing with more slats.
Now to test fit!

Remember when I said next time I'll only use a framing square to mark my drawer runners? Well, because I didn't, my drawer had a bounce.
Luckily I'd only put two screws in each runner for now. And I noticed one runner inside the bed frame was higher than the opposite at the back.
To correct it, I removed the back screw and let the drawer and runner go to where they wanted to. Then held the runner in place, pushed the drawer open slightly and added the screw in the correct position.
Once I knew it opened perfectly, I added the rest of the screws. And also, the remaining slats for the bottom drawer!

After already sorting out my first slats either end of the drawer base AND the runners on top, I then nailed the rest in between.
I didn't measure anything here. All I did was grab something as a spacer, then nailed an offcut and hand sawed it.
And repeated as I went. Sometimes I've cut all my strips, then nailed, but it doesn't always work out. And especially won't if your drawer isn't square!

For the front of the drawer, I cut another offcut of plywood to the same width as my DIY dog bed.
Then chamfered all the edges with a router and a 45 degree chamfer router bit. And rested it on a packer while clamping it to the drawer I'd built. I wouldn't recommend installing it while it's resting on the ground incase you have trouble opening it fully.
While it's clamped, I predrilled and screwed it from the back of it.

Another fun thing I wanted to do was install bed slats, because this was PERFECT for using tatty offcuts I had no use for.
I drilled and screwed a strip to match the same height as the side sections and nailed offcuts resting on top while running the opposite way.
I wasn't keen on how tatty it ended up looking, so cut a sheet of ply to go over it.
Apart from painting CLS timber black as this is what these offcuts were, I then sanded all of the plywood.
Then gave the ply a brush of teak oil and wiped off the excess. But really, you could add varnish instead if you wanted. Paint it. Whatever you wanted!
But leave it to fully dry until so it's safe for your dog to use. I recommend you look for a pet-safe finish, or read the manufacturer's instructions.

I wasn't sure what kind of drawer knob to use in all honesty. I'd googled DIY dog bed ideas and saw some cool drawer knobs. But they weren't dog friendly.
Anyway, as soon as I found Hans trying to get in his new drawer while I wasn't looking, I had a light bulb moment. I then wedging one of his balls on a rope between the handle.
I asked him to open it and he did! So, I decided to nail one by the rope on the reverse, leaving the ball hanging on the outside. It's cheap, easy and works for him!

If you wanted to make this a pallet dog bed, then you butt some strips together, either with dowels, biscuits, or strips of wood from behind.
If using strips behind, you could still add euro slides. You'd just lose a smidgen drawer width space and may need an added horizontal strip between them. This would give you space to screw them too.
Other materials would be fine, but if using dowels or biscuits, I wouldn't recommend any thinner than 12mm.
Have fun making my reclaimed timber dog bed! Just use what you can find. I'm sure your dog won't grumble! And didn't I tell you you didn't need any DIY dog bed plans? 😁
As your dog gets older, or if you feel what you've made is too tall, you can either alter the drawer space or make a ramp.
-
2 x lengths 63mm x 38mm CLS structural timber -
Offcuts of 12mm plywood (and 12mm or thicker of any type will work!) -
And more scraps for bed slats and drawer slats -
Dog cushion -
Dowels -
Wood glue -
Ball on a rope -
Teak oil -
Euro slide drawer runners (450mm)* mine were recycled from IKEA furniture
-
Combi drill -
Impact driver -
Trend pocket hole jig -
Pocket hole screws* -
Wooden mallet -
Tape measure -
Speed square -
Hand saw -
Clamps -
Sash clamps -
Mitre saw -
Mitre saw stand -
Knee pads -
Circular saw -
Spirit level -
Sawhorses -
Palm router -
Router bits -
Combination square -
Orbital sander -
Dust mask -
Bradawl -
Hammer -
Safety rigger boots
- Build 2 matching box frames from CLS around the dog cushion of your choice, ensuring they're square (see blogpost above for tips)
- With the top piece, make a mitred opening using a speed square and hand saw
- Glue and screw the two pieces on top of each other
- Cut two panels of plywood to the same shorter internal width of the top section - these are of your desired height and need to match each other
- Draw a 30mm or 1&¼" pencil line from the top on each and drill holes before screwing inside to dog bed frame
- Now measure the width between the top of these plywood sides FROM the top section
- Cut a shelf to match
- You can either pocket hole, drill and screw or fix together with dowels *read the post on how to use a dowel jig
- If using pocket holes, glue and clamp together with sash clamps
- Paint the upper dog bed frame while you wait for the above
- Rip and glue trim underneath the front and back of the shelf if setting your shelf slightly above the ground like mine
- Read the post above on how to fix euro slide runners and measurements on how to cut pieces for your drawer
- Drill and screw your drawer box frame together and ensure square again.
- Nail the base slats and screw your matching drawer runner on
- Check to see if the drawer opens or closes properly
- Cut a drawer face to the same width as the bottom plywood section and clamp evenly on the front of the drawer before predrilling and screwing on
- Sand everything and apply teak oil, danish oil or whatever finish you want!
- Nail a ball on a rope from behind the drawer leaving the ball hanging over the front for your dog to open


Frequently asked questions
Have a question about this project?