Disguise Circuit Breaker Box

by
Nancy Weldon McEntire
(IC: homeowner)
6 Materials
$7
6 Hours
Medium
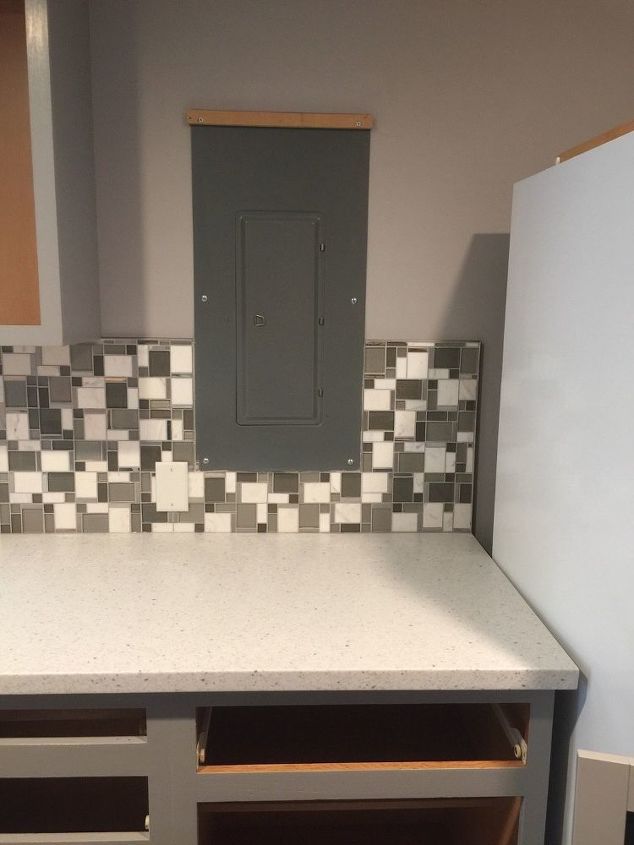
I took 9 x 19 feet of my attached garage and expanded my kitchen. In that area was a large breaker box that I needed to camoflage.
I took measurements of the breaker box and had to also allow for the 1/2 inch difference between the depth of wall and the tile, for what ever I decided to cover it with. The door to the breaker box protruded outwards also. I debated on a canvas print, rustic looking door, bulletin/magnetic board.
While installing my cabinet pulls, the contractor drill in the wrong place and had to order 2 new doors. I grabbed one of the doors and it fit perfectly over the breaker box. And the plus side was that the back was recessed, which made up the difference for the breaker box door sticking out. Then it hit me...chalk board!
I used a plastic drop cloth and painters tape to cover the frame around the door. Then following the instructions on the Chalk paint can, I sprayed the inside area lightly. I waited 2 hours, did a second light coat, then waited over night and did one more coat.
Door painted. I used wood putty to fill the holes that were drilled incorrectly, let it dry and sanded lightly to even the surface then used touch up crayon that came with my new cabinets to hide hole. Now how to mount. I found information on-line about French cleats and decided that this would be the best option. I had removed the face plate of the breaker box and saw that there were wires feeding in from the top, so definitely had to stay away from the center when mounting hardware. Also, only one stud was in the area I needed to mount. At this point I decided to use the top two holes on the breaker box where bolts held it to wall. I went to Hardware store with the bolts and found that ‘helper hardware man’ to find screws that matched in size-adding length to go through the 1/2 inch MDF that I used for the mounting cleat.
I started with 1/2 inch MDF (which made up for the 1/2 inch difference between the wall and tile below) and cut a 1”x16” inch piece. The breaker box was 15 1/2 inches wide, and cabinet door is 17 inches wide. I did a few practice runs on the table saw and found that 35 degree angle looked good. The cut was made 1/3 of the way in so that each piece would have a flat area to screw into wall and cabinet door. (Don’t cut corner to corner).
Once I was happy with that I lightly sanded the cut edges just to knock down the sharpness.
Then I measured the distance between the screw holes on the breaker box and drilled the holes accordingly into the wall cleat and attached it to the breaker box with my new longer screws. I determined the height that I wanted to hang the door, then centered the cabinet cleat to the back of the door and determined where to put screws..these screws were shorter than the wall cleat because my cabinet door was 3/4 inch and cleat was 1/2 inch. Be careful not to drill too deep and go through the other side, like I did on one—if you do, fill hold with wood putty, let dry, sand and use touch up paint/crayon.
Wall cleat screwed into top 2 holes of breaker box face plate. Be sure to attach with angle going in correct direction
Cabinet cleat attached to back of cabinet door. Be sure to attach with angle going in correct direction
So happy with this. It removes quickly and easily should a breaker get tripped. I also purchased a retro match box holder and mounted to left of chalk board. It holds my chalk and eraser. Just love this, so proud of myself!
Enjoyed the project?
Resources for this project:
See all materials
Any price and availability information displayed on [relevant Amazon Site(s), as applicable] at the time of purchase will apply to the purchase of this product.
Hometalk may collect a small share of sales from the links on this page.More info
Published August 7th, 2018 2:43 AM
Comments
Join the conversation
2 of 105 comments
-
 Sherry Miller
on Jun 19, 2023
Your are so creative, this looks fantastic!
-
-
 Em
on Jun 19, 2023
ALWAYS KNOW WHERE THE WIRING IS AROUND ELECTRICAL BOXES. I see people just randomly put screws behind, below, beside them. There are wires running into the box from different angles that are energized people! Know what you are doing when putting ANY type of nail or screw around the box. Hopefully there are studs around it that are safe to attach to.
-
-











Frequently asked questions
Have a question about this project?
Off subject , but where did you get the grey wall tiles. Just what I want for mykitchen. TIA
Was it difficult to screw through the electrical box and what size screw did you use?
Would it work to just put hinges on the door and attach to the wall or would it stick out too much?