


Faux Four-Post Bed

If you have a bedroom that needs a little touch to make the room complete, this is definitely a project worth looking into. As a kid, I always loved the thought of a 4-post bed -- there's something princess-y about it I guess. So now, instead of a princess, you can feel like a queen in your castle! :)
We want to help you DIY, so some of the materials in this post are linked to sellers. Just so you know, Hometalk may collect a small share of sales from the links on this page.

Best spray paint
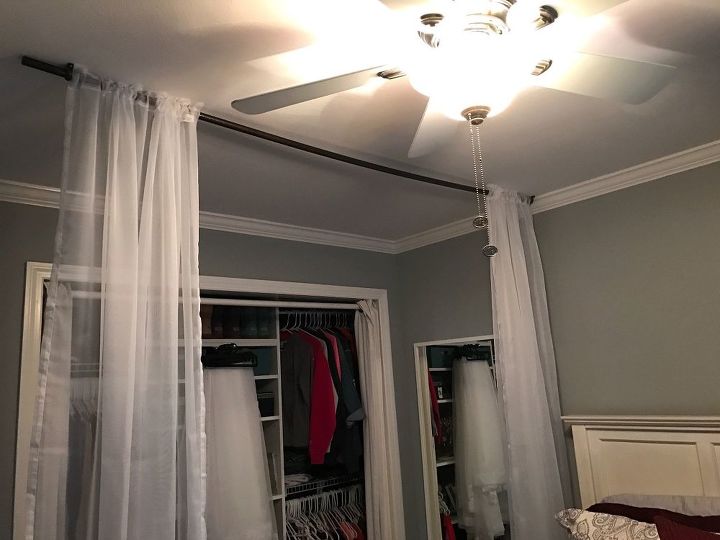
BEFORE: I love my sister-in-law's room...the color scheme is so HER, and everything meshes so well. However, as soon as I thought of doing this project, I thought of her because I felt that it would add a element of romance and maturity to her space..
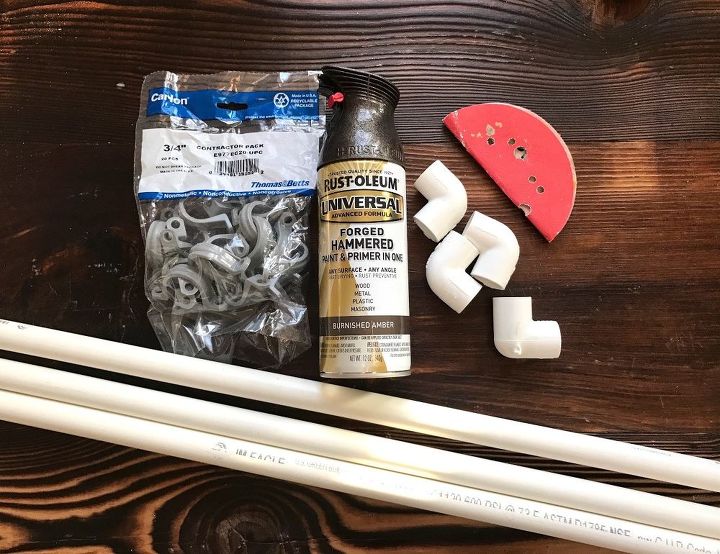
SUPPLIES:
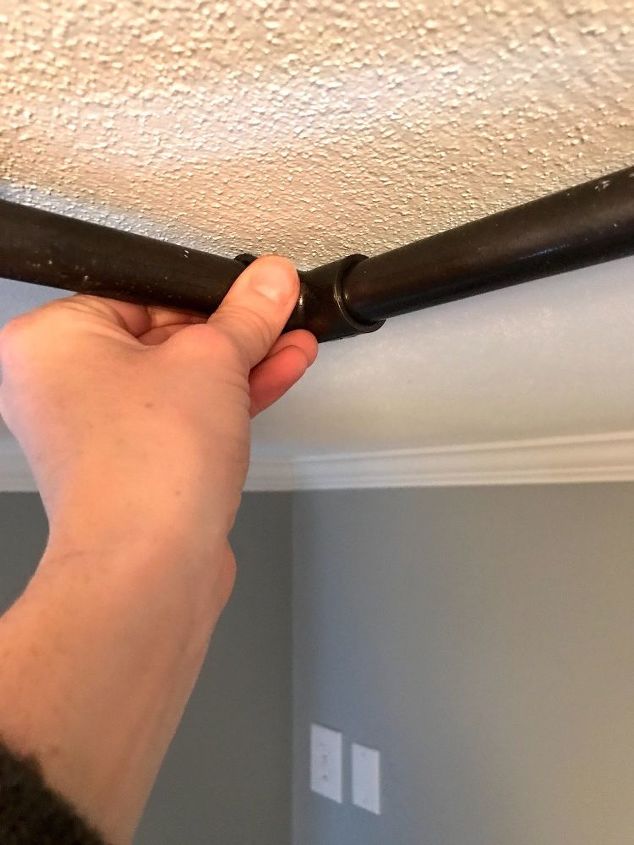
- (3) 1/2" PVC pipes (I would normally purchase 8' pipes but my Home Depot only had 10' so that's what I went with.)
- (2) 1/2" PVC elbows (My original thought was to have 4 sides, thus, I needed 4 pipes and 4 elbows; however, Rob advised that I should just do 3 sides, therefore only needing 3 pipes and 2 elbows.)
- 3/4" conduit clamps (I only needed 7 but it was cheaper to get a contractor's bag of 20.)
- Burnished Amber spray paint (I wanted the pipes to look like legit pipes so I chose this finish.)
- rough grit sandpaper
- Measuring tape
- Miter saw (you can have HD or Lowe's cut the pipes for you if you don't have a miter saw)
- (4) 2-packs of 108" x 84" white curtain panels
- pencil
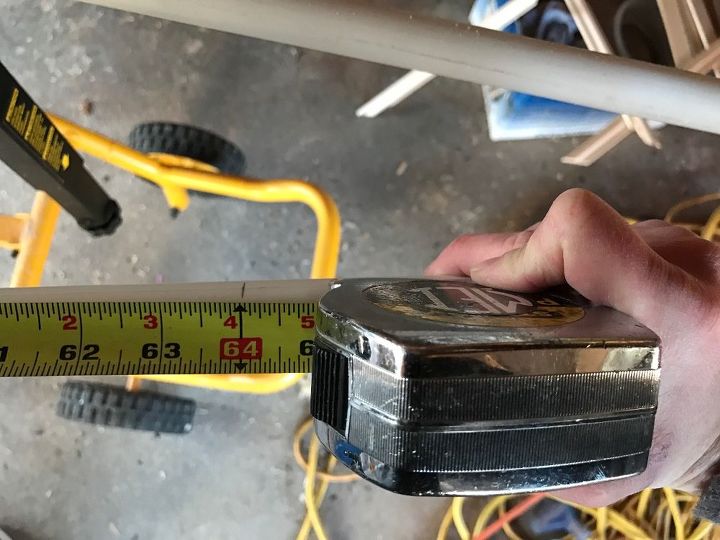
STEP 1: Measure and cut PVC pipes. After measuring my SIL's bed (she has a full size bed which is 54"x75"), I made my marks to cut my PVC pipes. I set my marks for 64" and 88" in order to have enough clearance from her ceiling fan.
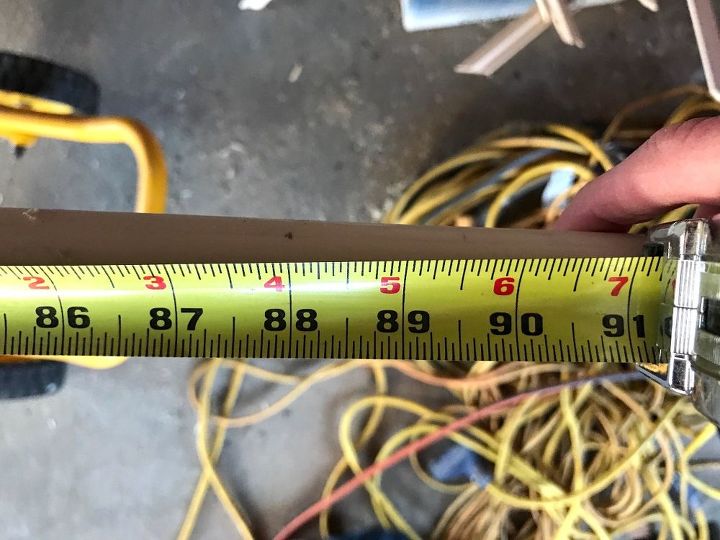
In the end, if you're only doing 3 sides like me, you should have 2 long pieces (88" in my case) which will hang over the long sides of the bed and 1 shorter piece (64" for me) which will hand over the foot of the bed. Of course, if you decide to do 4 sides, you'll need 2 PVC pipes for either measurement.
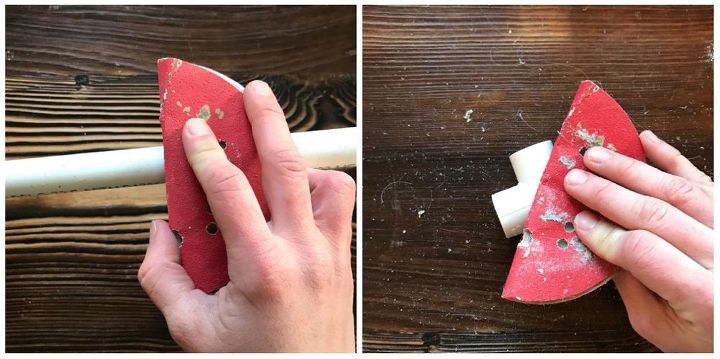
STEP 2: Sand pieces. Next, I used a piece of rough grit sandpaper to roughen up all of my PVC pieces (except for the conduit clamps which I didn't roughen up before spraying). This will help the spray paint adhere better.
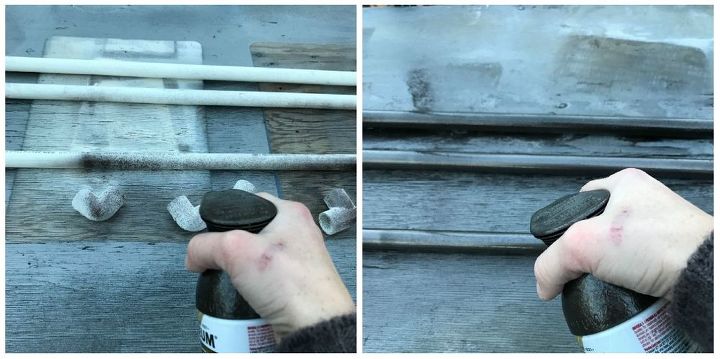
STEP 3: Spray paint all PVC pieces. After I roughed up my pieces, I sprayed everything with a coat of spray paint. Try to keep your coat even and not too heavy because it will drip. Make sure everything is completely dry before turning them over and spraying the other side.
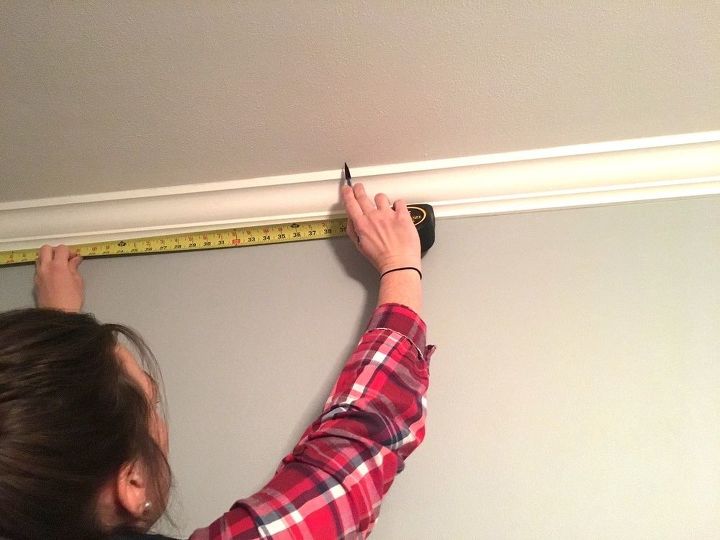
STEP 4: Measure wall to make ceiling marks. Next, I measured from the corner of the wall behind my SIL's bed and marked on the ceiling where my conduit clamps would need to be. At the head and foot of the bed, my marks were at 39.5 and 105.5. I got these measurements by measuring from the edge of the wall to the center of her headboard (which was 39.5 where the left side of the canopy would be), then adding 66" (the length of the short piece that would be hanging over the foot of the bed) which got me 105.5 (where the right side of the canopy would be).
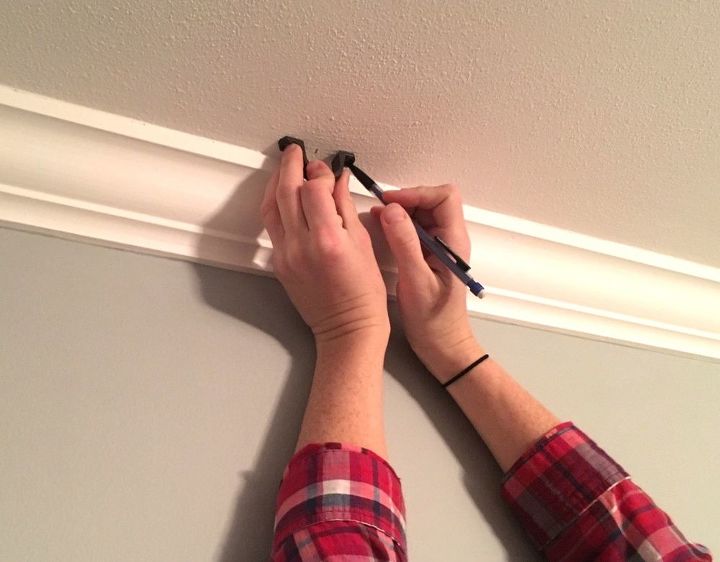
STEP 5: Install anchors, screws and clamps. Finally, it was time to start installing my hardware. First, I straddled a conduit clamp over my first mark (the left mark over the head of the bed) and marked the holes.

Then, I used the drill bit that came with the anchor/screw kit I purchased, and drilled holes on the marks that I made. After my holes were drilled, I pushed in the anchors, and lastly, I secured the conduit clamp by driving in the screws to hold the clamp in place.
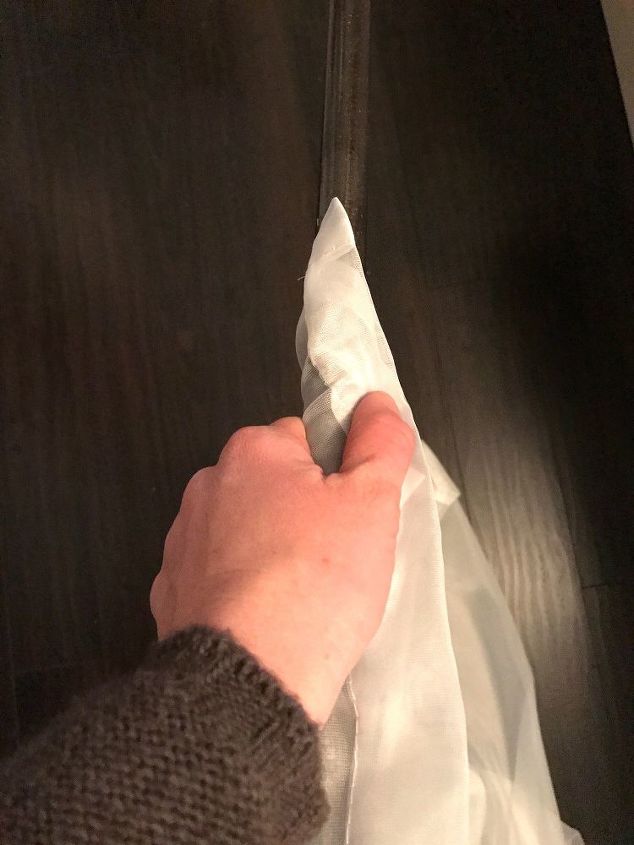
STEP 6: Slide on panel curtains. Next, I slid on 3 curtain panels. My original idea for this was to use curtain rings with clips to make for easy cleaning and to change things up quickly and easily but unfortunately, they were late coming in the mail so I went ahead with this method. If you plan to change your panels out for different seasons or if you are the type to change your bedroom up several times a year, you may want to stick with curtain rings.
Here is what my first side looked like. The strategy was to get the pipe in the clamp closest to the wall, then add the curtains and repeat STEP 5 to secure the end of the pipe.
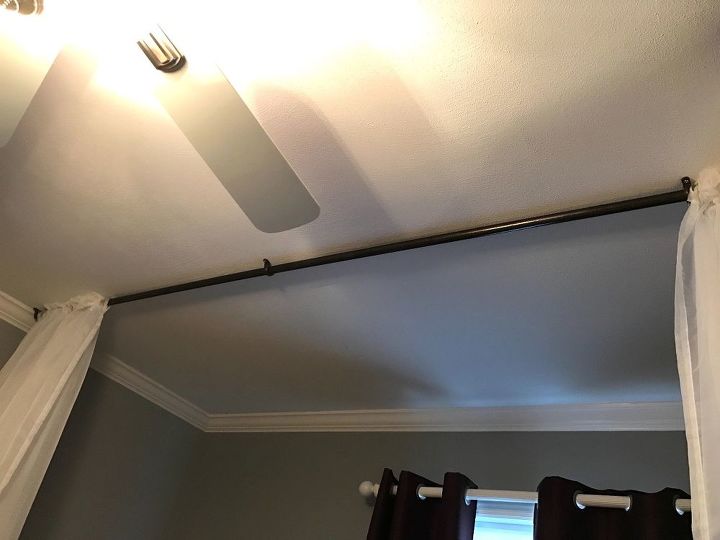
STEP 7: Repeat step 5. for the middle Don't forget to do this step! You're essentially going to repeat STEP 5 by adding a clamp in the middle of the pipe in order to eliminate the sag. I simply measured my pipe (which should be 88"), made my mark for 44" and installed anchors, then secured the clamp with screws. *NOTE: Make sure you put your curtain panels where you want them BEFORE adding the middle clamp. ***REPEAT STEPS 5-7 FOR THE RIGHT SIDE OF YOUR BED.***
STEP 8: Attach short pipe. The very last step is basically the same as the last one except you'll need to your curtain panels, then attach the short pipe that has the 2 elbows on either end, to the long pipes, creating a "U" shape over your bed (if you're only doing 3 sides like me). You'll install a final conduit clamp in the middle of the short end to secure everything. A COUPLE TIPS AND OBSERVATIONS FOR THIS PROJECT: 1) Hindsight, I would have purchased longer curtain panels--I didn't take into consideration how high up my SIL's bed was raised. I would have liked for the panels to reach the floor but she's super happy with how they are so I'm leaving them. 2) Because I was originally going to make this a 4-sided canopy, I purchased 8 panels--2 for each side--however, I would have liked to have 2 more panels so I wouldn't have had to compensate the way I did (read No. 3 for clarification). 3) Because I only had 8 panels, that meant I used 3 for each long side and then 2 for the short end which ended up working out ok but I had to maneuver the pipes so that there wasn't a gap in the panels at the foot of the bed. Essentially, I slid 2 panels towards the headboard on either side, then I gathered a panel between the bottom conduits and the PVC elbows, then I slid the 2 panels on the short pipe to either corner. I felt this would make the "posts" look fuller without me having to order more panels. Basically, everything looks good but the panels are no longer functional (at least the 2 at the ends of the long pipes that had to be gathered aren't functional anyway). I HOPE THIS MAKES SENSE TO Y'ALL READING THIS!

Here is the final result. Again, I'm not happy that the panels don't reach the floor but other than that, I think this turned out to be a pretty cool project and fairly painless once I got the knack of it (thank you to my amazing husband who helped me this this one out!). I feel like the "posts"/canopy ties my SIL's whole room together and makes it look complete.
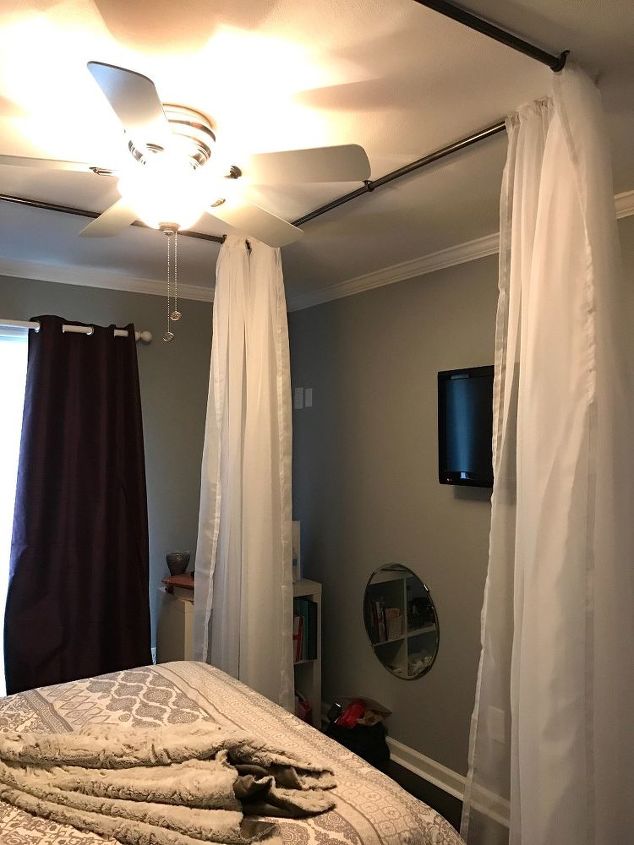
Here is a shot from the side of her bed, just so you can see another angle.
Resources for this project:
See all materials


Comments
Join the conversation
-
Looks really nice, thanks a lot for sharing all this!
-
I loved this.


Frequently asked questions
Have a question about this project?
How do you get them down to wash them?
Buy one more pamaeland add a the length you want. I think having them slightly too long would look amazing!! What do you think???
Just loved everything about this cozy bedroom! I wanna try to create something similar in 3d, probably in planner5d. Do you mind if I do that? Also, what is this style called, generally?