3 Simple and Stylish DIY Dresser Painting Ideas

One important lesson that I've learned is that you don't need to splash the cash to enjoy true style and luxury in your home. With just a little bit of thrift and some unloved old furniture, you can transform anything into a beautiful statement piece. For me, I opted to turn a plain, boring IKEA Rast dresser into a stunning painted dresser for my bedroom. To demonstrate the versatility of the piece, I decided to show you how to paint a dresser in three different ways, all of which are simple and straightforward. Let's dive right in!
Idea 1: Dresser with a Storage Shelf
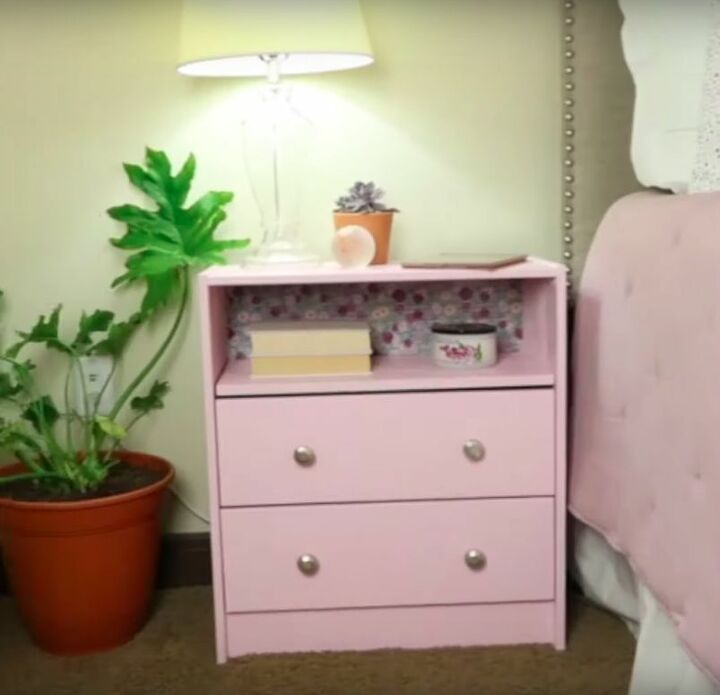
For my first painted dresser design, I simply converted the top drawer of the Rast dresser into an easy-access display shelf, as well as giving the piece a much-needed lick of pink paint. Here's how I did it.
Tools & Materials
First of all, you'll need to make sure you've got what you need to transform your dresser. Here's what you need:
- An IKEA Rast dresser
- FolkArt Home Decor Chalk Finish Paint. I opted for baby pink, but you can choose whichever color strikes your fancy
- 12x12 patterned vinyl streets
- a 23x11 wooden shelf
- Steel brackets
Step 1: Gather Your Materials
This first step of the DIY dresser painting ideas is to gather all of your materials together in one place. You'll want to lay down some plastic sheeting to avoid getting paint all over your floor. Then you can place your Rast dresser on top of the sheeting and get started. I removed all of the drawers first and mixed my paint before starting.
Step 2: Paint the Dresser
Once I had my tools and equipment together, I used a paint roller to apply the pink paint to both the inside and outside of the dresser. Remember, you don't need to paint the back wall on the inside, as this is going to be covered in vinyl sheeting anyway.
Step 3: Apply the Contact Paper
After ensuring my vinyl contact sheets were the right size (you can shave them down with a box cutter if they are too large), I simply applied them straight to the back of the dresser to create a colorful focal point. Make sure to flatten it out and get rid of any creases, wrinkles, or air pockets you might notice.
Step 4: Add a Shelf
The final step is to add the new shelf. Before painting the shelf, I added some steel brackets to the inside of the dresser, which serve to hold the shelf up. Then I gave my 23x11 a coat of paint and simply placed it on top of the brackets.
What I love about this dresser idea is that you can do it within minutes at a low cost. As you can see, I added some personal touches to the top to give it some style as well as easy-access functionality.
Idea 2: Dresser with an Extra Shelf
Another super-easy way to hack your IKEA dresser is to augment it with an extra shelf. This way, you can retain all of the drawers from the original, whilst adding additional storage space and style.
Tools & Materials
You really don't need much to pull this design off. Here's the full list:
- An IKEA Rast Dresser
- A can of pink Krylon spray paint (or you can choose any color you like)
- A SimpleHouseware expandable cabinet riser
Step 1: Gather Your Materials
To get started you'll need to gather your materials. Lay down some plastic sheeting, place the shelf on it, and make sure you have your paint ready. Remember to take the tags off the shelf!
Step 2: Paint the Shelf
For the painting part, I simply placed the shelf down on some plastic sheeting and gave it a couple of layers of spray paint. Make sure to do this in a ventilated room and to leave it to dry for at least of couple of hours.
Step 3: Assemble
Now all you need to do is place the shelf on top of the dresser and you're done! I made maximum use of the space by placing items both under and on top of the shelf, as you can see here.
This insanely simple painted dresser idea has a dramatic impact on the space, giving a dash of industrial hipster flair that complements the soft pink tones of my bedroom.
Idea 3: Faux Apothecary Chest
If you'd rather opt for a complete aesthetic transformation, you can do what I did and transform the dresser into a faux apothecary chest. This one takes a little bit more work and hardware, but again only takes a couple of hours max.
Tools & Materials
You'll need more materials to pull this off than in the previous two ideas. Here is what I used:
- IKEA Rast Dresser
- FolkArt Home Decor Chalk Finish Paint
- A circular buzz saw for wood cutting
- Some drawer pulls
- Superglue
Step 1: Gather Your Materials
As before, you'll want to make sure your room is protected from any paint splashback. You'll also need a pencil, a ruler, and plenty of space for the wood cutting saw.
Step 2: Measure and Add Grooves
The grooves are the most important part, as this is what will give your IKEA dresser an old-world apothecary-style look. I made sure to measure where I would cut the grooves on the old drawers, dividing each into thirds. After this, I placed the wood boards carefully under the buzz saw and carved a light groove along the lines I had drawn. Make sure not to cut too deeply, as this may destroy the wood.
Step 3: Paint
Next, I grabbed my trusty paint roller and did the same as earlier, giving the whole thing a lively coat of my favorite pink paint.
Step 4: Add Hardware
After this, it was time to finish off the look with some store-bought drawer pulls. You can buy them in a variety of vintage styles from Hobby Craft or Pottery Barn, and they can easily be attached with some superglue.
And there you have it! Although the drawers obviously don't "open" as they would appear to, the overall style makes the IKEA Rast look expensive, vintage, and effortlessly chic.
With these thrifty DIY dresser painting ideas, I transformed an uninspiring piece of furniture into a unique and sentimental piece for my home. If you were inspired by my Hometalk project, make sure to recommend this one to a friend.






Frequently asked questions
Have a question about this project?
Where are the instructions? The arrow does not start the video.
The video is working just fine.
Thank you for these fab ideas, last one is my favourite!