


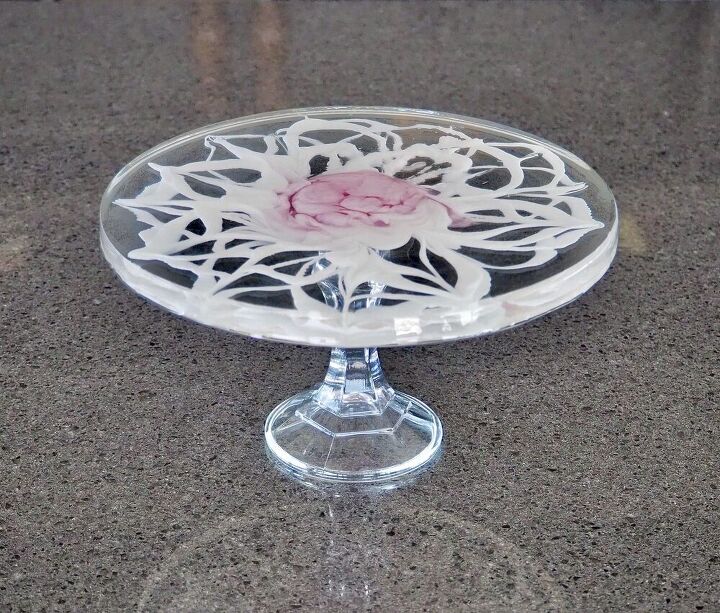
DIY Food Safe Resin Cake Stand

Hello everyone! I’m back with another resin-licious tutorial today so hopefully by now if you follow my projects on here you’ll be all tooled up and ready to go.
However, if not, have no fear, everything you need will be listed below along with my DISCOUNT CODE for resin products with a company that also offer FREE SHIPPING!
I also have an Etsy store if you don’t already know and I’ve added the link below where you can buy this exact cake stand and many other crafty handmade pieces.

MY YOUTUBE VIDEO
 Click play above to watch a video of this tutorial
If you would prefer to watch a video tutorial of this project then just click the play button above on my ‘Make Your Own Cake Stand’ thumbnail which will automatically start playing the YouTube video. Please take a look at my other tutorials on my channel and subscribe for future crafty videos too.
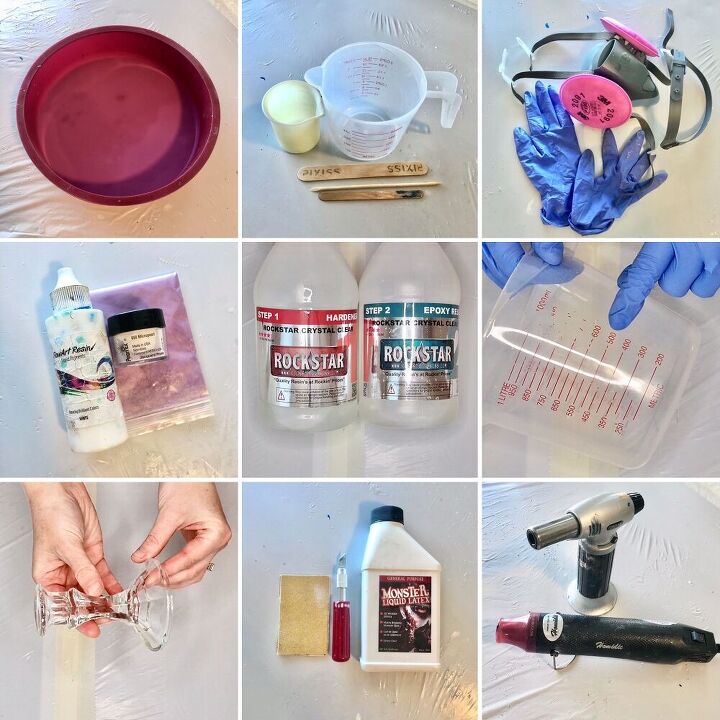
WHAT YOU’LL NEED
- Resin - I’m using ‘4 Star Coating Resin’ from Rockstar Resins. Use this link and my code HANNAH at checkout for 10% off any order. They also do FREE SHIPPING!
- Round silicone mold (mine is 9 Inchs outside measurement)
- Measuring Jug (that easily fits 500mls)
- Silicone/plastic cups and mixing sticks
- Colourants (liquid/mica pigments/food colouring/glitter etc)
- Liquid latex (or waterproof tape)
- Sanding paper
- Blow torch
- Heat gun
- Candlestick (not plastic)
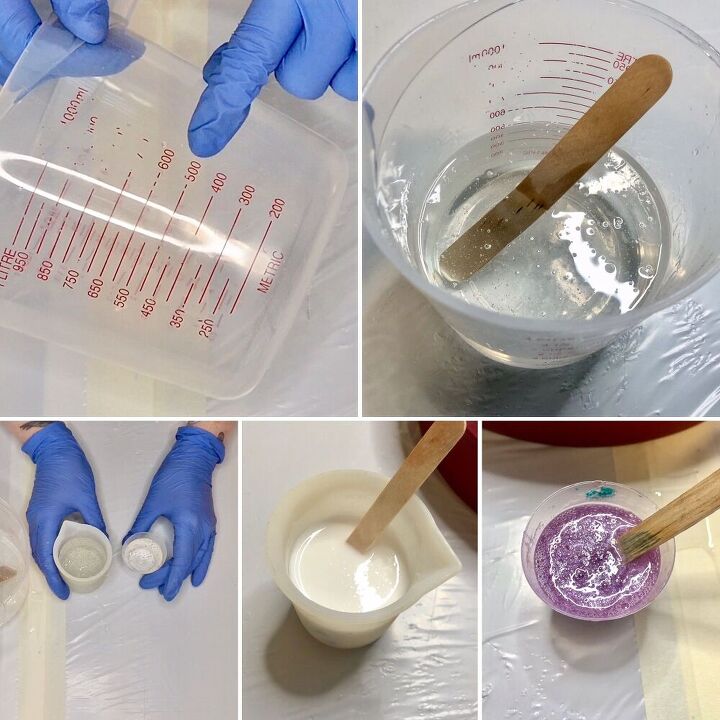
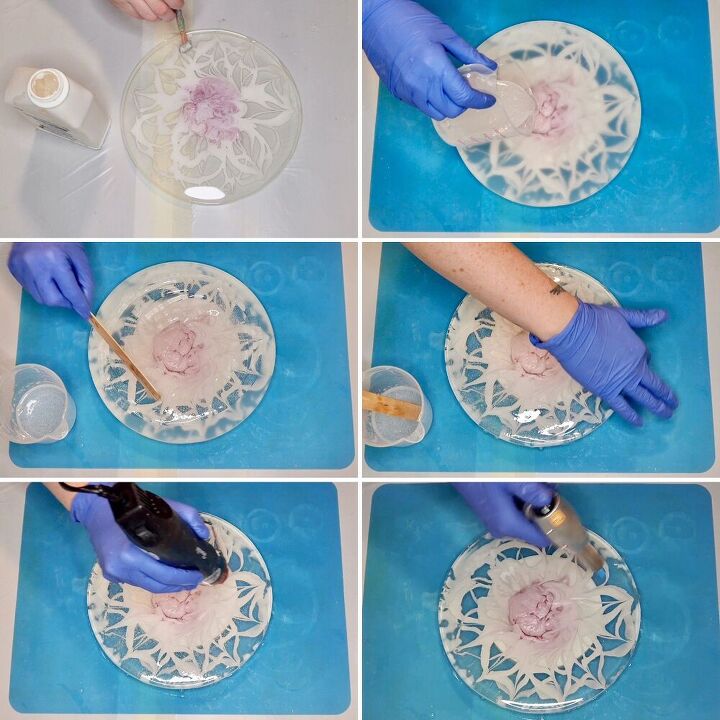
MEASURING AND COLOURING
First of all, measure out a fairly large batch of resin. As you can see from my final product, my cake stand base is thick and sturdy, as is my glass candlestick. If you have a more delicate candlestick that you’re working with or would prefer a slimmer base, or have a larger or smaller mold etc, then you will just need to bare this in mind when measuring your resin.
I first add 250mls of hardener to my measuring jug followed by 250mls of resin, in that order, for a combined 500mls. I mix the 2 together thoroughly for at least 5 mins.
Next I pour a small amount of my fully mixed resin into 2 separate containers, one with about 50mls in and the other with about 20mls in. I then colour both small batches of resin with my colourants. The 50mls batch gets white liquid pigment and a small amount of pearl mica pigments mixed in. The 20mls batch is coloured with pink mica pigments.
Set the coloured resins aside for a little later and bring over your round silicone mold.
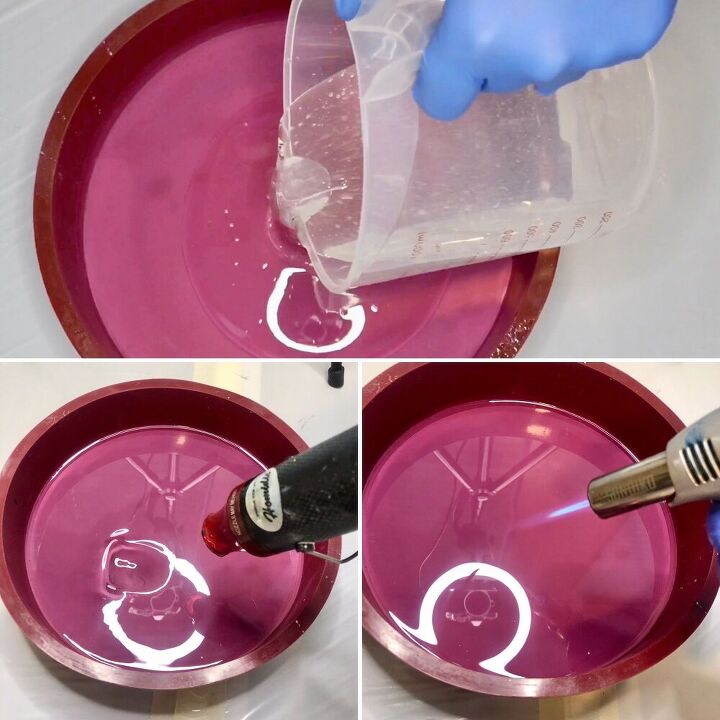
PREPPING YOUR BASE
Pour the rest of the remaining 430mls of clear resin out into your silicone mold.
Use your heat gun to get rid of as many bubbles as possible and then your blow torch for any stragglers at the end.
Get more tips for how to make silicone molds yourself.
Apparently where you live and your humidity levels will affect the number of bubbles you get. Bubbles are linked to moisture and therefore the more humid the area, the more of a bubble-battle you may have. I’m quite lucky as Denver is very dry but if you live in a humid area you may want to switch to the ‘5 Star Coating Resin’ for this project as your bubble-battle will be easier. Bare in mind that you will have less work-time with the 5-Star, around 20 mins instead of 35-45 mins with the ‘4 Star’.
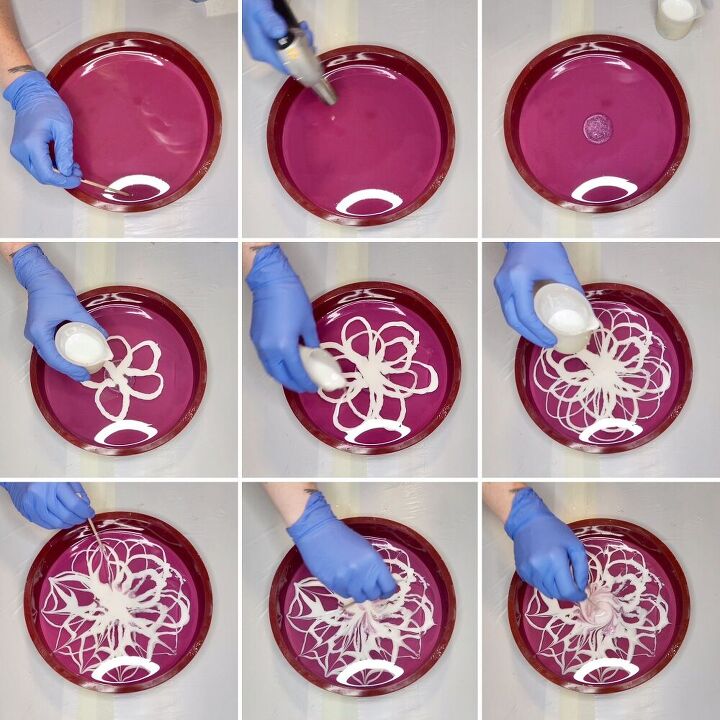
FLOWER POWER
If you’re using the ‘4 Star Coating Resin’ like I have, leave 10 mins between the last step and this next step to allow the resin to slightly stiffen. If you’re using the ‘5 Star Coating Resin’ then move straight onto this next step.
Bring back your white and pink resin from earlier and after picking out any dust floaties and blasting one more time with your blow torch, create the centre of your flower.
You can choose to make whatever pattern you want but if you want to copy what I’ve done then first add your pink to the centre of the clear resin. Add as much or as little as you’d like.
Blast in between coloured resin additions with your blow torch.
Now take your pearly white and create 1 round of petal shapes around your pink centre in a swift motion. You want the resin to sink slowly in layers, not thick and fast, so try not to add too much white as you go or the coloured resin will sink too quick. Basically don’t dawdle.
Repeat the last step but with slightly larger petals this time and keep repeating this step until you feel you’ve filled your space with a nice distribution of petals.
Try to make your petals thinner as they grow and they will also look better if they cut-through the petal shapes underneath them. If you get it right, when you de-mold your resin base, the petals should look like they sit on top of each other at different depths.
Next, use something pointy to pull through your petals from centre to petal tip and from petal edge to centre to add another dimension to your design.
Lastly, swirl your pointy object around the pink resin in the middle to create a bud-like look. Once your base is de-molded and flipped the right way round, this will make more sense!
Once you’re happy with how your design looks, allow your resin to cure for at least 12 hours.
PROTECTION
After fully curing, de-mold your base. If your mold is new then you should get a nice clean shiny look to the top of your base (previously the face-down-in-your-mold side). My mold is old and therefore it’s dull.
If your mold is lovely and new and you’re happy with how the surface looks already then you can move on to ‘ATTACHING YOUR CANDLESTICK’. Just give the underside a quick sand as the lip will still probably be a bit rough.
If your mold is well-loved like mine then to bring back that lovely top-coat shine, we need to follow a few more steps first.
Apply a nice generous coat of liquid latex to the underside of your base all around the edges. This will serve as a protective barrier from any resin drips. Allow the latex to dry.
Mix up some more resin. You shouldn’t need more than 50mls to cover a circle this big (25mls of hardener and 25mls of resin mixed together for at least 5 mins).
Making sure the latex is dry, elevate your base from your work surface to allow the resin to run off the edges and pour your 50mls of resin onto the dull, front side of your base. Spread the resin around using a stick or spatula and watch your design come back to life. Make sure to cover/coat all the edges of your base too.
Pop any bubbles using your heat gun and finally with your blow torch.
All to cure for a further 12 hours.
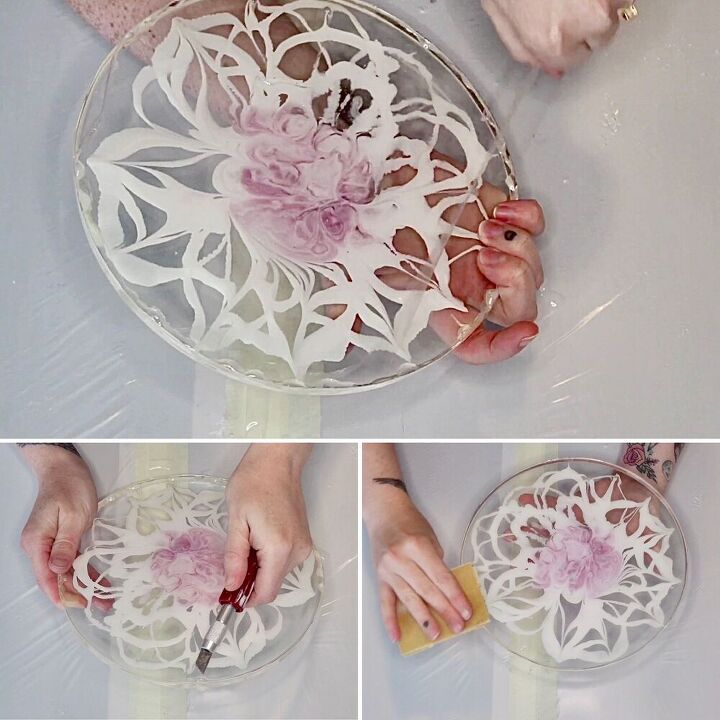
PEEL AND REVEAL
Once your resin has fully cured, peel off the latex from the underside and then pick off any resin drips with a knife or something sharp.
Then sand the underside edge to smooth off any little sharp lumps and bumps left behind.
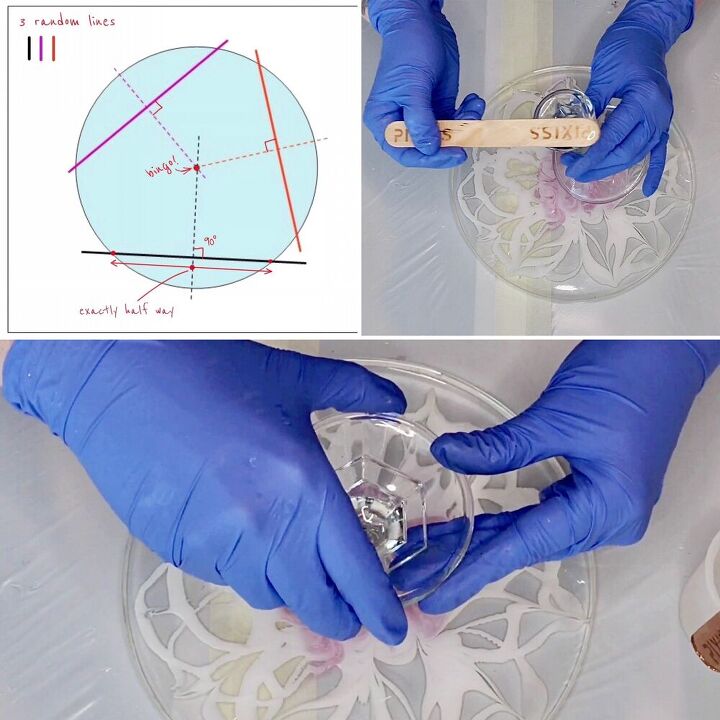
ATTACHING YOUR CANDLESTICK
On the underside of your base, mark out the centre using the method I’ve shown above.
As your base is see-through, you don’t want to sketch directly onto your resin so I suggest drawing around your base onto some paper and then marking out the centre of the circle on your paper. You can then transfer your centre point from there onto your resin base with a sharp knife by piercing your paper.
Mix one last tiny batch of resin (I mixed 40mls and had plenty to spare) to use as a bonding agent between your base and the candlestick and apply to the candlestick lip. Rest the candlestick on it’s head in the centre of your resin base and allow for one final cure.
You can chose to hot glue the 2 together or use some other bonding agent if you have it (I’m not an expert on what sticks to glass) but if this is easier for you and it doesn’t leave any visible residue then by all means go for it.
ONE MORE THING
Please remember to check out my Etsy Store if you get the chance where I have this cake stand and many other handmade pieces for sale.
Please also check out my YouTube video of this project which I’ve embedded within this tutorial above.
Many thanks for watching/reading. If you have any questions or comments then please drop them below and I’ll happily get back to you.
Happy crafting! X

Resources for this project:
See all materials


Comments
Join the conversation
-
Love it.
-
can I put my family photo inside?


Frequently asked questions
Have a question about this project?
At the top where you listed supplies, It says food coloring. Can you use food coloring to color resin? I've only used epoxy a couple times but I've never used any colorant. Just curious...