Giant Bean Bag Chair Tutorial

3 Materials
Making your own giant bean bag is the way to go! These comfy, foam-filled chairs cost upwards of $300 to buy new, and by making one yourself, you can not only save a ton of $$$, but you can customize with fabric you love, and know it is made well!
To make a 50" diameter, 28" high bean bag chair,


YOU WILL NEED:


-6 yards of 60" wide inexpensive fabric. This is for the insert, so the fabric won't be seen. I paid $1-2/yard for some plain white cotton quilting fabric.


-6 yards of 60" wide heavier, comfortable fabric. I have used denim, corduroy, decorator fabric, and velour. This is the fabric you will feel, so make sure you not only like the look, but also the way it rubs your skin.


-1 LONG zipper. I recommend 48" at minimum for this size chair. Many fabric stores sell zippers-by-the-yard. I have used these and they work great for this project.


-Shredded Foam Filler. My source for this can be found HERE. Order the 36"x 36"x 48" (30lb) size ($34.99 at time of publishing this post) to make one Giant --Beanbag Chair. If you are making more than one (or want to do this project with a friend!) you can get free shipping with a $75+ order.
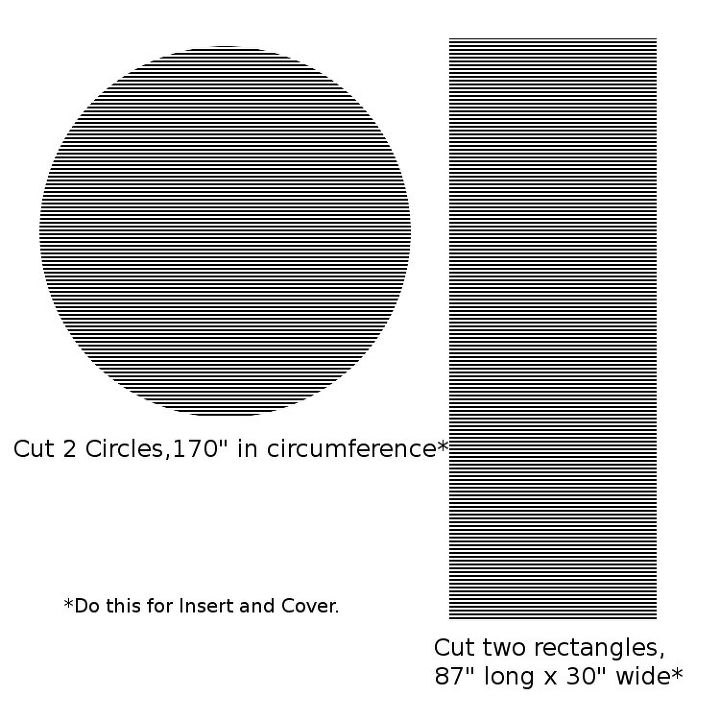
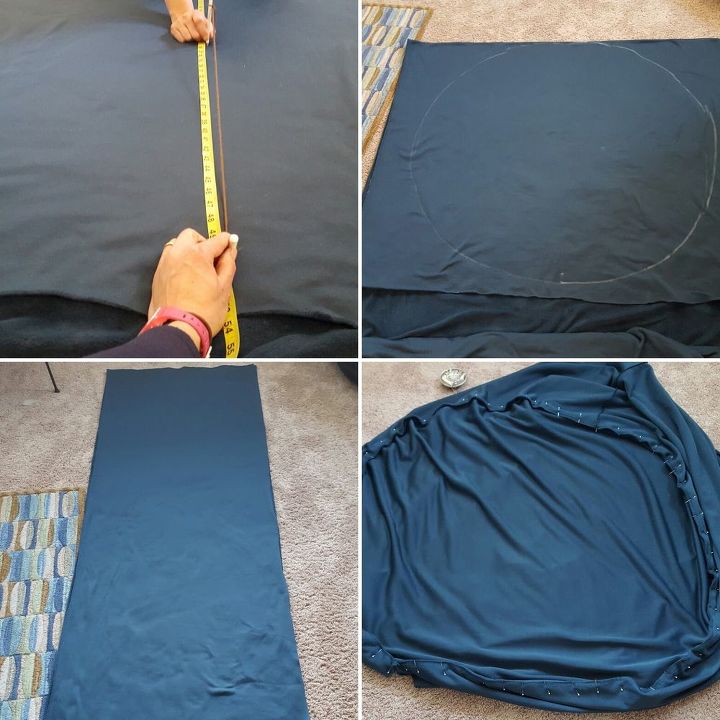
1. MEASURE AND CUT CIRCLES. Beginning with your insert fabric, cut two circles with a circumference of 170 inches. I fold my fabric over on itself enough to cut 2 at once.


The easiest way to measure is via the radius of the circle, which is 27". Cut a string about 40 inches long and tie one end to a pen or straight pin. This will be your pivot point.


Tie the other end to a piece of chalk or a fabric pencil, making the string exactly 27 inches long from tied-end to tied-end. Find the approximate center of the area on the fabric you will be drawing your circle, and hold the pivot end in place there. Extend the string until it is taut, then use the chalk to draw a perfect circle. Cut out both circles.


Repeat with your nicer cover fabric.


2. MEASURE AND CUT RECTANGLES. From each kind of fabric, measure and cut out two rectangles, 87" long by 32" wide.
3. SEW ONE END OF RECTANGLES TOGETHER. With right sides together, pin and sew the two rectangles together across the shorter (32") side. Now you will have one long rectangle, 32"wide x 170+" long. Do this for each kind of fabric.


4. PIN ONE CIRCLE TO RECTANGLE and SEW IN PLACE. With right sides together, pin one circle to the long side of the rectangle. Sew in place with a 1/4-1/2 inch seam allowance (depending on your fabric/ sewing machine. Heavier fabrics should have a larger seam allowance, but if you have a serger, 1/4 inch will be strong enough).


Sew the final short ends of the rectangle (right sides together) after you have attached it to the first circle to make sure everything lines up well.
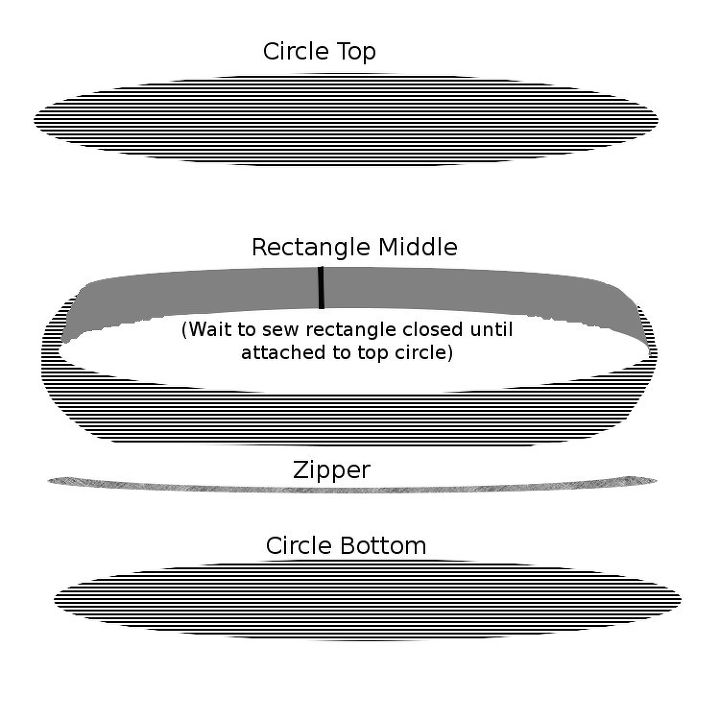
5. PIN & SEW THE ZIPPER and THE BOTTOM SEAM.


6.FILL INSERT WITH FOAM.


For the complete tutorial, visit somuchtomake.com.
Suggested materials:
  • Fabric   (fabric store)
  • Shredded Foam   (foambymail.com)
  • Extra-long zipper   (Amazon.com/ fabric store)
Kelly Fleming Smith
Want more details about this and other DIY projects? Check out my blog post!
Go
Frequently asked questions
Have a question about this project?
  1 question
  • Acl34097182 Acl34097182 on Sep 14, 2018

    Do you mean 30inches wide instead of 32 inches wide?

Comments
Join the conversation
 1 comment
  • William William on May 05, 2016
    I just can see myself sprawled out watching my favorite TV show or movie! Just don't wake me up! Thanks for sharing!
Next