


The Remodel is Finally Complete! Before & After!
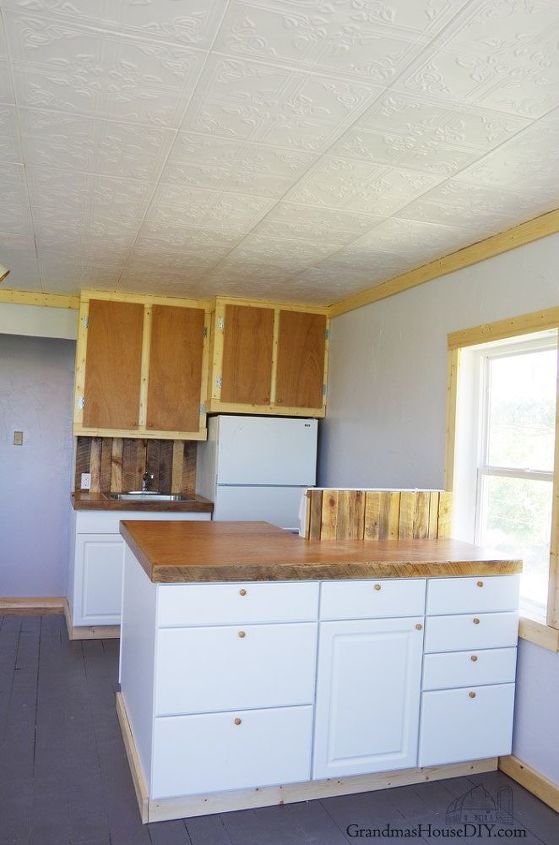
I am so excited to finally show you guys the before and after of the entire little house remodel! It took me about fifteen days in total to get this place up to snuff and around $3,000 to complete it. I had a serious plan and took a few hits when that plan collided with reality – I also tried a new product (styrofoam ceiling tiles!) for the ceiling in the main room and in the bathroom. I also purchased the most expensive plywood I have ever purchased (nearly $100 for a sheet!) that my husband helped me cut and get into place in the kitchen for the counter tops.
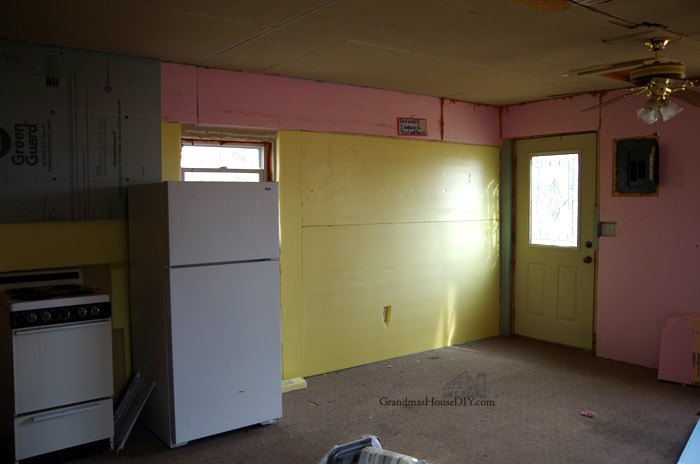
There is really only one thing you need to know about my dad to completely understand the state of this place: He doesn’t care what anything looks like, he doesn’t like paying bills, cleaning is not his strong suit and the man apparently believes that Everything can be fixed with spray foam. EVERY. THING. Hence: eight inches of foam board glued to the walls, windows bulging with 6-8 inches of spray foam around them and the entire house is still covered in cat hair from a cat that’s been gone for many years. He lived here for ten years before building his own place and moving last year, now it was my job to bring life back to this little house.
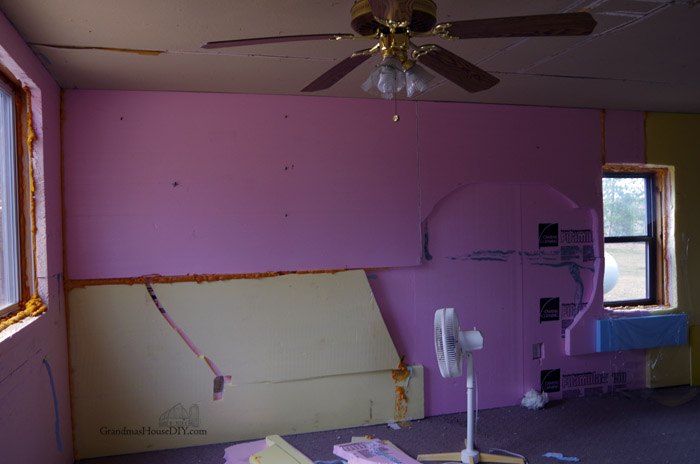
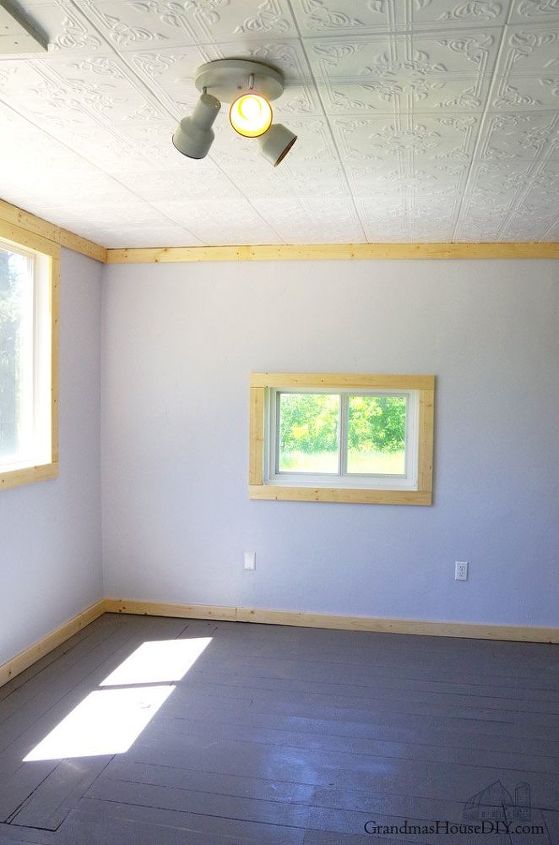
My main goal was so simple: Bring back in the light of day! Seriously, two windows were totally covered up with foam board! I only realized one of them even existed when I walked outside the house to get the plan on paper. I had no intention for this little home to be “feminine” or “girly” at all. (The Universe knows that I’m not much of a girly girl…) But to me it actually turned out quite lady-like in its own way. Everything is so light and airy now, the house feels twice as big as it did. They always say that it is amazing what paint can do and this little place is definitely testament to that. Between primer and a couple different shades of paint all in there were over twelve gallons put on this little house in different applications.
The walls also received over 60 pounds of sheetrock mud. (Yup it was like working in a tropical jungle for a couple of days while all that moisture dried.) I used a technique with the mud that I’m calling my “pallet knife” application, it turns out looking like stone, or concrete… or something. Well it is definitely different and certainly won’t be everyone’s style but with how those poor walls were DESTROYED by glue and foam I decided this technique was my best chance to save them in the least amount of time as possible. It is two heavy coats of mud with NO sanding, just smoothing as I go. I’ve done this before and, actually, I wish I had just done this in my house too. It only took me about eight hours to do the whole house and then I was ready for primer and paint.
I laid down linoleum floor tiles in the bath, hallway, bedroom and bedroom closet over the concrete slab. Linoleum stick down tile is actually not my favorite thing to work with however the price is so incredibly good on them that there didn’t seem to be a better alternative and, quite frankly, I think they really turned out nice!
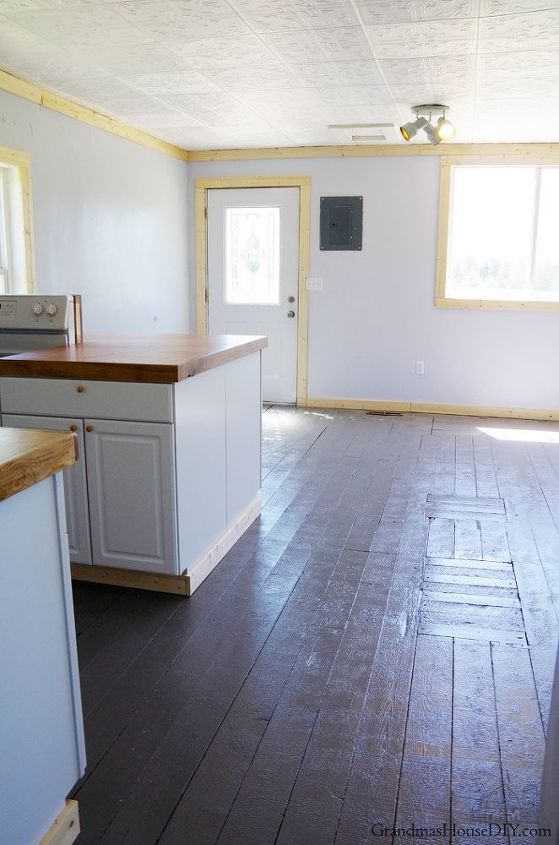
We chose a light gray paint for everything and a darker gray of the same shade for the floor. The front door got several coats of gloss royal blue Rustoleum on the outside and white gloss Rustoleum on the inside. (I also went ahead and painted the ugly vent pipe coming up from the basement and the bathroom door in gloss white too.)
I love how the floors turned out in this little house! Those are 60 year old tongue and groove pine floors. Are they perfect? Heck no! I even had to patch the middle of them with some barn wood. They are incredibly my style and, after two coats of primer, three coats of paint and four coats of poly acrylic, they are also practically indestructible!
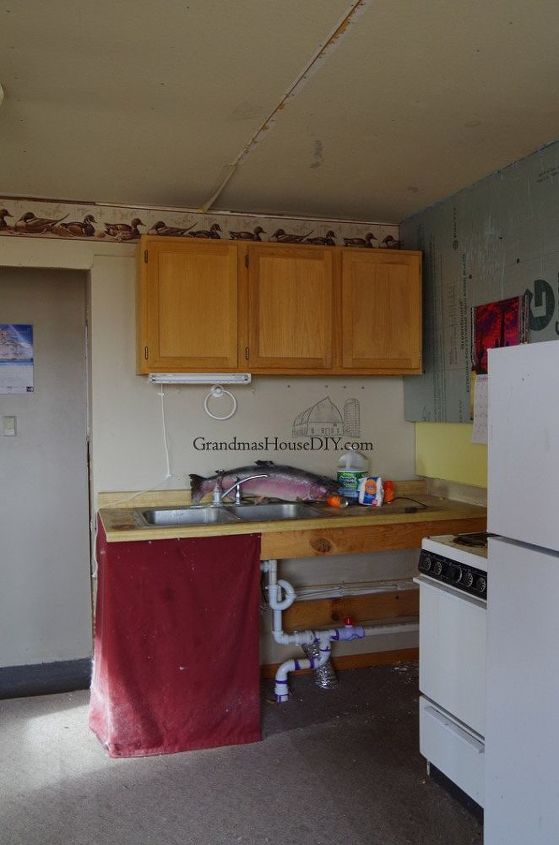
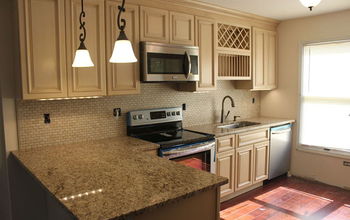
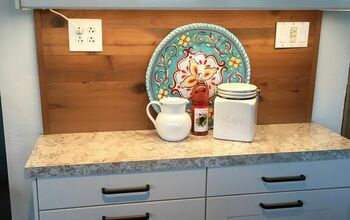
I built the upper kitchen cabinets out of pine and we purchased stock white Menards cabinets for all of the lowers. The cabinet doors and counter top are made of mahogany veneer plywood that my husband helped me cut and get into place. To tie it all together I added barnwood (from the barn of course) to the backsplash and behind the stove as well as little wood knobs throughout. (those knobs were only $8 for 20 of them!) Above the kitchen sink I built a utensil hanging rack and, get this, my Grandma’s fifty year old light from her kitchen that still works great!
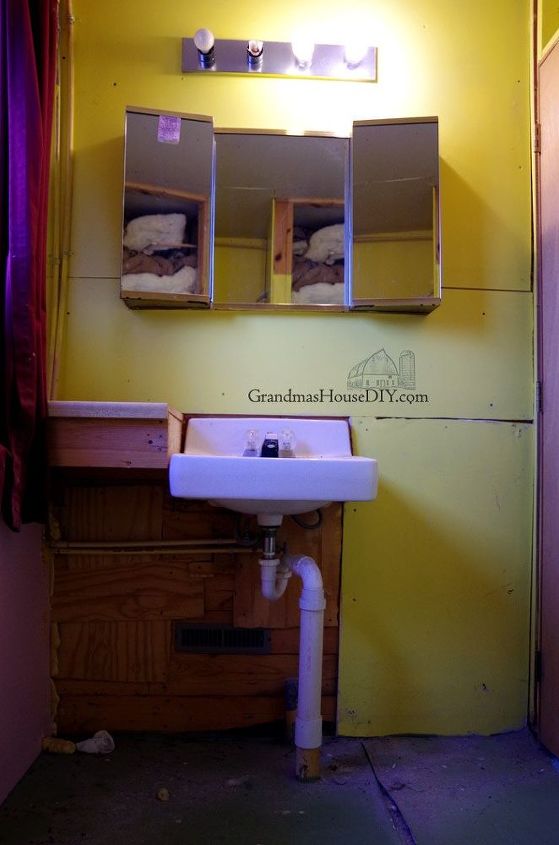
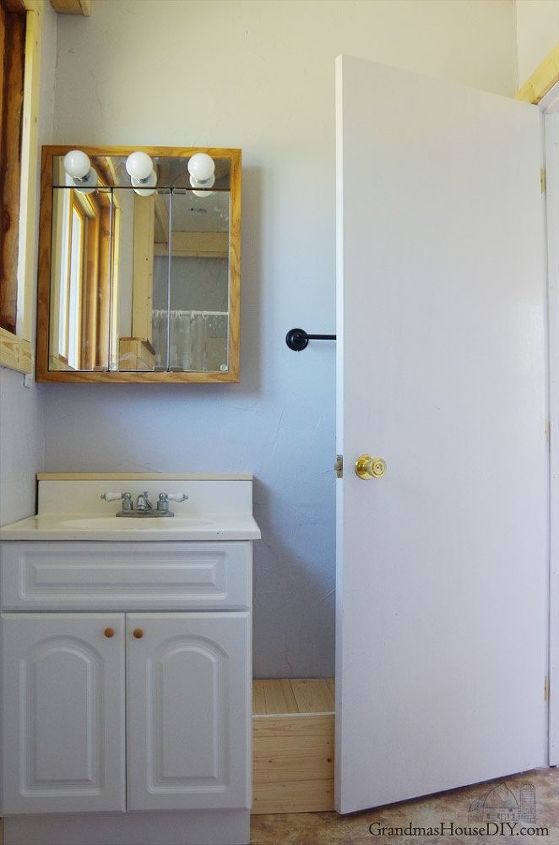
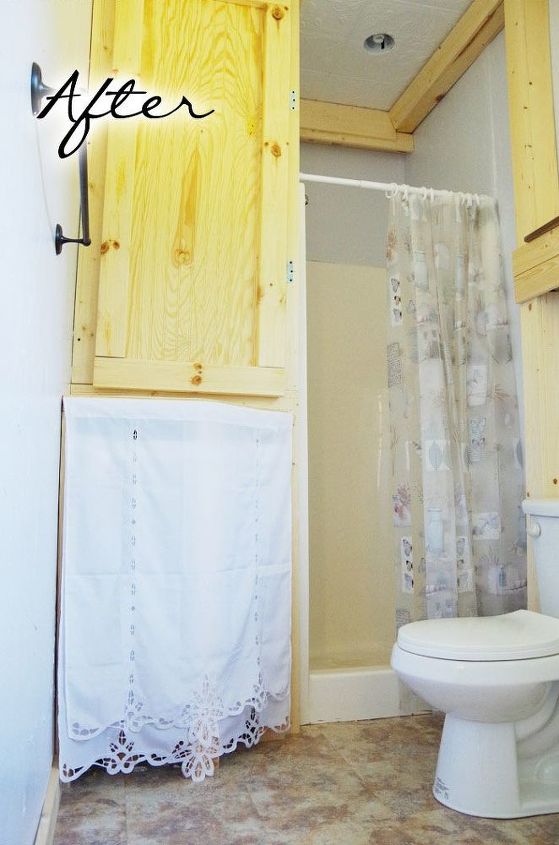
When it comes to the bathroom there is only one word that comes to mind: GROSS. So. Gross. It was probably the biggest aggravation in the whole remodel too. First thing we did was break the water pipes before I barely even got started and then, after I fixed the drain the first time, I realized I hadn’t put it in far enough to the left so I had to redo all of that work. Then we had to cut said drain to get the vanity installed so, after three attempts, I finally had the sink drain DONE for the last time. Breaking the water lines turned out to be a good thing because I was able to replace the whole run (from ceiling to floor) and put it INSIDE THE WALL like they’re supposed to be. The entire room was crazy wonky and there really wasn’t much I could do about it in our budget and timeline. I did install a “new” medicine cabinet (from the thrift store) that includes lights and I also happened to have one recessed light left over from my own renovation that I installed above the shower. (Really, you just can’t have too much light in my opinion…)
Whoever put the plumbing in (I.E. that horribly placed bathroom sink drain) clearly never thought there would need to be a door on the bathroom. There was just nothing I could do about the door hitting the drain so it will never open all of the way because the only alternative was to either cut the door or jackhammer out the slab to move the drain two inches. (The “hall” was just too small to have the door swing OUT into it so flipping the door around wasn’t an option either.) It remains one of those things that will always bug me that I’m just going to call “character” for lack of anything else that I can do. I added yet more wood to the bathroom to cover up those two drain pipes by building a “shelf” that we figure we’ll put a waste basket on top of at some point… or something. To add insult to injury this bathroom is actually really quite big, if they had moved the drain to under the window it would have easily accommodated a double vanity! Now it is simply the perfect example of how you can take a decent sized space and make it incredibly inefficient and impractical.
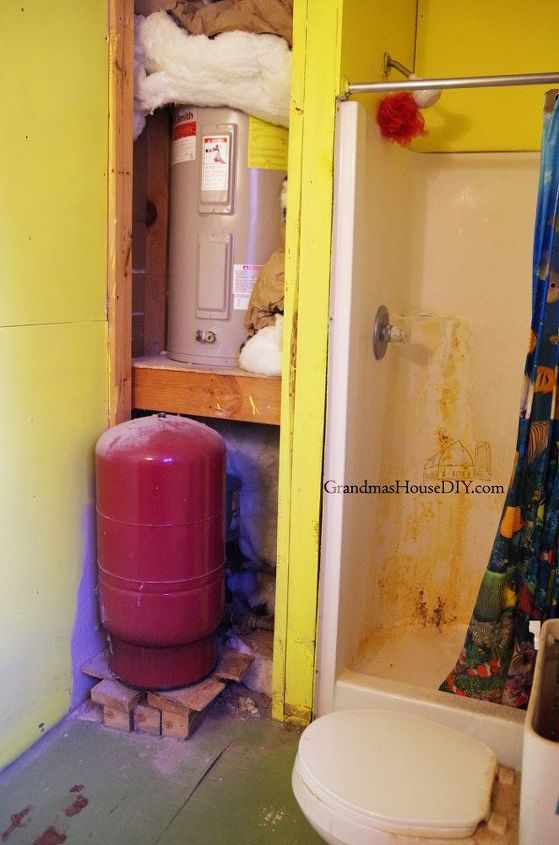
From there I spent nearly a whole day getting all of the water lines (that were run outside the walls along the ceiling) covered with trim/a soffit. I also built a door (out of 2x4s and leftover beadboard) and put it on the “water closet” to finally hide the water heater. Of course whoever put all of it in didn’t account for the size of the pressure tank so I had to build a removable “shelf” to cover that ugliness up too. I thought I was finally in the clear until we installed the toilet and turned the valve on and (of course) it leaked. Arghhhhghgh. So then I replaced that valve too… On top of all of that the walls were this weird shiny bathroom plywood that was very thin and I honestly just said “forget it” and gave them the same sheet rock mud treatment I did on all of the sheet rock. Rather weird but it has totally grown on me. Again, we’re calling it “character” :)
I had given myself ten full days to get this house done or, at least, that was the amount I took off from my day job to get MOST of it done. After those ten days it was a waiting game for the lower kitchen cabinets and bathroom vanity. I would guess it was probably another total five days all together after that as there were a few afternoons I took to putter around, touch up etc. Not to mention time spent tinkering here and there on the weekends too.
It feels (and smells!) so clean and nice now, it also feels so much bigger it is almost hard to believe! And, of course, my favorite thing is that it is still the little house, we didn’t cover the 60 year old wood floors because they weren’t “perfect” instead we let them shine. And that’s true of a lot of things here. This old place was built by my grandpa and I was able to bring in my grandma’s old kitchen light and a whole bunch of wood from his old barn, anything less and it just wouldn’t have been right.
To get links for all of the products I used here and to see in depth tutorials on how I did the Mahogany Plywood Counter tops and Styrofoam ceiling tiles go and check out my blog at: http://www.grandmashousediy.com

Comments
Join the conversation
-
Beautiful !!!
-
Wow, this gives me hope for my place! What a wonderful transformation!


Frequently asked questions
Have a question about this project?
How did you put down the mahogeny plywood for the counters
Bathroom door. Could you use a barn door type door? Just a thought.
HOW did you get that shower clean! Impressive.