Double Tiered Lazy Susan Made With Old Microwave Turntables.

Nadine Hartman Bourne
by Nadine Hartman Bourne
11 Materials
$56
4 Days
Medium
I needed space on my kitchen counter so I used a couple of old microwave plates, some DVD's, glue, grout and resin to seal the whole thing.
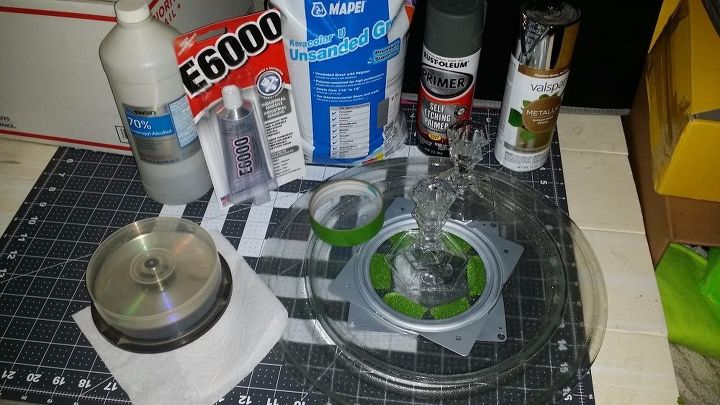
Items needed for this project: 2 old microwave turntables, a lazy Susan spinner, DVD's, a pair of candle sticks, grout, primer and spray paint, glue, alcohol and paper towels, tape. Later I decided I also needed resin.
Just a little tip. Use a cotton swab and a glob of petroleum jelly and swab the threads of the glue tube. The cap will never get stuck again. I used this stuff over the course of 4 or 5 days and never had an issue getting the cap off.
First step wipe everything that gets glue with a paper towel that has been wet with alcohol. This ensures no grease or dirt and is supposed to help glue stick better. Now find the center of the plate. Put the E6000 glue on the 4 corners of the lazy Susan spinner and glue it on the bottom side of the microwave turn table. The green tape is on the top side it is where my candlestick will go later.
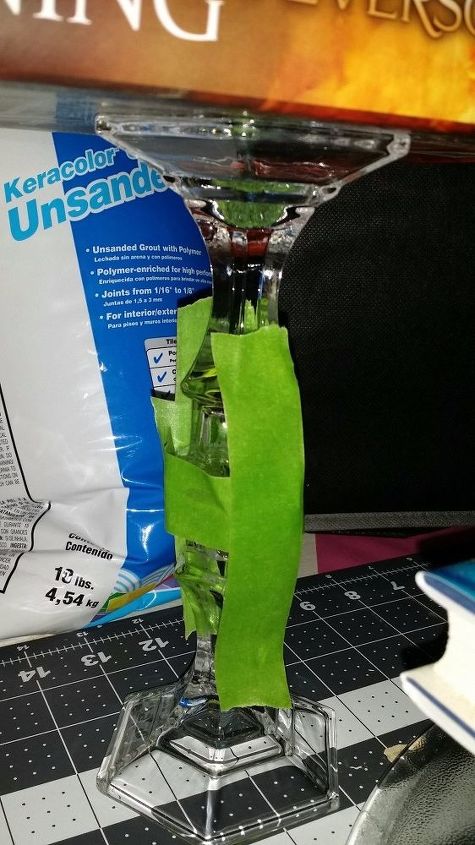
Put E6000 Glue on the candle holder ends of the candlesticks again wipe that area with alcohol first. Use the painters tape to hold it together.
I weighted them with books. Carefully balance them on the candlesticks so they don't slip apart. The stack of books in the front is holding the lazy Susan spinner to the plate.
Once the glue has dried, tape the fat ends so they don't get paint stuck to them this area will get glued to the plates later. I sprayed 2 coats of primer. I did this outside on a breezy day so I used a large box to shield it. Another tip, check your paint cans before you leave the store. Pop off the cap and make sure the spray nozzle is there. My primer was missing it and I used one from a different can that was slightly too big and primer splattered everywhere I wasted quite a bit, but I am 10 miles from town and really didn't want to go back in the heat so I made do.
Once the primer is dry spray 2 coats of the chrome spray paint. I really wanted Looking glass paint but Lowe's didn't have any so I settled for chrome. You can use any color you want. I just couldn't leave them clear as I would see my counter top through the center had I left it plain.
Once the glue and paint is dry. I waited a day in between steps as I had other projects to do. But you could wait the drying time and move on to the next step. Flip the plate so the right side is up and glue the candlestick post to the center. and weigh it down. Once I was satisfied with placement I pealed off the tape.
cut up a bunch of DVD's or CD's in to random shapes. I have seen posts where people just broke them, I tried that but all they did was bend, so I used kitchen sheers. I think I used about 10 DVD's
using a Popsicle stick I spread the E6000 glue and placed the DVD pieces. You have to work fairly fast in smallish areas so you have time to fit the pieces, once in a while a piece would get stuck and I'd have to cut a piece to fit because the glued piece wouldn't move the glue had set. It's 80 degrees in my house. icon
This is the smaller top plate all the pieces are glued in. See that spot on the bottom right that got glue globed on. Wait for it to dry and then with some tweezers you can pick it off, it is stretchy like rubber cement. I let this dry overnight.
Next up mix your grout according to the directions on the package. I used a kitchen silicone spatula to spread it like icing on a cake. I then let it dry about 10 minutes and scraped off the excess. after it has dried about 20 to 30 min (again refer to the package) with a damp cloth I wiped off the excess grout. Here is where I discovered a lot of the DVD layers had separated. None of the tutorials had mentioned this. I don't know if this was because they were the kind you put in the computer and burn info to instead of the ready to watch kind. So I decided to glue the bits that popped off back on, and do a coat of resin. I could have just popped off all of the layers and had a mirror like look but I liked them purple.
This is the box of resin I used. It can be purchased at Lowe's or Home Depot, but after checking the price it was about $2 cheaper buying it at Michaels craft store and using a 40% off coupon. Here you can see the dried grout is a light gray. After the resin it is a dark gray. I am fine with that.
This is after the resin pour. Just read the directions on the label of the brand you buy. Mine was a two pour kind of thing. I used 2 ounces resin and 2 ounces hardener in an old clean sour cream container. Stirred for 2 minutes, poured into another clean container then stirred 1 minute more. Pour onto plate I didn't want a very thick lager so I poured it then picked up the plate and tilted it to get the resin to evenly cover. Then place on a level surface, wait 10 minutes then with a lighter or butane torch lightly hover over the surface to pop the bubbles. You can just exhale on the bubbles and they will pop but I didn't want to hyperventilate there were A LOT of bubbles. I kept checking every 10 minutes and continued to pop bubbles. After about 30 minutes it was starting to thicken up and would leave a hole where the bubble was. I didn't know if it would fill in so I just held the lighter there for a second and it seemed to melt and fill in. Let dry my package said 6 to 8 hours to set 72 hours for hard cure. I put this out in the garage on the chest freezer. It was drier out there than in my house. Our only cooling system is an evaporative cooler and that makes inside quite humid. They call it a swamp cooler for a reason, it makes you feel like you live in the swamp but it does lower the temperature about 10 degrees if you don't mind the moisture.
Find the center on the top plate, squeeze on some E6000 glue. Don't forget to wipe the surfaces with alcohol. I weighted it down with books overnight and here it is all done. Now place it where you need it, for me that's the kitchen counter. All my kids medicine will go on the bottom and the top will hold stuff like the coffee grounds container and stirring spoons etc.
Total cost was about $56 that is if you need everything on the list, things most people have on hand like paper towels and alcohol I didn't include in the list. If I hadn't needed the resin it would have been cheaper. My resin kit was a 32 oz kit. I used 4 ounces so I have plenty more for the original reason that I bought it months ago. I only needed about a quarter cup of grout (If that) so there is plenty more for another use. I will be using that when I do my kitchen back splash with some tiles I am making with alcohol inks. There is plenty of primer and spray paint to use on something else. I did however use about 95% of the E6000 glue. Carrying in the pieces after the resin dried the metal Susan part fell off. I glued it back on if it falls off again a friend suggested using an epoxy.
This is my first time doing a write up on how to make something... How'd I do?
Resources for this project:
See all materials
Any price and availability information displayed on [relevant Amazon Site(s), as applicable] at the time of purchase will apply to the purchase of this product.
Hometalk may collect a small share of sales from the links on this page.More info
Frequently asked questions
Have a question about this project?
3 of 9 questions
  • Me66 Me66 on Nov 19, 2018

    I have never used e6000 to glue glass to glass. I was wondering how sturdy the candle sticks are glued together like that. I would hate for the whole thing to come crashing down. Very pretty project.

  • Rhe49175176 Rhe49175176 on Aug 29, 2023

    Do you have to use the resin? Could you use resin instead of the grout? Just curious if both are needed. I love it. Going to check to see if we have the dvds.

  • Sherrill Sherrill on Sep 19, 2023

    Beautiful! And to the person who wondered about E6000 glue- it’s very sturdy !!
Comments
Join the conversation
3 of 133 comments
  • Kat Rogers Kat Rogers on Feb 13, 2019

    Excellent Job & Fabulous, BEAUTIFUL Idea~ I Love The 🌈Colors On The CDs! I wonder if 2 glass serving platters, particularly for the top piece, would adhere better due to its possible lighter weight.


    In any case, I think it's time to go to a local thrift store~ I could certainly use That Pretty Kind Of Organization!


    Thanks for sharing!

    🐈

    • Nadine Hartman Bourne Nadine Hartman Bourne on Jun 07, 2019

      Sorry it took so long for me to get to you. Hometalk has stopped giving me notifications. I popped on to find this post because I just picked up more plates at the thrift store and a friend asked what I was doing so I wanted to show her this post. You could try platters. The top one isn't very heavy being that it is small.

  • Terry Terry on Jan 21, 2024

    This is gorgeous! And your instructions are precise and clear. I love that you also included the problems you encountered and how you resolved them. Great job! I have several old microwave plates, a couple of them quite large. I have used them as serving platters during the holidays and other gatherings. Even used them for wedding receptions when I had my wedding business. To make them rotate I simply placed a glass plate underneath and filled it with marbles. Don’t remember who told me about that trick but it works very well to make a lazy Susan. I’ve also used it with old cake pans that I painted and made into a two-tier lazy Susan for my perfumes. Looks very pretty on my dresser. I am definitely going to give your project a try with a couple of my smaller microwave plates. Since purple is my favorite color I hope mine will turn out as nicely as yours did. Thanks for the inspiration!

Next