


The Sights and Sounds of Paradise: My Tropical Tiki Fountain

by
Megan
10 Materials
$50
3 Days
Medium
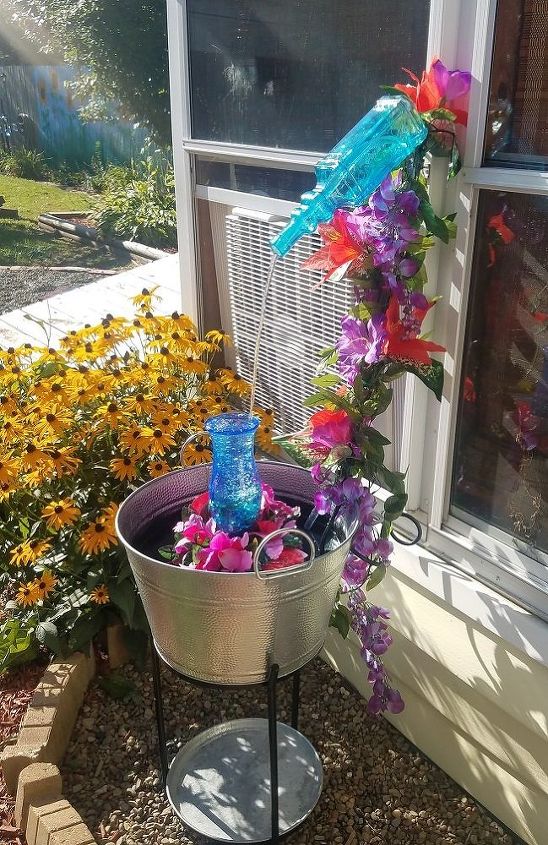
Elegant wine bottle fountains are very popular right now, and very expensive. I am more of a tropical, frozen drink with an umbrella kind of a girl, so I decided to DIY a fountain with a Tropical Tiki twist!
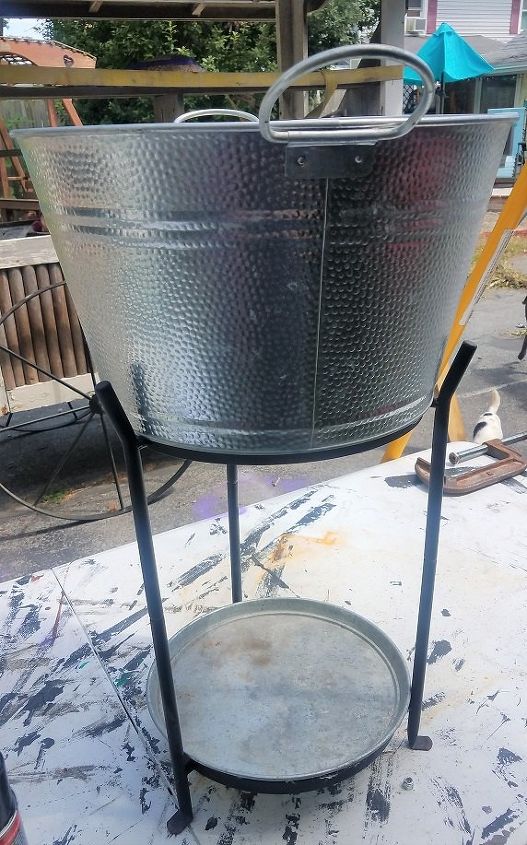
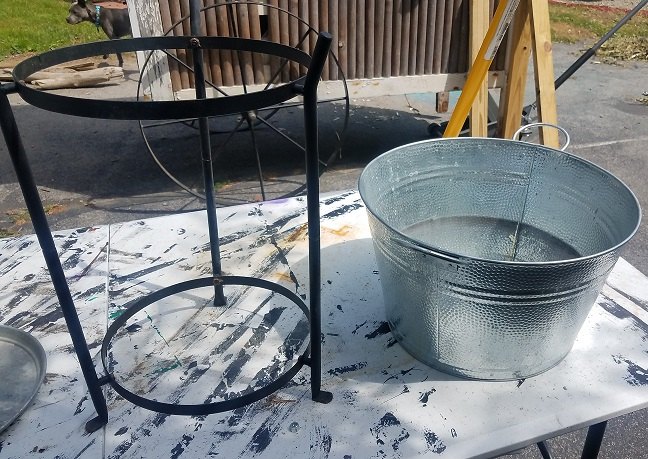
I had this beverage tub/cooler sitting around in our hot tub room for years, and we rarely used it, so I thought we might be able to repurpose it for this fountain. You can use anything that holds water for a fountain really. The base needed to be Gorilla Glued together because it tended to get a little wobbly, and it needed to be repainted a nice flat black to cover the years of aging. I also coated the inside with flex seal spray to insure better waterproofing, and to help hide the black pump. I know this base will not last forever because it is aluminum, but this will prolong its life.
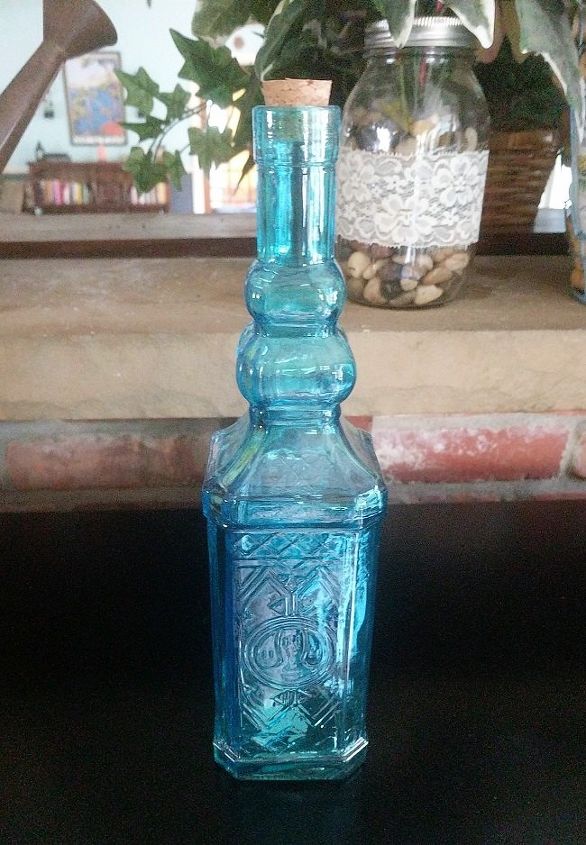
Next, I chose my bottle. I wanted something colorful. I could have chosen a wine bottle (and probably gotten one out of my recycle bin for free!) but I wanted something more colorful and more interestingly shaped. I got this bottle at the craft store, but wouldn’t you know, I saw it the very next week at the Dollar Tree! So keep your eyes peeled, you can find them in the strangest places…
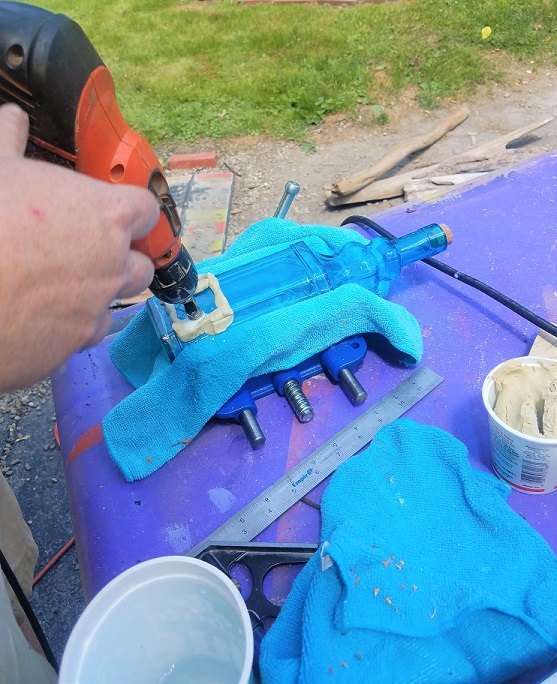
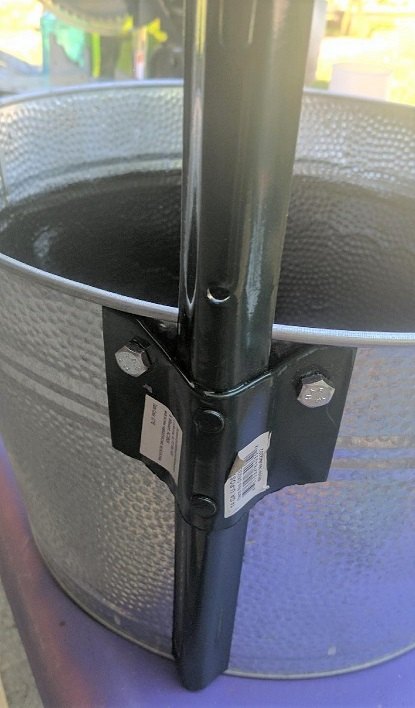
Here came the hardest part. Super Hubby (his real name is Brian, and I have to give him dual billing on this one… he did a lot of the hard work) had to learn how to drill a hole in a bottle. We thought this would be a long process filled with lots of broken glass. But we found a good online tutorial, and followed the instructions, practiced a few times, and he got it down pretty well. You just need the right tools and patience. The right tools being a vice, a diamond bit hole saw bit, plumber putty, and water. The patience you have to find on your own. Drill the hole a little off center of where the bottom of your bottle will be. A bracket will be holding your bottle at the bottom, and a tube will have to be fed through the hole, so you don’t want the bracket to block the hole.
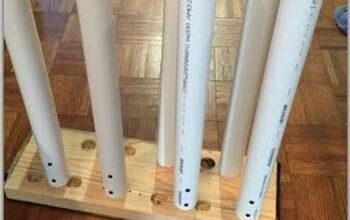
To suspend the bottle above the water bin, we used a garden stake normally used to put garden fencing up. It has a nice groove for the tubing to go up, and it is easily hidden by the greenery. It also has a flat tab where we drilled holes to attach it to the bin. In case it isn’t apparent at first thought (I almost made this silly mistake) Attach it above where your water line will be or you will have a leak! Bolt the stake to the bin to secure it. We had to hacksaw it to make it shorter, but that all depends on your water receptacle.
To secure the bottle to the stake, first you have to glue a bracket to the bottle.
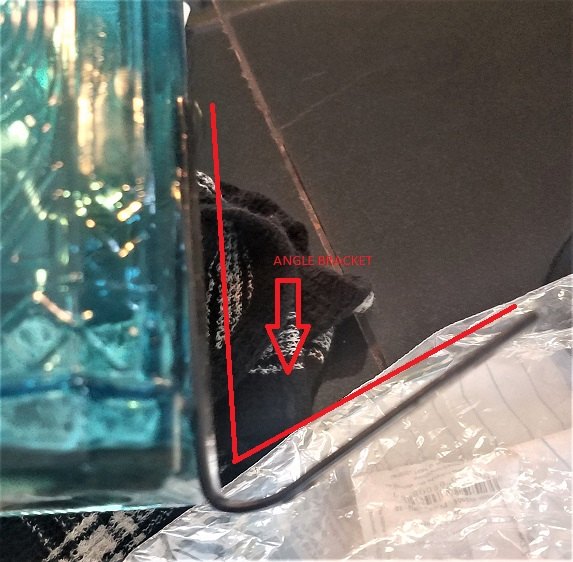
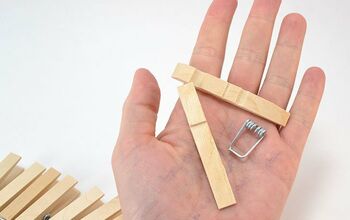
We had a square bottle, so a regular angle bracket worked. For a round bottle, you would need to use something with a curve, like landscape edging stakes [**see picture below**] (which would have to be cut down with a hacksaw and a hole drilled to be attached to the upright). Whichever method you choose, you will have to bend it using a vice, tools of your choosing (whatever works for you) and some brute strength (Super Hubby’s Superpower). Be sure to bend it to a sharp enough angle that your bottle ‘pours’ into roughly the center of your water receptacle. Once the bracket is bent, glue it to the bottle with clear Gorilla Glue. Don’t skimp on this step. Give it the time it needs to really cure and form a good bond. One it does, it will be set strong.
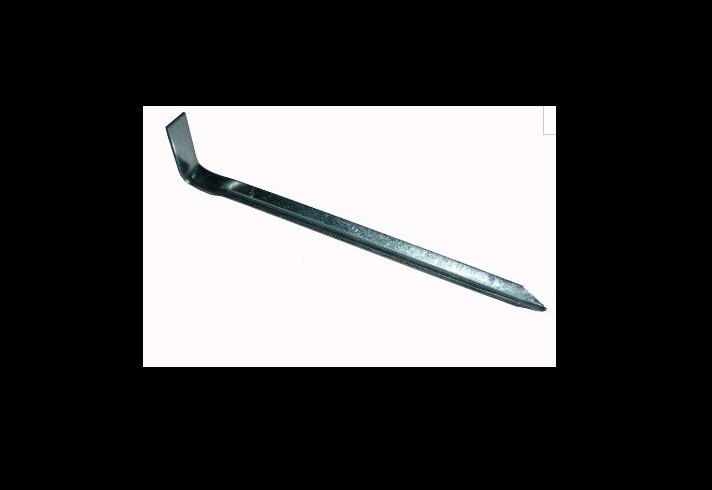
**This would be better for a round bottle. It is a landscape edging stake and it has a curve to it. it would need to be hack-sawed shorter and a hole drilled into the short end to be secured to the upright stake.**
First, attach your bottle bracket to the upright on the water receptacle. Again, make sure the bracket is bent to a steep enough degree. You can still bend it once it is glued, but you have to be VERY VERY Careful!!
Next, install your pump. Buy a pump and coordinating amount of tubing that will pump at least 2 feet vertical (for this particular application). You can, of course, make adjustments to the materials you use for this, and make a much taller fountain. In that case, adjust what type of pump you purchase
Before you do any of the fun crafty stuff, hook up the pump and make sure it all works as planned. . I ran the tube up the stake, securing it with green zipties, and into the bottle through the drilled hole, out to the lip of the bottle. Depending on how you want it to pour, you can run the tube just into the bottle or all the way out to the end like I did.
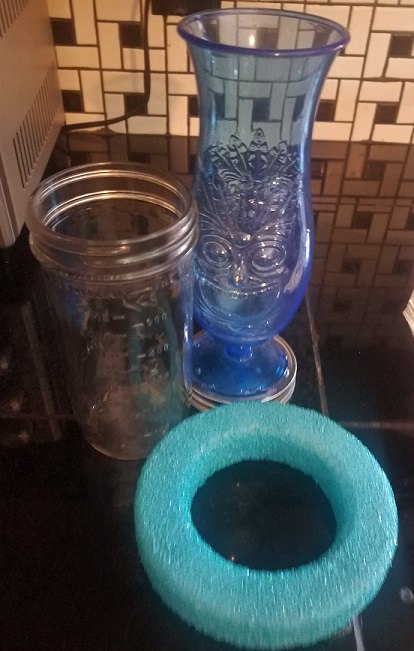
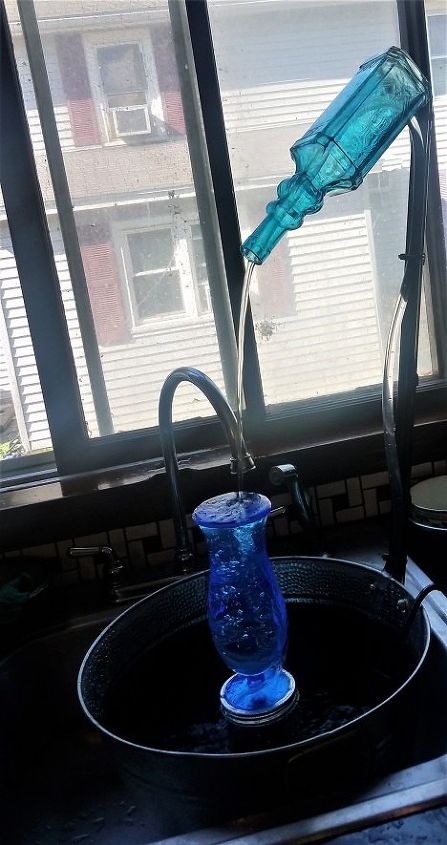
Now, for what the bottle will be pouring into…. You can have it pour into anything you want here… a bowl, a wine glass, right into the water itself… I chose a hurricane glass with a tiki face on it. I happen to have it on hand in our hot tub room. It is plastic but you can use glass too. The trick here is getting your glass high enough to sit out of the water. I measured where my water line was going to be. It was exactly 7”, so I purchased a tall mason jar that was exactly 7” (I lucked out there!) and filled it with glass marbles from the Dollar Store.
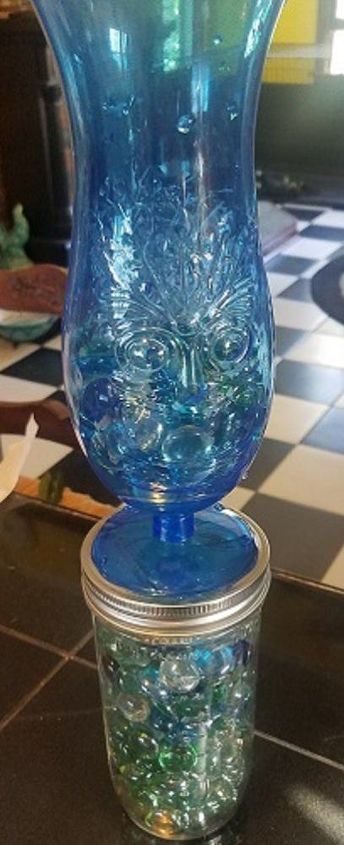
I glued my glass (Again, clear Gorilla Glue!!! Stuff is MAGIC) to the top of the mason jar. This way, if I ever want to change it, I only have to change the top of the jar. I tossed the extra glass marbles on the bottom of the fountain for extra color so it didn’t look like a bottomless pit.
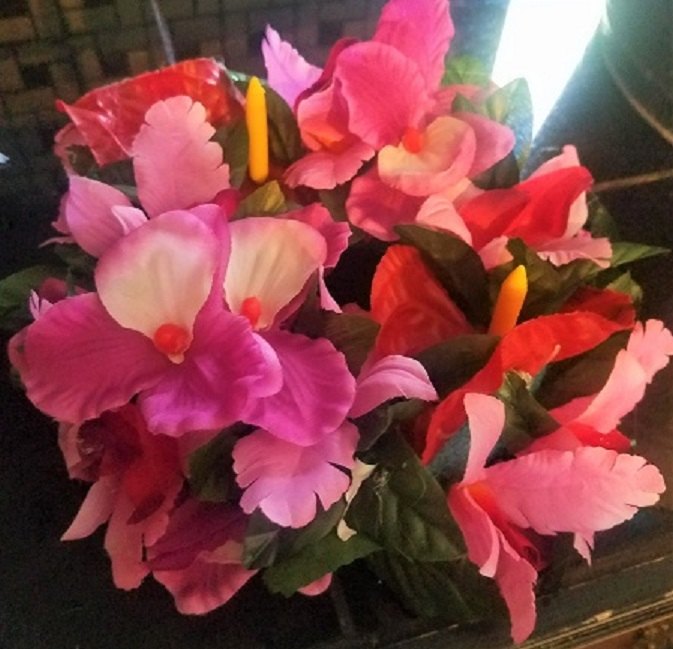
Lastly came the flowers. I bought some inexpensive swags with tropical feels at local dollar stores. I used the long swag and covered the upright, attaching it with more green zipties. I made a few very tropical bundles and tucked them here and there down the stake. Lastly, I made a wreath of tropical flowers on a round Styrofoam form (it floats!) that was painted the closest I had to green, and floated that around the base of the glass to fully conceal the mason jar under the water.
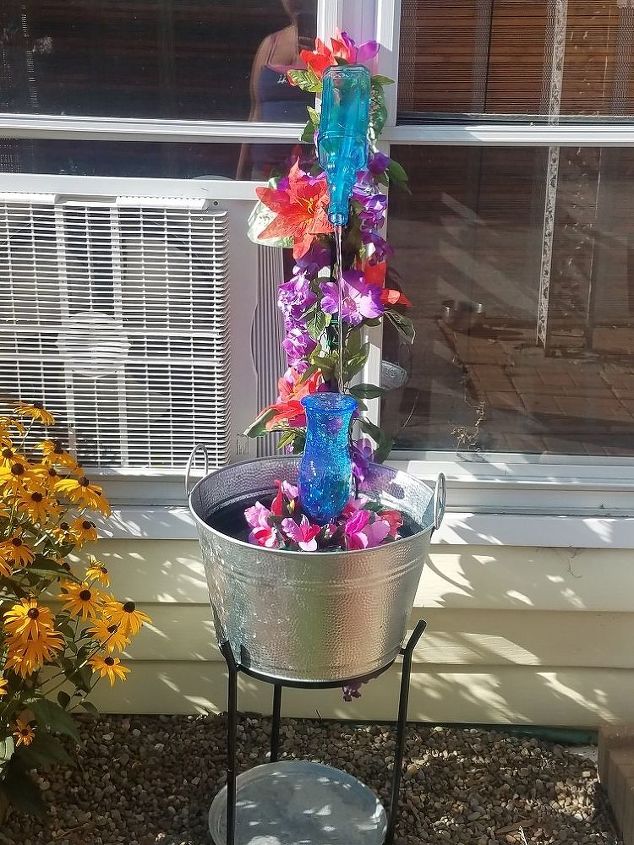
And here it is! My Tropical Tiki Fountain that sits right outside the Tiki Room in my house that holds my hot tub… It makes the most wonderful sound and brings a little bit of tropics to my back yard.
{
"id": "4148955",
"alt": "",
"title": "",
"video_link": "https://www.youtube.com/embed/Jcua8JhyEbI",
"youtube_video_id": "Jcua8JhyEbI"
}
{
"width": 634,
"height": 357,
"showRelated": true
}
Resources for this project:
See all materials


Any price and availability information displayed on [relevant Amazon Site(s), as applicable] at the time of purchase will apply to the purchase of this product.
Hometalk may collect a small share of sales from the links on this page.More info
Comments
Join the conversation
2 of 20 comments
-
How beautifully clever!
-
Love cute new ideas! Love this one.


Frequently asked questions
Have a question about this project?
Congratulations on your Challenge win! What do you think made your challenge so exceptional? It is beautiful and inspirational! 😇
I love this idea. I did something like that using a watering can and tub. Only thing u forgot to mention is that u also need a water pump. Is that the same as your garden stake?


What was the site you said
""found a good online tutorial, and followed the instructions, practiced a few times, and he got it down pretty well.""
I love the fountain!!