


A Great Day for an Artistic Experiment
6 Hours
Easy
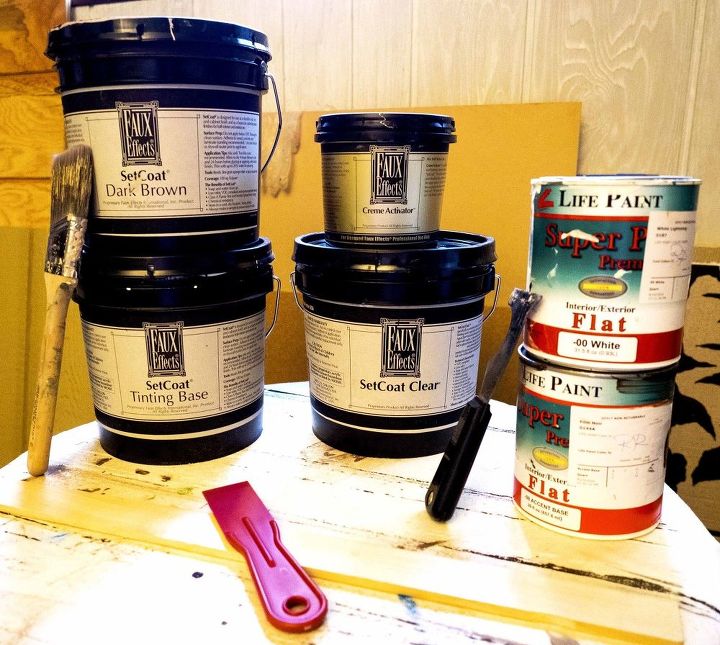
When the sun’s shining and fresh air is blowing through the studio, for some reason this makes me want to experiment. Sitting on the shelf is a little container that I’ve never opened. It’s a gold label product from Faux Effects® called Creme Activator™. In a nutshell... this product is supposed to make things easy for me to paint multiple colors and scrape, peel and distress for an old, worn look. Sounds sweet!
Don't forget to check out our Finish Gallery for inspiration http://www.nluvstudio.com/the-gallery-finishes-designs-furniture-and-more/the-finish-gallery/
And sign up for The nluv Memos to get up-to-date project ideas happening right in our studio http://www.nluvstudio.com/nluv-memos-blog-jaime-pirozzi/
Experimenting is fun! Try, learn and create.
What about the rules? The official description from Faux Effects® is that this product is designed to be used with a specific paint called SetCoat™. Of course companies want you to use their products, but what happens if I don’t have any SetCoat™ to use? Does that mean Creme Activator™ won’t work as described and I can’t use it? A lot of product companies are very serious about testing, science and formulas so when they say a product will only work as described, they really mean it! That’s where curiosity struck me and it was time to set up an artistic experiment. Who doesn’t have random buckets of paint laying around? I sure do! I always seem to accumulate so many paint cans! My studio has several buckets of SetCoat™ and over 15 random colors & sizes of latex paint. Sounds like the perfect time to experiment… artistic experiment, that is! The artistic experiment setup No beakers or Bunsen burners. Just wood planks, paint and my Creme Activator™. Let’s not over-complicate this and make things confusing.

This is the product of our experiment. Trying out Faux Effects® Creme Activator™ with & without the rules!
Three scenarios will do it and cover all the variations. And to help speed up the process, gather all your tools and supplies so everything is ready and within reach. No rules here. Latex paint only & Creme Activator™ Sort of follow the rules. Latex paint with a coat of Set Coat™ Clear & Creme Activator™ Follow the rules. Set Coat™ paint & Creme Activator™ You'll need the following supplies & tools: Set Coat™ in two colors (or custom mix them)Set Coat™ Clear Latex paint in two colors Paint brushes Scrap wood boards Creme Activator™ Various scraping tools made of wood, plastic and metal Create Board 1 No rules here rocks!
Gather all your tools and supplies to stay organized!
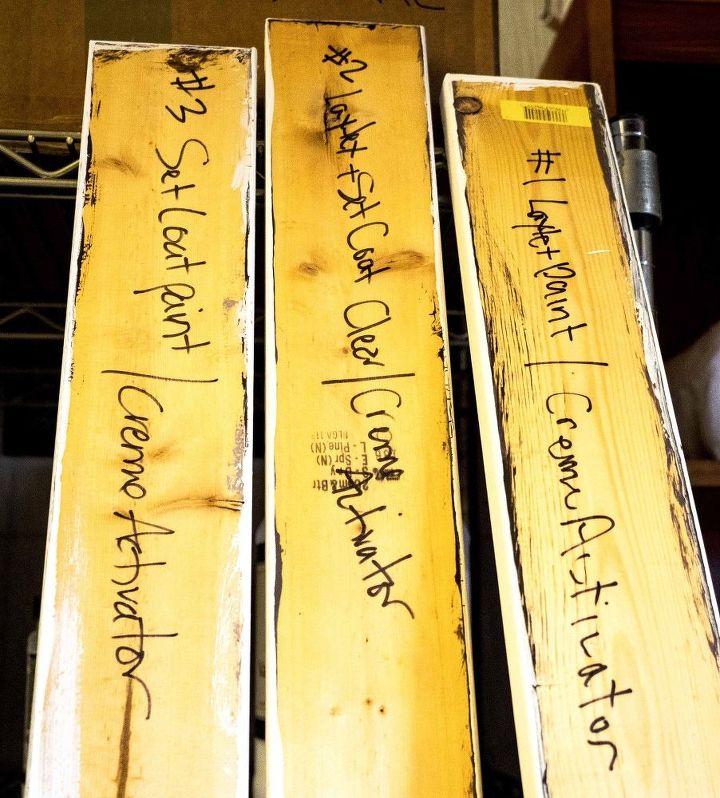
Three scenarios will cover all options and don't forget to number your boards! Don't get them mixed up in the end.
Not following the rules is so easy! This board is simple and takes the shortest time to complete as it has the fewest layers. Paint the wood board with one color of latex paint. Let dry. Apply Creme Activator™ and let dry until dull in appearance (30+ min.) Paint second color of latex paint. Set board aside. Create Board 2 Sort of following the rules has the most steps and takes the longest. With more layers and drying time, you may want to start this one first or do at the same time as the others. Paint the wood board with one color of latex paint. Let dry. Paint one coat of Set Coat™ Clear. This is a clear paint that creates a suitable surface over latex paint for many faux finish techniques. It is a great product to have in your studio. My thought is that if I don’t use the right Set Coat™ paint and substitute latex, if I at least coat with Set Coat™ Clear, maybe the results will be the same as if I used all Set Coat™ products. We’ll have to wait till the end to see if this is true. Let fully dry, at least 2 hrs. Apply Creme Activator™ and let dry until dull in appearance (30+ min.) Paint second color of latex paint. Let dry. Paint another coat of Set Coat™ Clear over this second color of latex paint. Let fully dry, at least 2 hrs. Set board aside. Create Board 3 Ironically, following the rules is also as easy a process as not following the rules! Maybe rules aren’t so bad. Paint the wood board with one color of Set Coat™. Let dry.Apply Creme Activator™ and let dry until dull in appearance (30+ min.) Paint second color of Set Coat™. Set board aside. Scraping time!
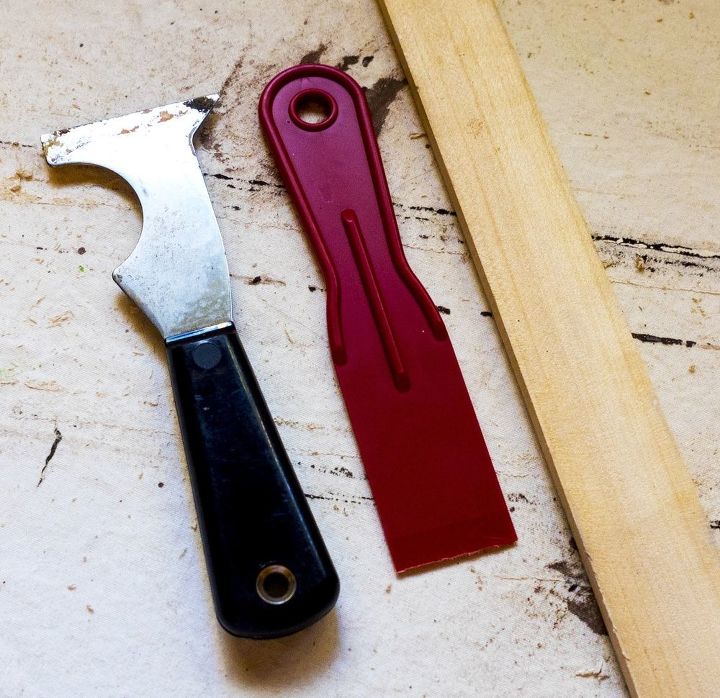
Metal, plastic and wood are good tool choices for scraping.
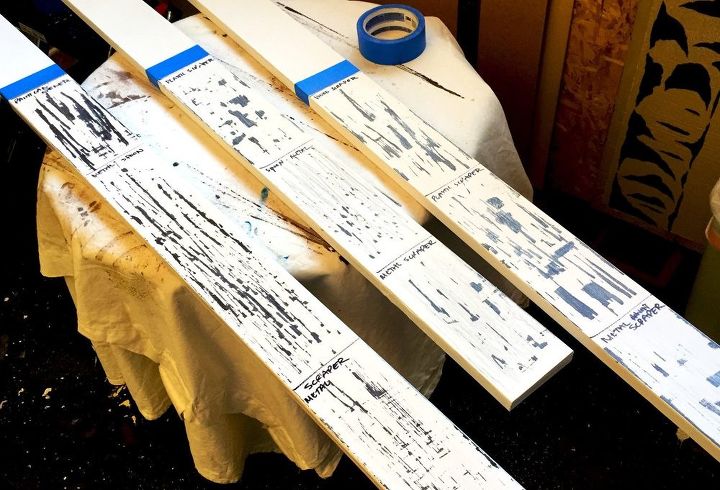
Now is the fun part and what all the setup is for. It’s scraping time! When distressing/scraping paint, you can use plastic items like spoons and putty knives as well as wood stir sticks and metal tools. I wanted to try all three variations to see the effect it left on the samples. Keep track of what tool you use in what section of the board. I used a marker to draw lines on the boards and write the tool type so I didn’t forget. I also write on the back of the boards which # they are since they look alike after painting! Don’t mix up your samples! For my scraping exercise, I used a plastic putty knife, metal paint can scraper/opener combo tool and a thick wood stir stick. To me, it’s always a good experiment when I’m surprised by the results and my little artistic experiment didn’t disappoint! All three sample boards were able to be scraped and paint layers removed. All types of scraping tools worked regardless if plastic, wood or metal.
If I stopped here, you would say my experiment proved that any paint can be used with Creme Activator™ to create a distressed painted look. But, I am not making that claim yet. It’s the details of this artistic experiment that are most important. Let’s review each of the sample results. Read carefully as we are detailing in reverse order, discussing Board #3 first.

Sample Board #3 result
Board 3 - Using all Faux Effects® products produced the cleanest and clearest results, hands down. What I mean is that when the paint is scraped, the underneath color scrapes clean with no residue from the upper color layer. You see the pure color of both paints with no traces of the other. All tools scraped fast and left no drag or burning coloration marks.

Sample Board #2 result
Board 2 - Trying to mimic using all Faux Effects® products by applying Set Coat™ Clear over the latex paint didn’t quite live up to the same standards. While all the tool types scraped the paint, it is harder to get the paint off so more pressure is needed. The metal tools left metallic drag marks which is very noticeable on lighter color finishes. Also, when the paint is scraped, there is a residue of the top color on the underlying color for a murky look. You can see the dark brown base color is milky as the top cream color seems to have transferred in the scraping motion.

Sample Board #1 result
Board 1 - The results are similar to Board 2’s with only a couple differences. The paint is easier to scrape using only the latex paint and the metal drag marks are not as pronounced. If you are very careful with your scraping, you can actually avoid most all metal drag marks when scraping. The color is still not as clear and bright as in Board 3 but does look to scrape a little cleaner than Board 2.
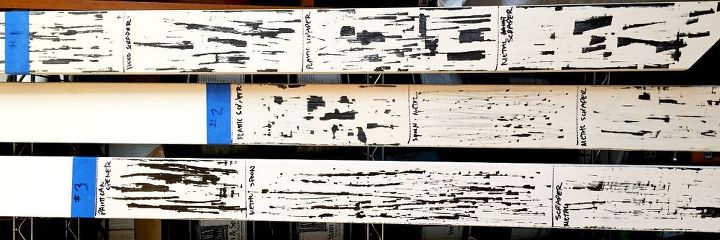
All boards side-by-side. Board #3 is the winner, with Board #1 in a close 2nd place!
CONCLUSION: I know deep down we all want to be rebels and break the rules, but I can’t argue with results in front of me. My takeaway is that the best results are to follow the instructions and use Set Coat™ paint with Creme Activator™. It was the shortest time frame, easiest to scrape, all tools worked with no drag/burn marks and the colors stayed pure and clean. I can’t argue with this outcome. But, on the flip side, if I don’t have the Set Coat™ paint I need and want to create a distressed, scraped paint look, I will follow Board 1 and break all the rules! Latex paint only with Creme Activator™ is a close second in results and much better than the Sort of following the rules option in Board 2. And, if your paint colors were light enough, you may not even notice the murky or cloudy look between the colors like my samples show with dark brown against cream. To sum it up in one sentence – First place goes to Board 3, so follow the rules… but if you can’t, then break them all with Board 1 for the next best result! Happy experimenting.

Want more details about this and other DIY projects? Check out my blog post!
Comments
Join the conversation
5 comments
-
LOL, so glad you tried this. That's good to know. Thank you
- See 1 previous
-
All really terrific information!! I love experimenting... lol Thank you!


Frequently asked questions
Have a question about this project?