


How to Remove Upholstered Walls: Dining Room Renovation
Interested in learning more about upholstered walls? Whether you have them now or want to DIY it, wait until you see what NOT TO DO when upholstering walls.
This post is Part 1 of our dining room renovation where I’m sharing everything you need to know about upholstered walls, how to remove them, and a safety tip you need to know.
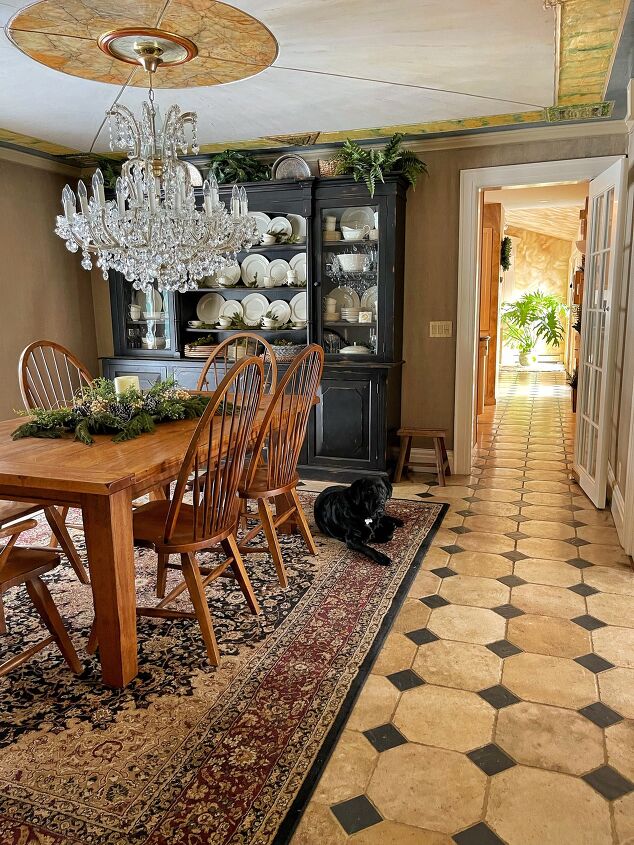
Dining Room Renovation – The Big Picture
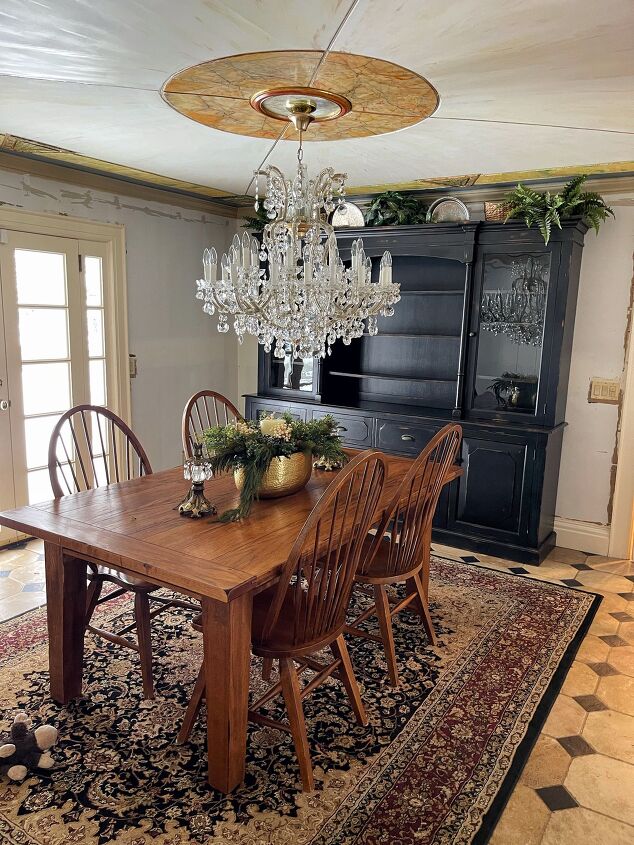
We just moved to this incredible 1850 farmhouse that’s really beautiful but needs a little sprucing up.
There are lots of textured walls and ceilings, faux finishes, and would you believe…upholstered walls.
I’ve heard that upholstered walls are back in style.
Have you heard that too?
Whether they are trending or not, they needed to go.
The upholstered walls were a dark beige and look a little dingy.
So getting rid of the padded fabric walls is the first thing we are tackled to renovate the dining room.
Aside from removing the upholstered walls, the ceiling has a heavily textured faux finish that is very distracting.
So we plan to tone that down too with a few coats of paint.
There’s a gorgeous chandelier that I love and want to keep.
So whatever we do, I want to highlight that chandelier and accent my china cabinet hutch.
We love the travertine tile floor too, so that’s staying.
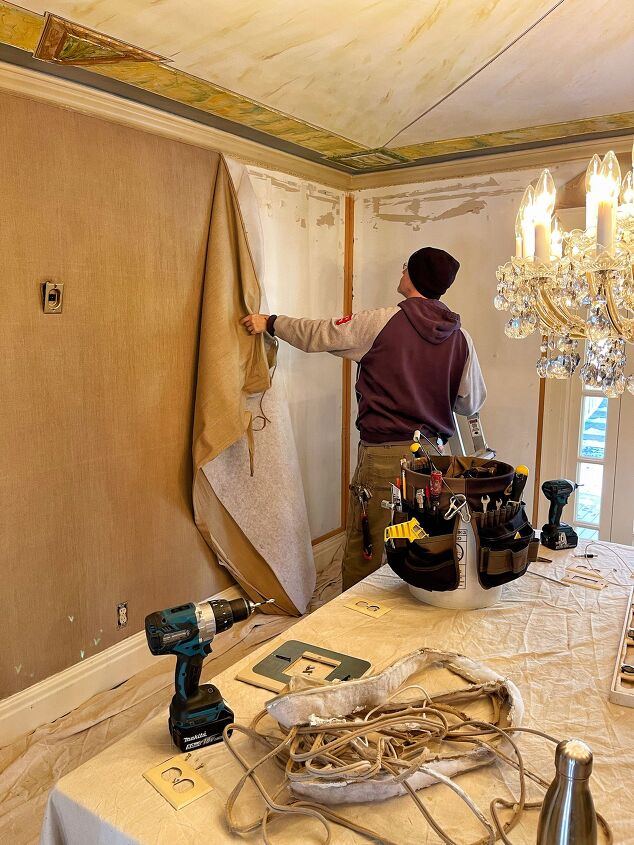
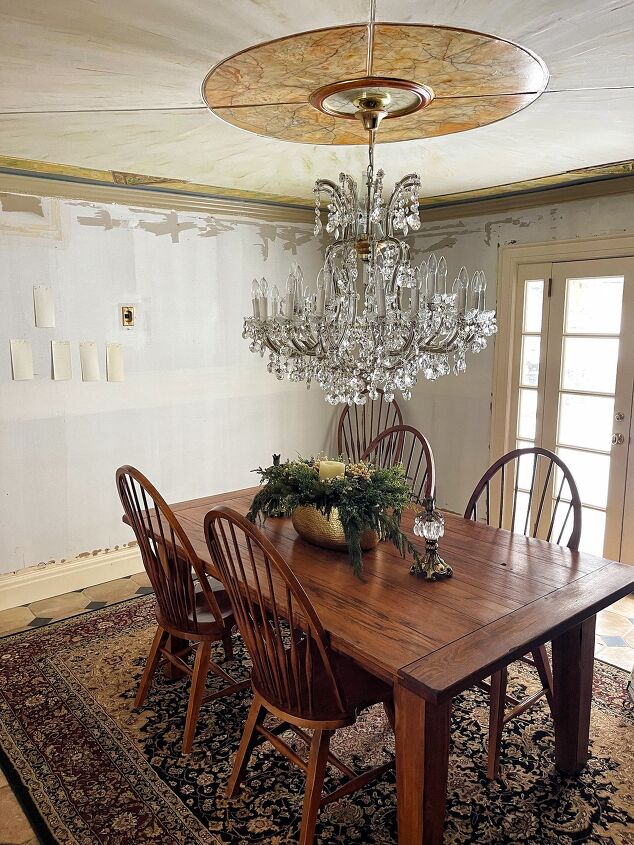
Last week, we kicked off the dining room renovation by removing the upholstered walls.
While taking it all down, we learned something that you absolutely NEED TO KNOW if you plan to go with the trends and upholster your walls.
Wait until you see how scary this is!
How Do You Upholster a Wall?
There are 2 ways to upholster walls.
The first method uses a tacking and batting method to create a padded, upholstered look.
And the second method does a little less damage to the walls because it uses everyday laundry starch to apply the fabric.
So it goes up similar to wallpaper.
The upholstered walls that we removed here were installed using the tacking and batting method.
What’s the Easiest Way to Upholster Walls?
After removing the tacked method, I recommend going with the starch method if you want to get a textured or patterned look.
It is reversible and sounds easier to do without damaging walls.
And trust me when I tell you, there is significant damage done to the walls using the tacking and batting method.

How do You Starch Fabric to the Walls?
While I’ve never done this before, it sounds pretty simple and straightforward to do.
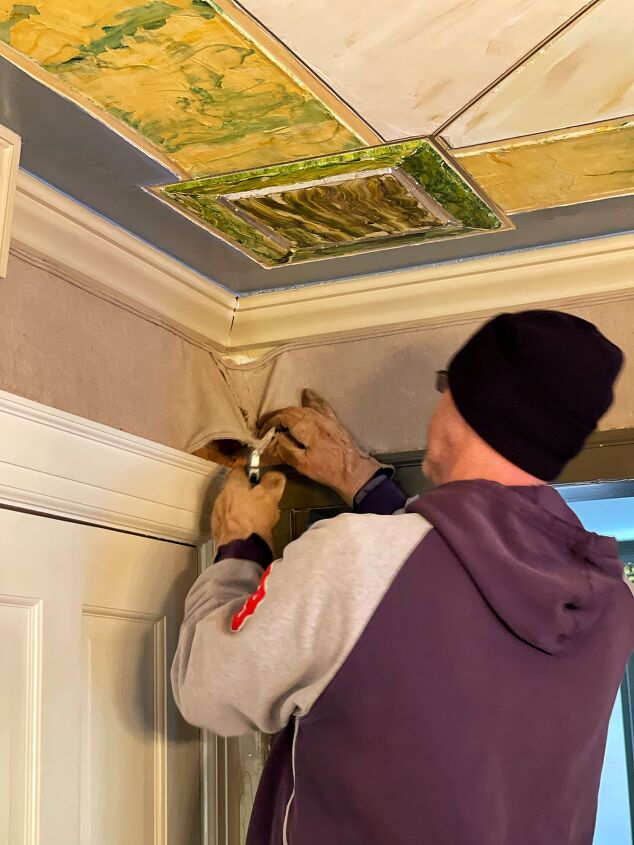
How to Remove Upholstered Walls With Tacking and Batting
It took us an entire weekend to remove these upholstered walls in a 12’x12′ room.
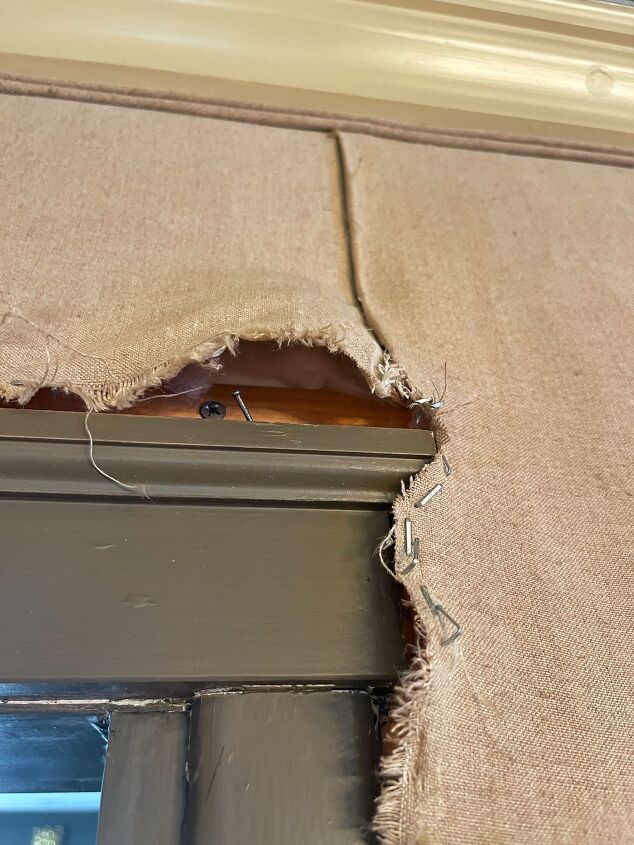
It was heavily stapled and the wood strips that helped anchor the batting and fabric to the walls were both hot glued and screwed in each of the corners as well as next to all of the door moldings.
Suffice it to say, the upholstered walls were securely attached and it took a lot of effort to remove them.
Supplies Needed
- Flathead screwdriver
- Thick gloves
- Protective eyewear
- Hammer
- Sharp razorblade
- Scraping tool
- Drill gun
- Drop cloth
- Garbage can
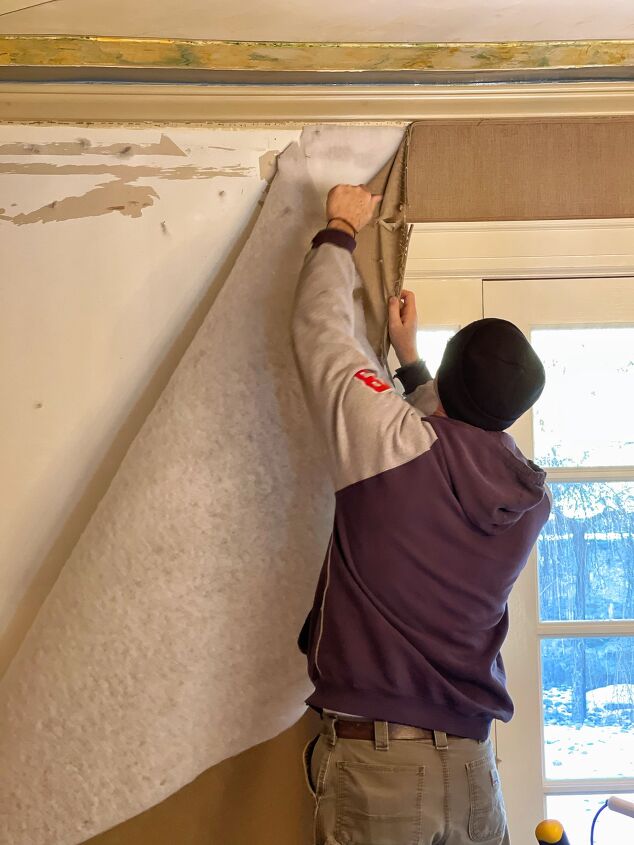
How to Remove the Fabric
- Wear gloves and protective eyewear before starting.
- Lay out a drop cloth to protect the floors and help collect the staples.
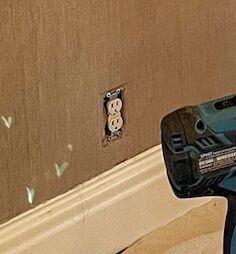
- Remove all of the switch plates and outlet covers.
- Pull open any easy areas or use a sharp razor blade to loosen and open it up.
- Then pull down the fabric using your weight behind it. At one point my husband was hanging on it to pull it down just to get it started.
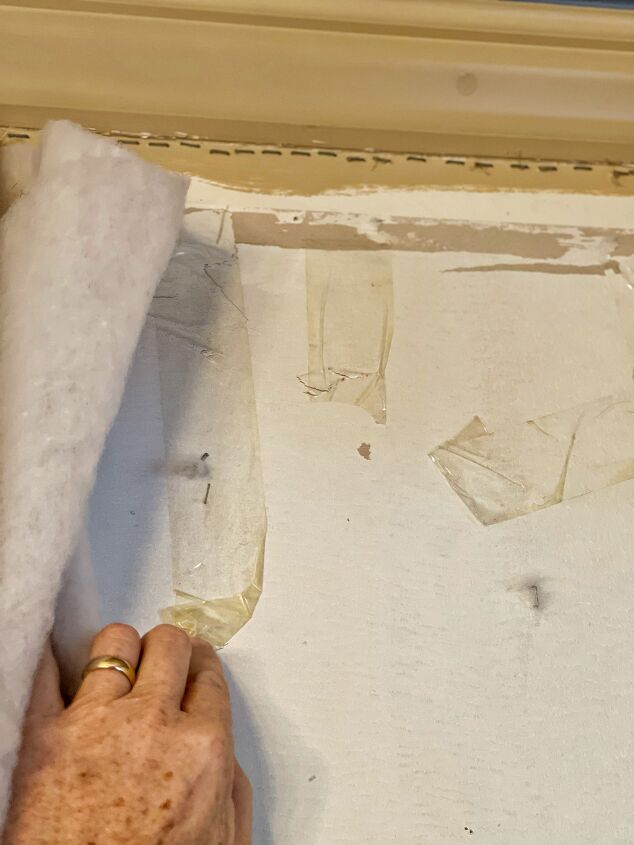
- Once the fabric is down on one wall, remove the batting beneath it.
- Using a drill gun, hammer and scraping tool to get underneath, remove the screws and wood slats from around the door moldings as carefully as you can to avoid damaging the wall. Some damage is inevitable if it is glued down.
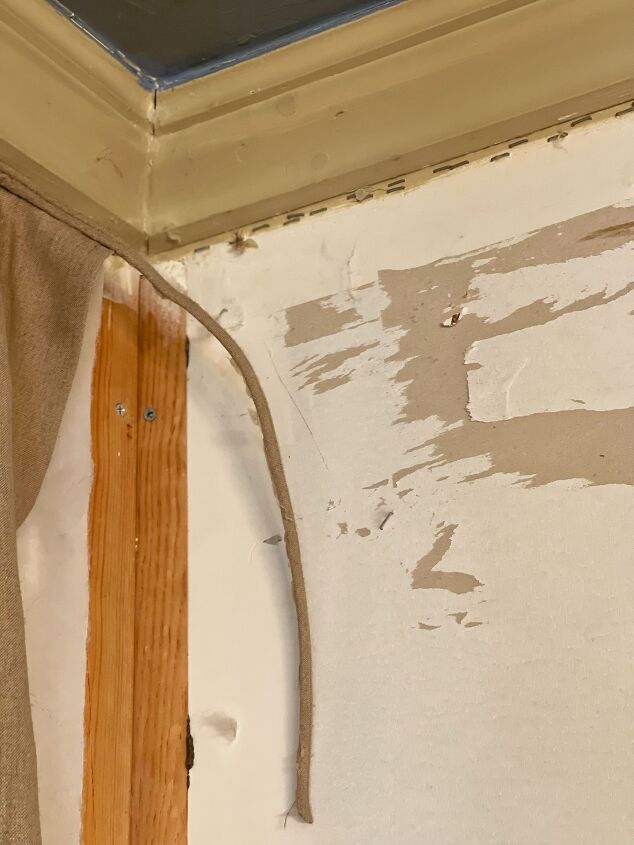
- Remove ALL of the staples. It was easiest using a flathead screwdriver.
- Collect debris in the garbage can.
Don’t Do This When You Install Upholstered Walls
When we removed the switch plates and outlet covers from the walls before removing the upholstery fabric and batting, we noticed that they were tucked into the outlet and switch plate boxes beneath the covers.
Thus, raw fabric and batting were directly next to the wiring in our 1850 farmhouse.
Not a good mix, right?
But that wasn’t even the worst part!
We took pieces of the fabric and batting to test whether they were flame resistant.
We learned they were not flame resistant at all.
Because both the fabric and the batting lit right up.
How dangerous is that?
So the batting and fabric were not flame resistant AND they were tucked into the switchplate and outlet covers next to the wiring.
Now I know this was not a DIY project that the prior homeowners did themselves, so a professional installed this.
And we were all very lucky that the house never burned down because that was a fire waiting to happen.
Therefore, if you plan to install padded upholstered walls in your home, make sure you are using flame-resistant fabric and batting.
And keep them away from the electrical wiring.
After removing padded upholstered walls from our dining room, I personally recommend not upholstering walls at all.
Trending or not.
The fabric was REALLY dusty and dirty when it came down and while it sounds really cool, I’m not a fan of this technique.
But if you really want to do it, please please please install it safely.
Keep all fabric away from electrical wiring, make sure it is flame resistant and consult with your local fire department about it how to safely install it away from the wiring.
What Do You Think?
Isn’t it amazing how different it looks already?
Without the upholstered fabric, the room feels much lighter and brighter.
And the walls have not even been repaired yet!
I’m going with a pretty white in this room
And am leaning towards Benjamin Moore Simply White on the trim and Benjamin Moore White Dove on the walls.
I was kicking around Benjamin Moore Linen White for a while but decided to go with a brighter white.
Next up on the project list.
Wall Repair and Painting!
And yes, we are painting right over that textured ceiling.
I can’t wait!
Watch the Video
Wait until you see how tough it was to remove the upholstered walls.
Watch it here!
For more before and after DIYs, CLICK HERE!
Pin and Save It For Later
If you like this post, please share and pin it on Pinterest. (If you hover over the image, the Pinterest button will be in the upper left corner.)
I’ve created the below-custom pins for this post.

Subscribe to the blog and gain access not readily available to the public.
Thanks so much for following along.
Enjoy a beautiful day! xo

If you like this post, please follow me @bricksnblooms on Pinterest, Facebook, Instagram, and Tik Tok. Subscribe to my YouTube Channel. Or join my Facebook Group.


Frequently asked questions
Have a question about this project?