


Cupid Has Finally Struck
The other day, I found some really fun treasures at my local thrift store. I was really excited about all of my finds, but when I found Cupid, I was floored!
Cupid has finally struck!
I have wanted a Cupid for a long time and to finally found one (that I liked) was so exciting! Even more exciting….. he was only $2! I love it when things just fall together like that.
Even though I thought Cupid was pretty great the way he was, I thought a little red paint would make him more “festive”. So, I used red craft paint to paint over the gold parts.
Much better.
I also thought the thing he was carrying needed to be filled with arrows. I made them by adding some red triangles to skewers. I cut the triangles from red duct tape and hot glued them on the skewers.
After painting Cupid and giving him some arrows, I started planning where he was going to go. I thought he would be perfect in the basket hanging on the sign I made for our entryway. After I set him in there, I knew I wanted to add something on the front of the basket. It just needed a little something “valentine” related.
In comes a ceiling tile my mom had given me. It would be the perfect thing (after I tweaked it) to put on the front of the basket.
The ceiling tile was a horrible terra-cotta color so I dry brushed some white paint on it and added some dark pink paint on top of that. (The birch pieces are for another project).
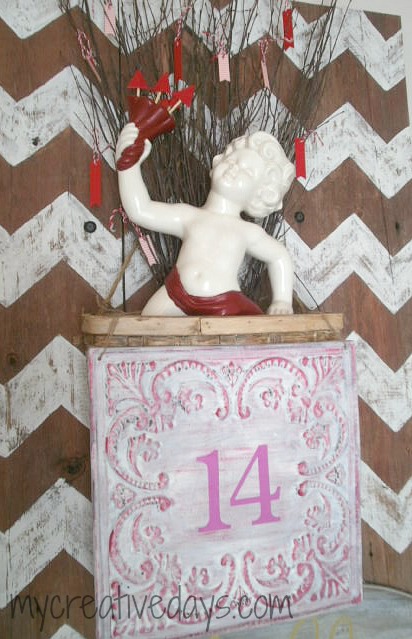
Then, I used my Cricut to cut out the number “14″. I Modge Podged the number on the front of the tile. I added the ceiling tile to the front of the basket and put Cupid back inside the basket. I also added some pink and red washi-taped, wood pennants to the branches behind Cupid.
I love the way this entire “vignette” came together. I did not spend a lot of money and it really adds a lot of “Valentine’s Day” to our front entryway. I am so excited Cupid has finally struck and I was able to bring him home with me.
Cupid has finally struck!
I have wanted a Cupid for a long time and to finally found one (that I liked) was so exciting! Even more exciting….. he was only $2! I love it when things just fall together like that.
Even though I thought Cupid was pretty great the way he was, I thought a little red paint would make him more “festive”. So, I used red craft paint to paint over the gold parts.
Much better.
I also thought the thing he was carrying needed to be filled with arrows. I made them by adding some red triangles to skewers. I cut the triangles from red duct tape and hot glued them on the skewers.
After painting Cupid and giving him some arrows, I started planning where he was going to go. I thought he would be perfect in the basket hanging on the sign I made for our entryway. After I set him in there, I knew I wanted to add something on the front of the basket. It just needed a little something “valentine” related.
In comes a ceiling tile my mom had given me. It would be the perfect thing (after I tweaked it) to put on the front of the basket.
The ceiling tile was a horrible terra-cotta color so I dry brushed some white paint on it and added some dark pink paint on top of that. (The birch pieces are for another project).
Then, I used my Cricut to cut out the number “14″. I Modge Podged the number on the front of the tile. I added the ceiling tile to the front of the basket and put Cupid back inside the basket. I also added some pink and red washi-taped, wood pennants to the branches behind Cupid.
I love the way this entire “vignette” came together. I did not spend a lot of money and it really adds a lot of “Valentine’s Day” to our front entryway. I am so excited Cupid has finally struck and I was able to bring him home with me.
Valentine Vignette

Want more details about this and other DIY projects? Check out my blog post!


Frequently asked questions
Have a question about this project?