


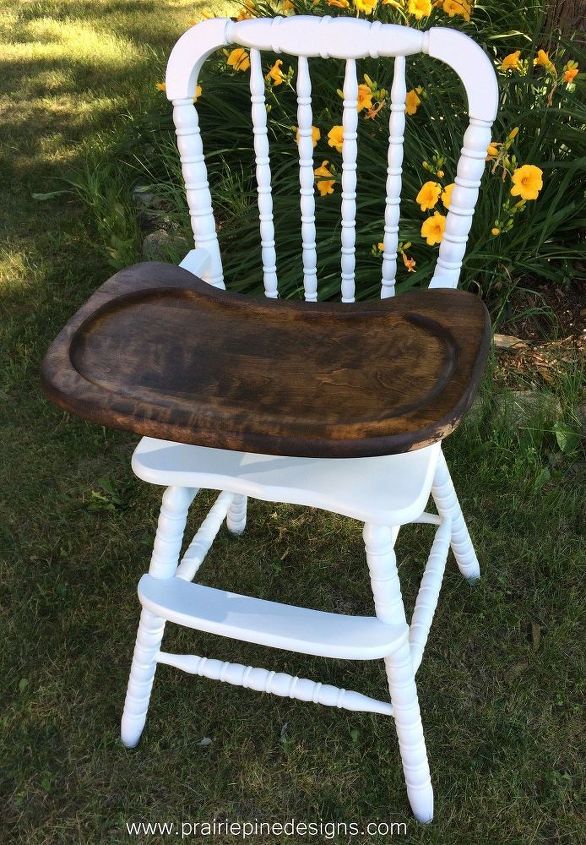
Shabby to Chic Highchair

by
Brianna
6 Materials
$19
1 Hour
Easy
If you have a little one on the way or are on the hunt for a stylish highchair, I highly suggest finding a wood highchair (found mine at a garage sale!) and follow these steps!
You will only need SIX things to turn your shabby chair into a farmhouse chic keepsake.
Material Needed:
(2) 12 oz cans of spray paint
I really like using Rust-oleum brand, so that is what I would suggest using. I also suggest finding a paint that also is a primer. That is why I love this paint so much! Their is no need to prime your furniture before painting, and it goes on so smoothly. You will need at least TWO 12 oz cans. I was able to spray my chair with exactly two cans. But, if you wood takes the paint differently, you may need THREE.

(1) 1/2 Pint sized can of stain
I used Minwax Dark Walnut for the tray. Dark Walnut is one of my all time favorite stain colors and my go-to for almost anything. If you don’t already of a can of stain on hand, I highly suggest this brand and color.

(1) 11.5 oz Spray Can of Clear Semi-Gloss Polyurethane
If you already happen to have a can of clear polyurethane or varnish on hand, please use what you have! It doesn’t make a big difference if it is gloss, semi gloss, or satin finish. This step is important though, and I wouldn’t go without it. A polyurethane or vanish ensure that the tray of the highchair will hold up to spills, scratches, and stains for years to come.

You will need a sander to sand off any and all finishes on the tray of the highchair. I love using my Black & Decker Orbital Sander, but anything will do. If you plan on hand sanding, I suggest using one of these.

(1) 80 grit sheet of sand paper
It will depend on how much sanding your tray will need, but I only needed to use ONE sheet of sand paper to sand the entire tray before staining.

Lastly, you will need masking/painters tape. This will be used to tape off any metal parts and/or safety straps that you do not want to get paint on.
Now that you know the SIX things you will need to refinish your highchair, it’s time to get to work!
- First, you will need to give your chair a good cleaning. I did this by taking it outside and spraying it down with the garden hose. I then took a bucket of hot water with some dish soap and a rag and started to scrub. If you happen to have a chair like mine, you will want to make sure you get in between all of the nooks of the back rest. This was the most difficult part of the whole process.
- Once your chair is nice and clean, dry it off with a towel or let it dry in the sun.
- Next, find a safe spot to spray paint. Since it was so beautiful out this last weekend, I went ahead and did this project on my lawn. If you are contained to an apartment or garage, make sure you lie down newspaper or a drop clothe to protect your floor!
- The final piece of prep is to tape off any parts of the chair that you do not want to spray paint. I taped off the safety harness strap and the side rails (the metal part) that the tray slides onto.
- Now it’s time for the fun! Start painting! I started at the legs and worked my way up making sure the inside dowels and the bottom of the seat were all painted. As stated above, you will need at least TWO cans of paint, if not THREE to cover the entire chair in 2 or 3 coats of paint.
- While your chair is drying, you can now sand down the tray with your sander and 80 grit sand paper. Make sure everything is sanded off, including the bottom and sides like the example shown below.

- Once everything is sanded off smoothly, take a shop rag (old towel, t-shirt, or sock) and stain the top and bottom of the tray. Place in a safe place for drying. Allow at least 24 hours for complete dry time.
- After the paint is dry on the chair (a few hours or overnight), it’s time to polyurethane it. This doesn’t require a specific technique. I personally started at the bottom and worked my way up just as if I were spray painting it making sure I coat the seat really well as that is will be the area with the most wear and tear. Allow for an hour or two between each coat. I applied three coats on mine.
- The last step is to clear coat the tray. Once the stain is dry, coat the bottom of the tray and let dry. Once the bottom is dry, coat the top with 3-5 coats. It is important to coat the tray with as many coats as your can to protect it from the moisture of spills and colors of stains from food.
After buying the chair for $5.00 and all the supplies needed, I spent $19. I’d say that’s a great deal for a “farmhouse chic” highchair that you can use for generations to come!
After

Before & After
After
Want more details about this and other DIY projects? Check out my blog post!


Frequently asked questions
Have a question about this project?