96 Views
Custom Cedar Utensil Organizer

by
Ryan Hubbard
(IC: vlogger)
5 Materials
$40
5 Hours
Medium
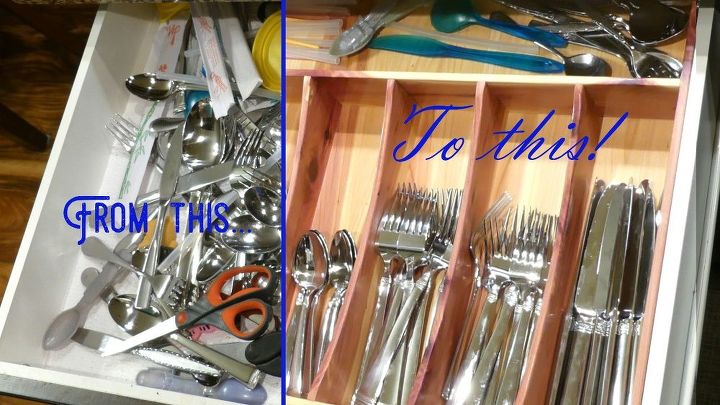
We didn't like how the plastic utensil organizer did not fit the drawer well and seemed to cause more clutter than it prevented. I took careful measurements and my wife drew up a simple plan to give us seven dividers and a large space at the back of the drawer.
We had a plastic drawer organizer, but it slid around in the drawer and didn't have enough spaces for different utensils. This organizer was made from only two 1x4 red cedar boards.
{
"id": "4671936",
"alt": "",
"title": "",
"video_link": "https://www.youtube.com/embed/4-Vs90c1S3Y",
"youtube_video_id": "4-Vs90c1S3Y"
}
{
"width": 634,
"height": 357,
"showRelated": true
}
Watch the whole build process and subscribe to my YouTube channel! https://www.youtube.com/c/hubbardshandmade
I started by cutting my boards to length at the miter saw and cleaning up one edge on the jointer. The size of your boards will of course depend on the drawer it is going in.
{
"id": "4672172",
"alt": "",
"title": "",
"video_library_id": "7039",
"thumbnail": "https://cdn-fastly.hometalk.com/media/2018/02/13/4672172/custom-cedar-utensil-organizer.jpg"
}
{
"width": 634,
"height": 357,
"showRelated": true,
"noautoplay": ""
}
[{"sources":[{"type":"video\/mp4","src":"https:\/\/video-cdn-prod.b-cdn.net\/hometalk\/2022\/01\/13\/15882\/15882_source-406.mp4","label":"406p"},{"type":"video\/mp4","src":"https:\/\/video-cdn-prod.b-cdn.net\/hometalk\/2022\/01\/13\/15882\/15882_source-720.mp4","label":"720p"},{"type":"video\/mp4","src":"https:\/\/video-cdn-prod.b-cdn.net\/hometalk\/2022\/01\/13\/15882\/15882_source-1080.mp4","label":"1080p"}],"poster":"https:\/\/cdn-fastly.hometalk.com\/media\/videos\/2022\/01\/13\/15882\/thumbnail.jpg","media":{"video_library_id":15882,"thumbnail":"https:\/\/cdn-fastly.hometalk.com\/media\/videos\/2022\/01\/13\/15882\/thumbnail.jpg"}},{"sources":[{"type":"video\/mp4","src":"https:\/\/video-cdn-prod.b-cdn.net\/hometalk\/2023\/08\/23\/28843\/28843_source-406.mp4","label":"406p"},{"type":"video\/mp4","src":"https:\/\/video-cdn-prod.b-cdn.net\/hometalk\/2023\/08\/23\/28843\/28843_source-720.mp4","label":"720p"},{"type":"video\/mp4","src":"https:\/\/video-cdn-prod.b-cdn.net\/hometalk\/2023\/08\/23\/28843\/28843_source-1080.mp4","label":"1080p"}],"poster":"https:\/\/cdn-fastly.hometalk.com\/media\/videos\/2023\/08\/23\/28843\/thumbnail.jpg","media":{"video_library_id":28843,"thumbnail":"https:\/\/cdn-fastly.hometalk.com\/media\/videos\/2023\/08\/23\/28843\/thumbnail.jpg"}},{"sources":[{"type":"video\/mp4","src":"https:\/\/video-cdn-prod.b-cdn.net\/hometalk\/2022\/04\/20\/17335\/17335_source-406.mp4","label":"406p"},{"type":"video\/mp4","src":"https:\/\/video-cdn-prod.b-cdn.net\/hometalk\/2022\/04\/20\/17335\/17335_source-720.mp4","label":"720p"},{"type":"video\/mp4","src":"https:\/\/video-cdn-prod.b-cdn.net\/hometalk\/2022\/04\/20\/17335\/17335_source-1080.mp4","label":"1080p"}],"poster":"https:\/\/cdn-fastly.hometalk.com\/media\/videos\/2022\/04\/20\/17335\/thumbnail.jpg","media":{"video_library_id":17335,"thumbnail":"https:\/\/cdn-fastly.hometalk.com\/media\/videos\/2022\/04\/20\/17335\/thumbnail.jpg"}},{"sources":[{"type":"video\/mp4","src":"https:\/\/video-cdn-prod.b-cdn.net\/hometalk\/2023\/03\/17\/24970\/24970_source-406.mp4","label":"406p"},{"type":"video\/mp4","src":"https:\/\/video-cdn-prod.b-cdn.net\/hometalk\/2023\/03\/17\/24970\/24970_source-720.mp4","label":"720p"},{"type":"video\/mp4","src":"https:\/\/video-cdn-prod.b-cdn.net\/hometalk\/2023\/03\/17\/24970\/24970_source-1080.mp4","label":"1080p"}],"poster":"https:\/\/cdn-fastly.hometalk.com\/media\/videos\/2023\/03\/17\/24970\/thumbnail.jpg","media":{"video_library_id":24970,"thumbnail":"https:\/\/cdn-fastly.hometalk.com\/media\/videos\/2023\/03\/17\/24970\/thumbnail.jpg"}},{"sources":[{"type":"video\/mp4","src":"https:\/\/video-cdn-prod.b-cdn.net\/hometalk\/2022\/01\/07\/15825\/15825_source-406.mp4","label":"406p"},{"type":"video\/mp4","src":"https:\/\/video-cdn-prod.b-cdn.net\/hometalk\/2022\/01\/07\/15825\/15825_source-720.mp4","label":"720p"},{"type":"video\/mp4","src":"https:\/\/video-cdn-prod.b-cdn.net\/hometalk\/2022\/01\/07\/15825\/15825_source-1080.mp4","label":"1080p"}],"poster":"https:\/\/cdn-fastly.hometalk.com\/media\/videos\/2022\/01\/07\/15825\/thumbnail.jpg","media":{"video_library_id":15825,"thumbnail":"https:\/\/cdn-fastly.hometalk.com\/media\/videos\/2022\/01\/07\/15825\/thumbnail.jpg"}}]
My boards were 3/4 inch thick which would just take up too much room, and I could make my material go farther by resawing them. I set my table saw fence to cut each board in half right down the middle.
I am very lucky to have a drum sander, so I passed the pieces through to clean them up and make them all the same thickness. You can also do this with a random orbit sander, but it'll take longer.
I glued up several of my boards to make a flat panel for the bottom. I also cleaned this up on the drum sander. Then I trimmed the edges to final size on the table saw.
The dividers were the same width as the sides, but needed to be smaller because they would sit inside the box. I trimmed them to size on the table saw.
I cut a curve in one divider until I was happy with how it looked. Then I taped all seven boards together and cut them at the same time on the bandsaw. While they were still taped together I cleaned up the curve with sandpaper. That way they all came out the same.
I set up a quick box joint jig on my table saw. There are other tutorials on how to do this. I wanted box joints because they would be strong corners for these thin boards. They also look really good, but unfortunately are hidden in the drawer.
I glued everything together and after it was dry, sanded the corners flush. Quick tip: a kitchen silicone brush is perfect for spreading glue. Its the same silicone as what the wood stores sell for 2-3 times as much. Let the glue dry and peel it out of the bristles then reuse.
I did some quick math and cut a spacer for each slot so they would be evenly spaced. There was some more sanding before each one got glued and nailed in place with a pin air nailer.
After the final glue up and sanding I finished it with three coats of spray lacquer. This is a quick and easy finish, just watch out for the fumes!
I'm very happy with how it came out.
Too bad those beautiful corners are hidden in the drawer!
{
"id": "4672211",
"alt": "",
"title": "",
"video_library_id": "7036",
"thumbnail": "https://cdn-fastly.hometalk.com/media/2018/02/13/4672211/custom-cedar-utensil-organizer.jpg"
}
{
"width": 634,
"height": 357,
"showRelated": true,
"noautoplay": ""
}
[{"sources":[{"type":"video\/mp4","src":"https:\/\/video-cdn-prod.b-cdn.net\/hometalk\/2023\/06\/06\/26644\/26644_source-406.mp4","label":"406p"},{"type":"video\/mp4","src":"https:\/\/video-cdn-prod.b-cdn.net\/hometalk\/2023\/06\/06\/26644\/26644_source-720.mp4","label":"720p"},{"type":"video\/mp4","src":"https:\/\/video-cdn-prod.b-cdn.net\/hometalk\/2023\/06\/06\/26644\/26644_source-1080.mp4","label":"1080p"}],"poster":"https:\/\/cdn-fastly.hometalk.com\/media\/videos\/2023\/06\/09\/26644\/thumbnail.1.jpg","media":{"video_library_id":26644,"thumbnail":"https:\/\/cdn-fastly.hometalk.com\/media\/videos\/2023\/06\/09\/26644\/thumbnail.1.jpg"}},{"sources":[{"type":"video\/mp4","src":"https:\/\/video-cdn-prod.b-cdn.net\/hometalk\/2022\/04\/21\/17363\/17363_source-406.mp4","label":"406p"},{"type":"video\/mp4","src":"https:\/\/video-cdn-prod.b-cdn.net\/hometalk\/2022\/04\/21\/17363\/17363_source-720.mp4","label":"720p"},{"type":"video\/mp4","src":"https:\/\/video-cdn-prod.b-cdn.net\/hometalk\/2022\/04\/21\/17363\/17363_source-1080.mp4","label":"1080p"}],"poster":"https:\/\/cdn-fastly.hometalk.com\/media\/videos\/2022\/04\/21\/17363\/thumbnail.jpg","media":{"video_library_id":17363,"thumbnail":"https:\/\/cdn-fastly.hometalk.com\/media\/videos\/2022\/04\/21\/17363\/thumbnail.jpg"}},{"sources":[{"type":"video\/mp4","src":"https:\/\/video-cdn-prod.b-cdn.net\/hometalk\/2023\/05\/10\/26098\/26098_source-406.mp4","label":"406p"},{"type":"video\/mp4","src":"https:\/\/video-cdn-prod.b-cdn.net\/hometalk\/2023\/05\/10\/26098\/26098_source-720.mp4","label":"720p"},{"type":"video\/mp4","src":"https:\/\/video-cdn-prod.b-cdn.net\/hometalk\/2023\/05\/10\/26098\/26098_source-1080.mp4","label":"1080p"}],"poster":"https:\/\/cdn-fastly.hometalk.com\/media\/videos\/2023\/05\/10\/26098\/thumbnail.jpg","media":{"video_library_id":26098,"thumbnail":"https:\/\/cdn-fastly.hometalk.com\/media\/videos\/2023\/05\/10\/26098\/thumbnail.jpg"}},{"sources":[{"type":"application\/vnd.apple.mpegurl","src":"https:\/\/video-cdn-prod.b-cdn.net\/hometalk\/2021\/12\/01\/9101\/3xVn2ZxJ.m3u8","label":"HLS"},{"type":"video\/mp4","src":"https:\/\/video-cdn-prod.b-cdn.net\/hometalk\/2021\/12\/01\/9101\/9101_1080p_h264.mp4","label":"1080p"},{"type":"video\/mp4","src":"https:\/\/video-cdn-prod.b-cdn.net\/hometalk\/2021\/12\/01\/9101\/9101_720p_h264.mp4","label":"720p"},{"type":"video\/mp4","src":"https:\/\/video-cdn-prod.b-cdn.net\/hometalk\/2021\/12\/01\/9101\/9101_406p_h264.mp4","label":"406p"},{"type":"video\/mp4","src":"https:\/\/video-cdn-prod.b-cdn.net\/hometalk\/2021\/12\/01\/9101\/9101_270p_h264.mp4","label":"270p"},{"type":"video\/mp4","src":"https:\/\/video-cdn-prod.b-cdn.net\/hometalk\/2021\/12\/01\/9101\/9101_180p_h264.mp4","label":"180p"}],"poster":"https:\/\/cdn-fastly.hometalk.com\/media\/2021\/11\/08\/7962618\/thumbnail.jpg","media":{"video_library_id":9101,"thumbnail":"https:\/\/cdn-fastly.hometalk.com\/media\/2021\/11\/08\/7962618\/thumbnail.jpg"}},{"sources":[{"type":"video\/mp4","src":"https:\/\/video-cdn-prod.b-cdn.net\/hometalk\/2022\/02\/25\/16354\/16354_source-406.mp4","label":"406p"},{"type":"video\/mp4","src":"https:\/\/video-cdn-prod.b-cdn.net\/hometalk\/2022\/02\/25\/16354\/16354_source-720.mp4","label":"720p"},{"type":"video\/mp4","src":"https:\/\/video-cdn-prod.b-cdn.net\/hometalk\/2022\/02\/25\/16354\/16354_source-1080.mp4","label":"1080p"}],"poster":"https:\/\/cdn-fastly.hometalk.com\/media\/videos\/2022\/02\/25\/16354\/thumbnail.jpg","media":{"video_library_id":16354,"thumbnail":"https:\/\/cdn-fastly.hometalk.com\/media\/videos\/2022\/02\/25\/16354\/thumbnail.jpg"}}]
My wife did the organizing in the end. And we are super happy with it! Thanks for looking, good luck!
Enjoyed the project?
Suggested materials:
- 2 Red Cedar 1x4 boards (Hardwood dealer)
- Wood glue (http://amzn.to/2Cj29On)
- Silicone kitchen brush (http://amzn.to/2EtjoCz)
- Many tools listed on my Amazon Store (https://goo.gl/fReXap)
Published February 13th, 2018 11:39 PM










Frequently asked questions
Have a question about this project?