


How to Make a Rustic Farmhouse Table - Epoxy Resin Glow Table
9 Materials
$220
2 Days
Medium
I love building tables with unique wood and epoxy resin. The combination of these two elements enhances the wood's natural beauty and preserves it's look for many years. In this tutorial, I show you how to make a rustic table with epoxy resin and reclaimed wood.
I offered to build a table for my sister in November while brainstorming project ideas during Thanksgiving. My sister is older than me, which typically means she does more favors for me than I do for her.
I spoke to my sister and traded many Pinterest screenshots via text over a two week period to get an idea of the style table she wanted me to build. The final decision was a industrial style table with a rustic flare with reclaimed wood.
I decided to incorporate a few unique elements to this rustic table, which compliment my sister's personality and her faith.
Needless to say, I was happy to build this table for my sister. I completed the table the same week as her birthday, which made it more special.
{
"id": "4732874",
"alt": "",
"title": "",
"video_link": "https://www.youtube.com/embed/iPKJrZttKJg",
"youtube_video_id": "iPKJrZttKJg"
}
{
"width": 634,
"height": 357,
"showRelated": true
}
Step 1: Gather Materials
The first step to all of my projects is to gather the materials. I become frustrated when I start a project and realize I don't have the materials I need to proceed with the build.
I separated the materials I used and tools I used into 2 sections for this rustic table with epoxy resin project. I referred to this list many times before I started my project to make sure I had the materials I needed.
I'll include the materials I used for this item in this HT post down below. The tools I used can be found on my website.
Step 2: Mill Wood
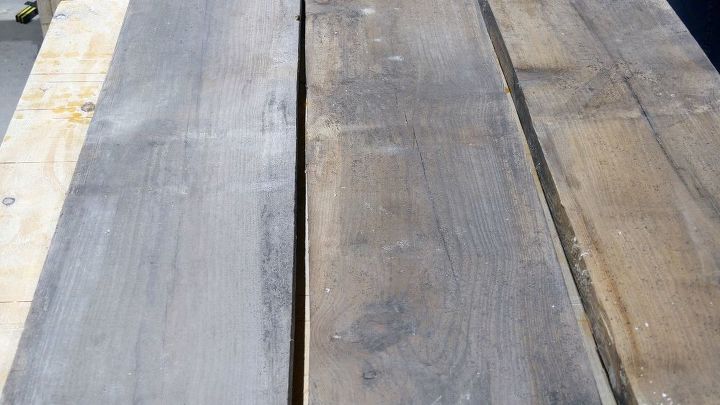
Once I obtained the materials, I started milling the wood. I used 3 pieces of reclaimed heart pine for this project.
Since I don't own a joiner, I used my festool track saw to get one straight side. Next, I used my table saw to get the other side of the same board straight. Then, I placed the straight side against the table saw fence to use as reference and trimmed off a thing piece on the other side.
I repeated this process for each board.
Since the boards were relatively flat, I ran each side through my planer. I removed just enough to remove the dirt and grime from each piece.
Step 3: Join Wood
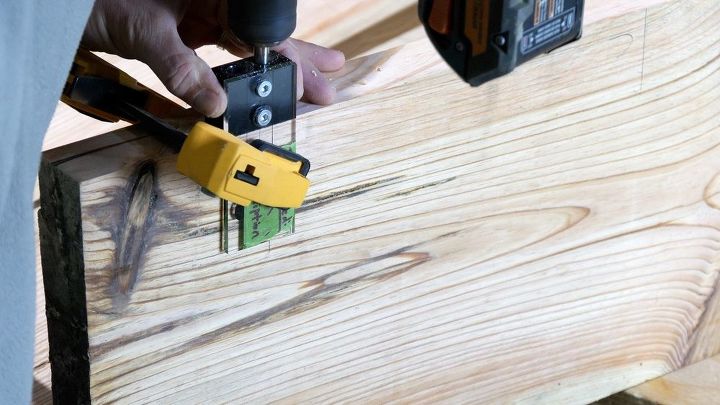
Next, I decided to use 3/8" wood dowels to join each piece of wood. I lined up the 3 pieces of heart pine and marked where I would use dowels. Each dowel is spaced 12" apart.
Additionally, I marked each join as 'A/B' and 'B/C' to avoid confusion. The first board is 'A', the second is 'B', and the third is 'C'. Therefore, the first join was between 'A' & 'B' and the second was between 'B' & 'C'.
My dowel jig came in very handy during this step; however, the dowel jig is setup to be used on 3/4" stock.
These reclaimed heart pine wood pieces were 2.5" thick. I decided to place the dowels on the upper side and lower side of each piece of wood.
In other words, I placed the first dowel with the jig laying on top of the wood. I placed the next dowel 12" away with the dowel jig laying on the bottom of the wood. This provided enough spacing horizontally and vertically for a nice join.
Next, I cut the dowels on my miter saw, spread glue on each surface, and tightened the boards together with clamps.
Step 4: Remove High Spots
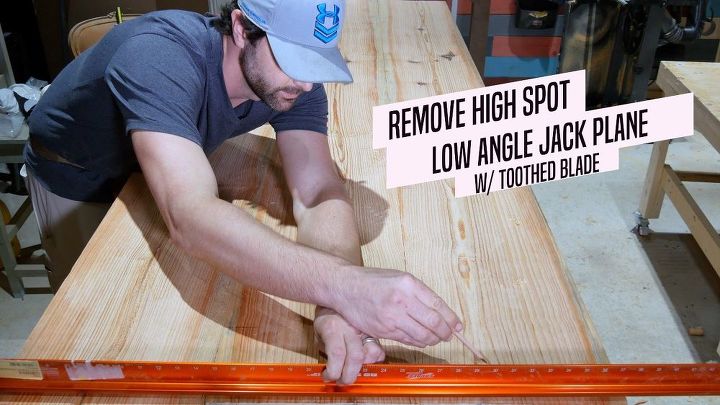
After the glue dried for 8 hours, I removed the clamps and used my glue scraper to remove excess glue.
Next, I used my straight edge to locate high spots. Then, I used my low angle jack plane with a toothed blade to remove the high spots.
It is crucial to get a flat surface when using epoxy resin.
An orbital sander also works well to remove high spots.
Step 5: Trim Table to Size and Roundover Edges
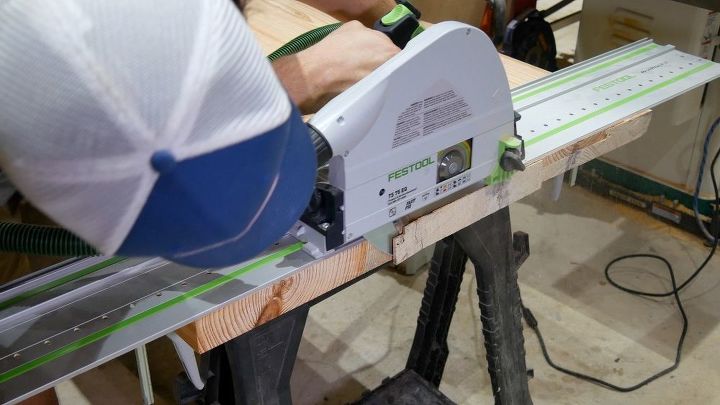
After the resin hardened, I used my festool track saw to trim off both ends of the table.
Next, I used my trim router with a roundover bit to round the edges of the rustic table.
An orbital sander and circular saw are alternate tools that can be used to complete this step.
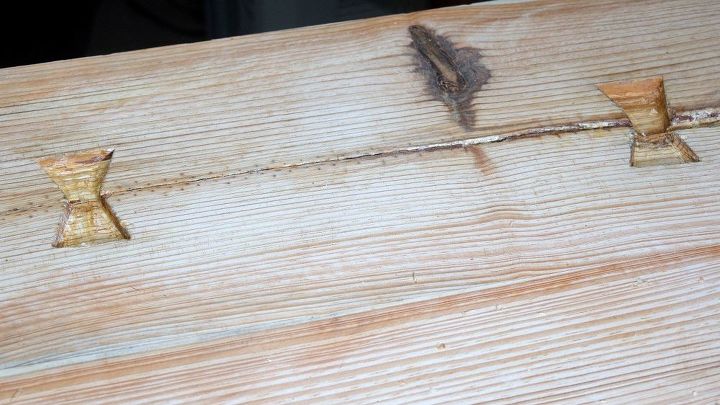
Step 6: Cut Inlays
There were many cracks and imperfections in the reclaimed heart pine wood.
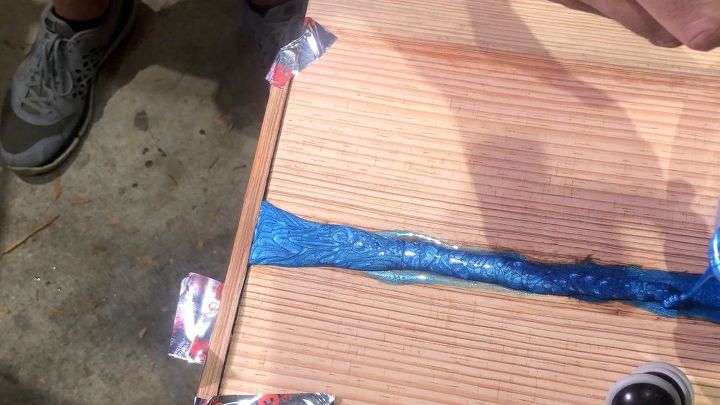
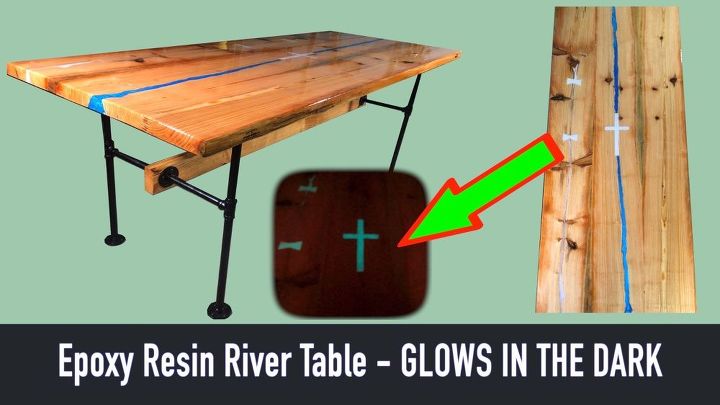
I used my chisels to carve 2 bowties horizontally over a crack in the wood. My sister loves her christian church, so I used my trim router and chisels to make a cross in the middle of the table over a crack that extended the length of the middle board.
Next, I used my trim router and spiral bit to route a 1/2" deep channel from one end of the middle board to the top of the cross and from the other end to the bottom of the cross. In order to create an illusion of a river in the middle of the table, I used my router to drop the river down 1/2" deep into the end of the table.
To make the table more unique, I decided to secure them using resin bowties instead of wood bowties.
Step 7: Fill Inlays with Resin & Sand
I used Pro Marine epoxy resin to fill the inlays along with pigment powder and glow powder.
I mixed white pigment powder and glow powder with the epoxy resin for the bowties and christian cross. For the river color, I used blue pigment powder in the epoxy resin.
Next, I poured the resin and popped the bubbles with a mini torch.
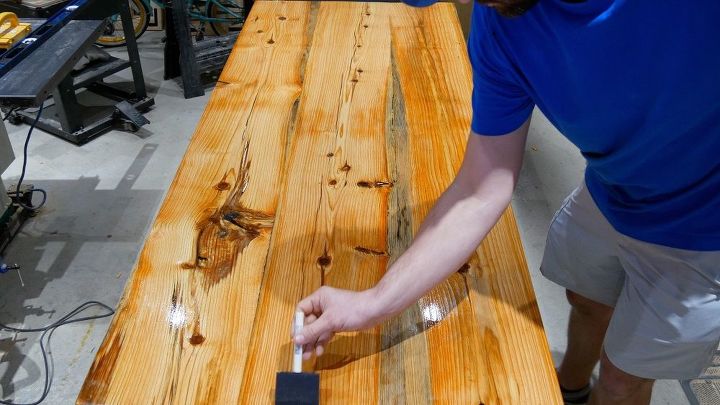
I sanded the table with 60 grit, 80 grit, 100 grit, 120 grit, 150 grit, 180 grit, 220 grit, and 320 grit sandpaper.
Often times, people tell me each grit is unnecessary; however, I learned this isn't entirely true.
If I want a smooth, nice surface each grit is necessary.
If I don't care that much about a perfect finish, I skip every other grit mentioned above.
Step 9: Sand and Finish Underside of Table
I sanded the underside of the table with all grits I mentioned above using my festool RO125 sander. The excess black resin was easy to remove with the lower grit sandpaper.
Next, I applied a satin finish to the underside of the table.
Why did I finish the underside of this table? Good question.
Not everyone likes colored resin inlays that glow in the dark. I wanted to finish the underside of the table to give my sister the option to flip the table over if she chooses to do so.
This certainly added extra work to this project as I normally don't finish the underside of the tables I build.
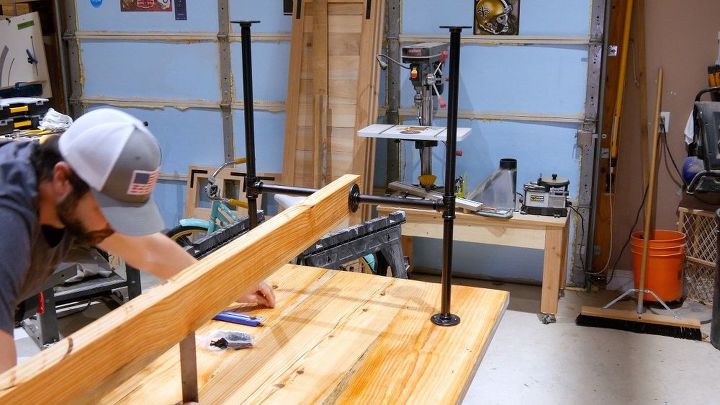
Step 10: Assemble and Attach Black Pipe Table Base
After the underside was finished, I flipped the table back over to assemble the table base.
For the table base, I used black pipe legs to add an industrial look to the table. I built the black pipe table base to incorporate a piece of heart pine I cut from an extra wide piece I used for the table top. The size of this piece was roughly the size of a 2x4 and 60 inches long.
I used acetone to clean the grime/grease from the table legs.
Next, I used a razor blade to remove the stubborn stickers/tape from each pipe. The stickers and tape were very aggravating to remove, but acetone made it easier.
Then, I coated the leg base with 3 coats of black spray paint.
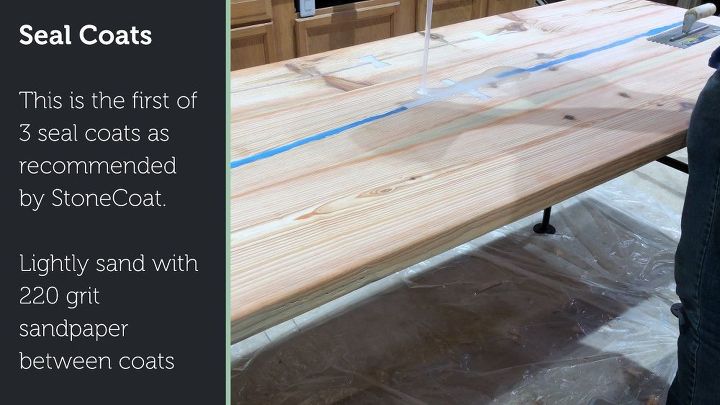
Step 11: Apply Epoxy Seal Coats
I used a product called Stonecoat Countertop Epoxy made by stonecoat countertops.
This product is made to cover old countertops and is very durable, which is why I decided to use it for this project. It is heat resistant and more scratch resistant than most table top epoxy resin products.
This was my first time using the product and it is quite different than most epoxy resins used for tables. It has a longer working & curing time.
I really like the fact this product can be mixed with a mixing paddle attached to a drill, which saves time and takes the guess work out of mixing by hand.
Stonecoat recommends applying 3 seal coats. Unlike other manufactures that take a conservative approach to their instructions, this recommendation from Stonecoat is very accurate. I recommend following their instructions very closely and to not skip a step.
The 3 seal coats I applied went on without any issues.
I removed the bubbles after each coat with a torch for approximately every 2 minutes for approximately 20 minutes.
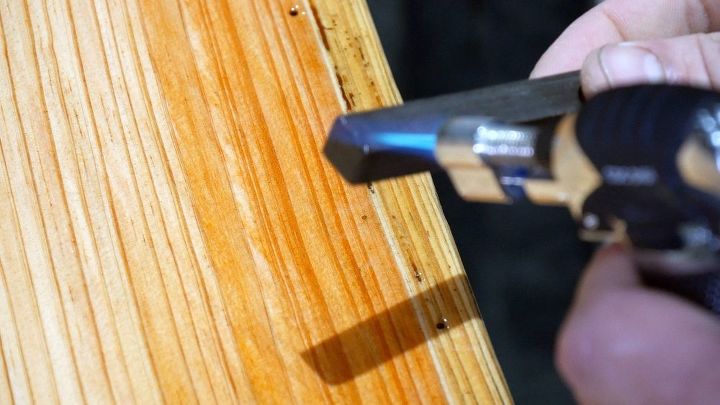
Step 12: Fill Voids and Lightly Sand
Reclaimed wood is beautiful, but it can be challenging to use with epoxy resin. It often has stubborn pin holes that are very thirsty.
Before I applied the flood coat, I used a burn in stick to seal the stubborn holes. I used a razor blade
Additionally, I used 220 grit sandpaper to lightly sand the table to remove any high spots.
I cleaned the table with a roll of paper towels after sanding.
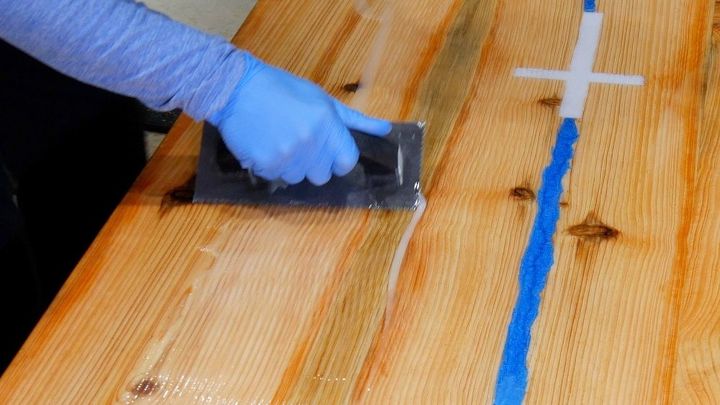
Step 13: Apply Flood Coat
I applied the flood coat and made sure I followed Stonecoat's instructions.
The 1/8" trowel helped spread the material evenly across the table.
Next, I used a chop brush on the entire table to pat the material down in order for it to gel together and remove the trowel marks.
Then, I used my blow torch to remove the bubbles. The heat from the blow torch also helps the material gel together and flatten out.

Step 14: Glow Table
As stated previously, I mixed glow powder in most of the resin inlays excluding the blue river. This glow powder is charged by light and glows in the dark quite brightly.
I use this glow powder quite often in my projects. It can also be mixed with paint.
Many manufacturers sell this powder; however, only some work in water-based mediums. It's important to buy the good stuff - trust me, I learned the hard way. to see the type I purchase and try it on just about any project.
Conclusion
I hope this project on how to make a rustic table with epoxy resin provided you with some value because this is, and always will be, my ultimate goal.

Want more details about this and other DIY projects? Check out my blog post!


Frequently asked questions
Have a question about this project?
Great work! I appreciate your thorough explanations, too. As for finishing the underside...seems like it would be wise to do routinely. If you seal the top and don’t seal the bottom, wouldn’t there be a tendency (especially in a humid climate) for the bottom to draw ambient moisture, swell, and ultimately warp or crack the slab you built? I learned that lesson working in a custom door factory. Once upon a time, we didn’t pay careful attention to sealing the tops and bottoms of the solid wood doors we made. After several doors were returned for warping/cracking, we made it part of the finishing process and were almost complaint-free afterwards.