


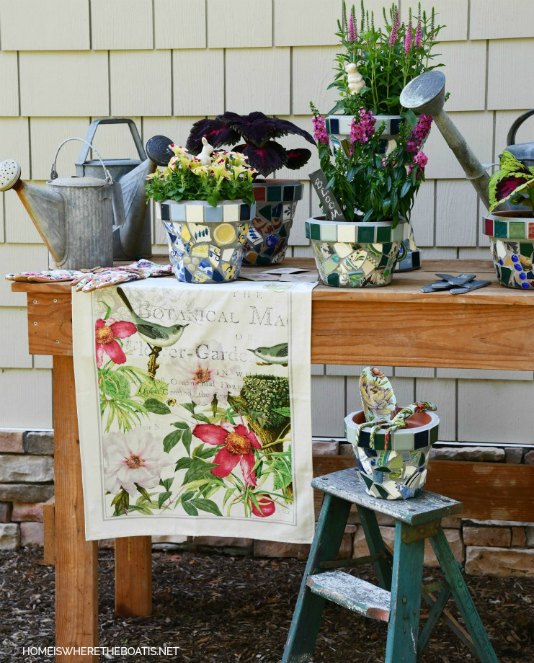
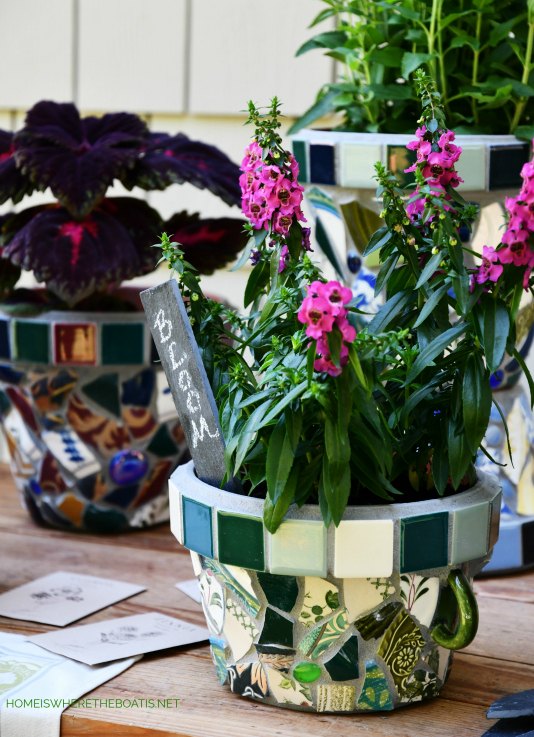
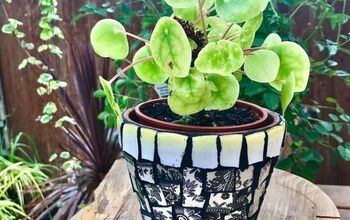
Create Mosaic Flower Pots
Let your creativity bloom with DIY Mosaic Flower Pots! Upcycle your broken dishes or thrift store finds with this trash-to-treasure craft and create one-of-a-kind flower pots for your garden or for gifts.
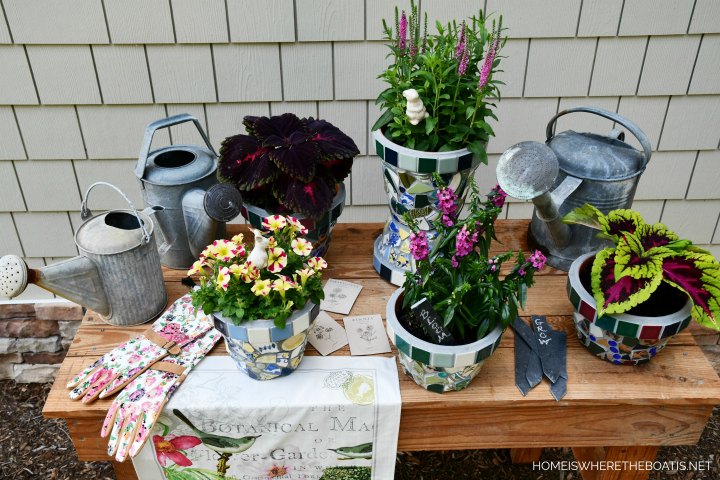
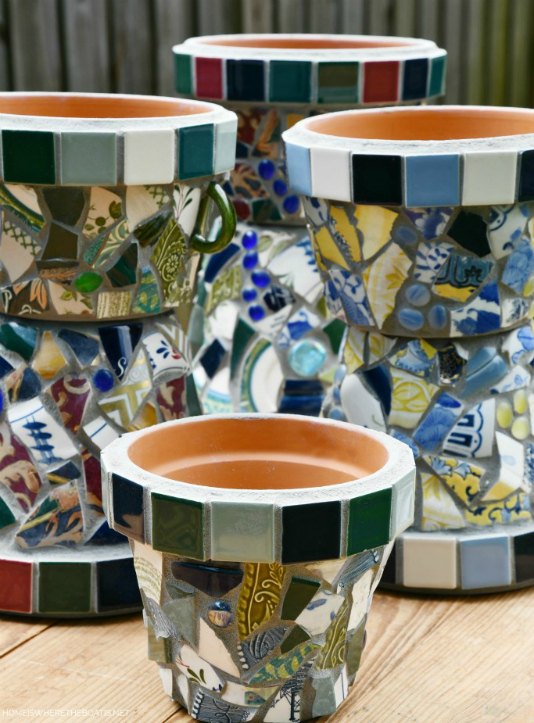
This is a fun and creative way to transform plain terra cotta pots, turning them into a one-of-a-kind pieces of garden art for your flowers. The beauty of this craft project is that you can recycle your broken dishes, use thrift store finds, ceramic tiles, glass marbles or whatever pottery you might find.

Many years ago, my mom used to work the Atlanta gift market and had access to import pottery and ceramics and was able to bring home broken pieces for me to use for mosaic projects. . . trash to treasure! I mixed the broken ceramic pieces with tiles, flat marbles and unloved, chipped dishes to make mosaic flower pots.
I’m embarrassed to admit how long I’ve been hoarding this last stash of pots in the garage, waiting to be grouted “one day”.
“One day” = pandemic, a great project motivator while stuck at home!
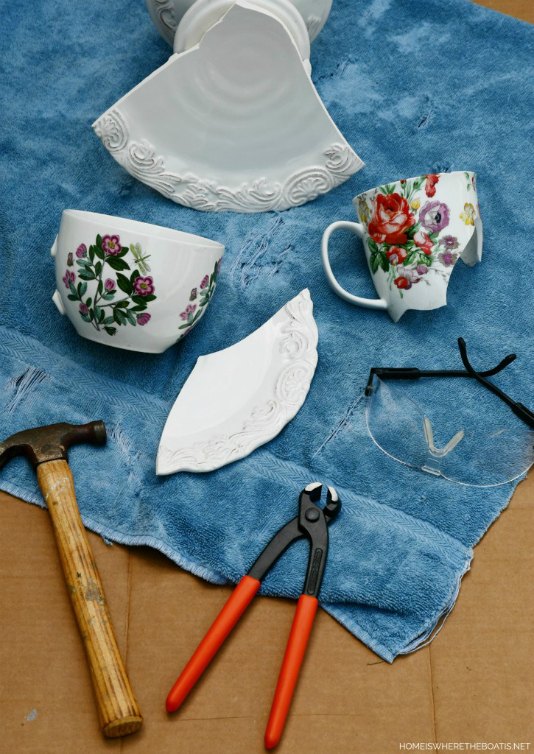
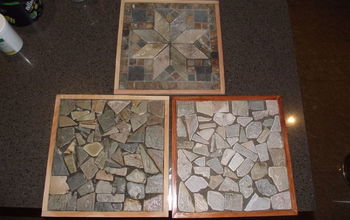
I made these pots before my blogging days and don’t have any step-by-step photos of the mosaic process, so I took a few photos to demonstrate with broken pieces I have stashed in a box in the garage, in case I get the urge to make more “one day”.
Method:
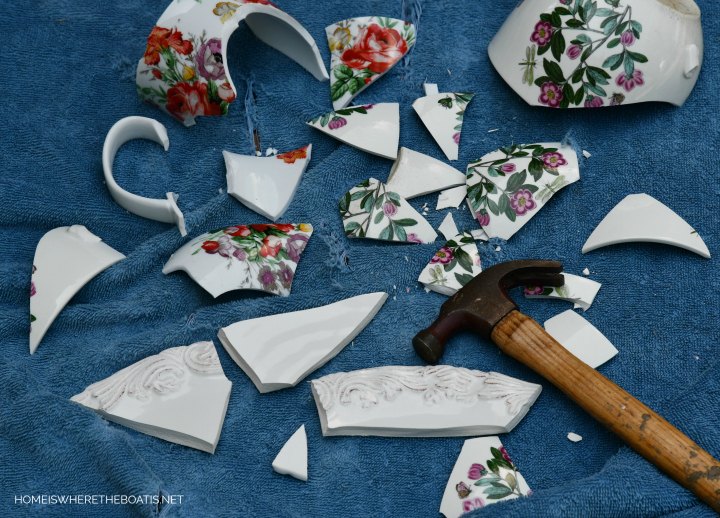
To break your ceramic pieces or dishes, lay an old towel on a hard surface like a piece of plywood or your garage floor or driveway. Cover your dishes/pottery pieces with the towel and lightly tap them with a hammer. Sturdy stoneware and some ceramic pieces will require a hard blow. . .a great way to vent your frustration. ;) The towel will keep the sharp shards contained and from flying, but it’s still a good idea to wear safety googles to protect your eyes. Check the size of your broken pieces and repeat until you have the assortment of sizes you want. I like a mix of large and small pieces but the same size pieces work fine too. You can also use a tile nipper to control the break in your pieces or if you want to keep a design or pattern intact.
Here's a list of materials used:
Material for mosaic assembly:
- Terra cotta pot(s)
- Dishes / tiles /ceramics /flat marbles
- Hammer
- Tile nipper (optional)
- Old towel
- Safety glasses
- Liquid Nails Heavy Duty Construction Adhesive
- Caulk gun
- Latex gloves
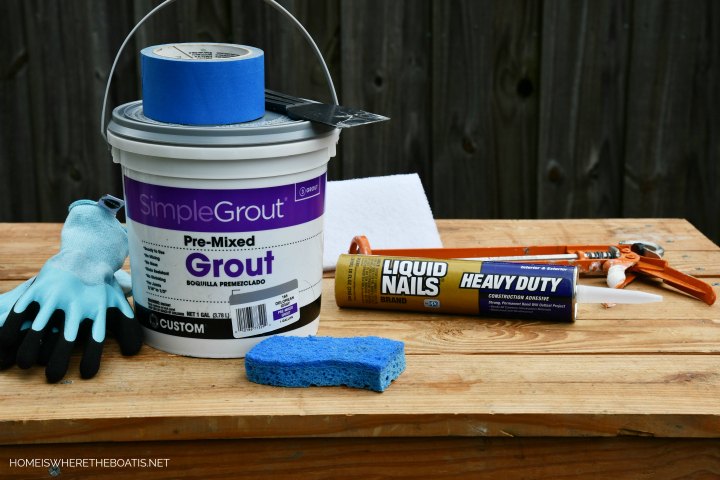
Materials to grout pots:
- Sanded grout (premixed recommended)
- Putty knife
- Sponge (2 recommended if grouting several pots)
- Bucket of water
- Old towel
- Newspaper or cardboard for work surface
- Rubber gloves
- Painter’s tape and plastic bags (optional)
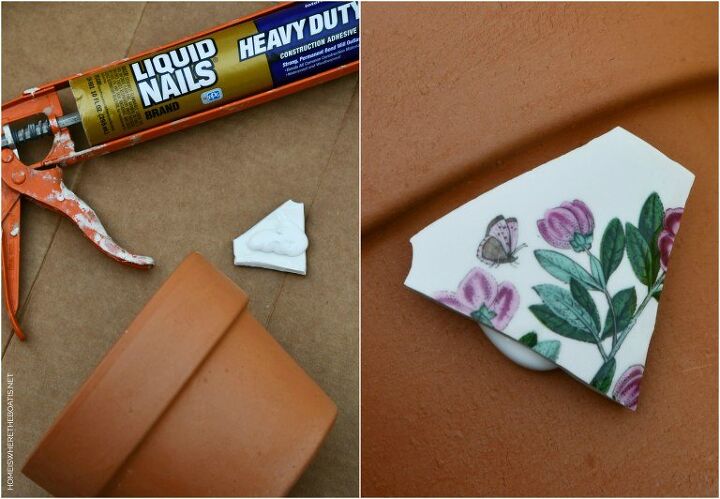
I use a caulk gun and Liquid Nails Heavy Duty Construction Adhesive to attach the shards to the pots. It’s low odor, sets in about 15 minutes and creates a strong bond that’s waterproof. It cleans up with water while wet, but I wear latex gloves to avoid contact with skin while using it. Follow the manufacturer’s directions for use, applying it outdoors so you have adequate ventilation and wear a mask if needed.
A little caulk is sufficient but apply enough caulk so you have good contact between your shards and pot, especially if some of your larger shards are curved. Don’t worry if some of the caulk seeps beyond the edges of your shard, as it will be hidden by the grout as long as it’s not level with your shard. Otherwise use the edge of a putty knife to remove the excess caulk that wouldn’t be covered by the grout. Cover the surface of your pot, fitting your pieces together to your liking like you would a puzzle. Don’t leave more than 1/2 inch space between your shards for the grout to span. Unlike the grouting process, you can stop and start, picking up where you left off and working at your desired pace. Once your caulk is cured and your pieces have bonded, (24 – 48 hours), you’re ready to grout.
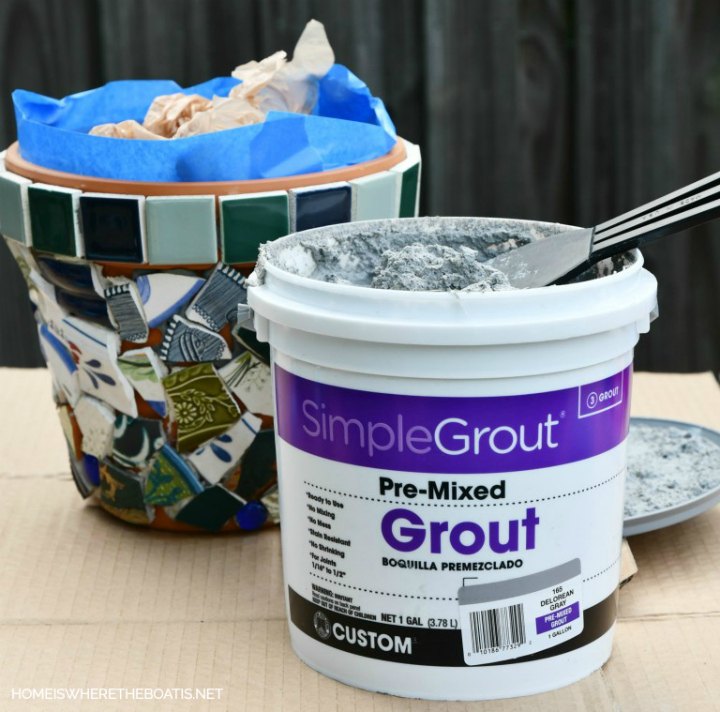
Premixed grout is a big time saver! You’ll need a sanded grout as it’s best for gaps up to 1/2 an inch and resists shrinkage and cracking. Grout comes a wide variety of colors so use whatever color you like. I like gray as it tends to disappear allowing your mosaic pieces to be the focal point rather than the grout color.
You can find sanded grout in the flooring tile department of Lowe's or Home Depot or online. It’s available in quart and gallon size buckets. I purchased the gallon size and used 2/3 of the bucket to grout my 7 pots.
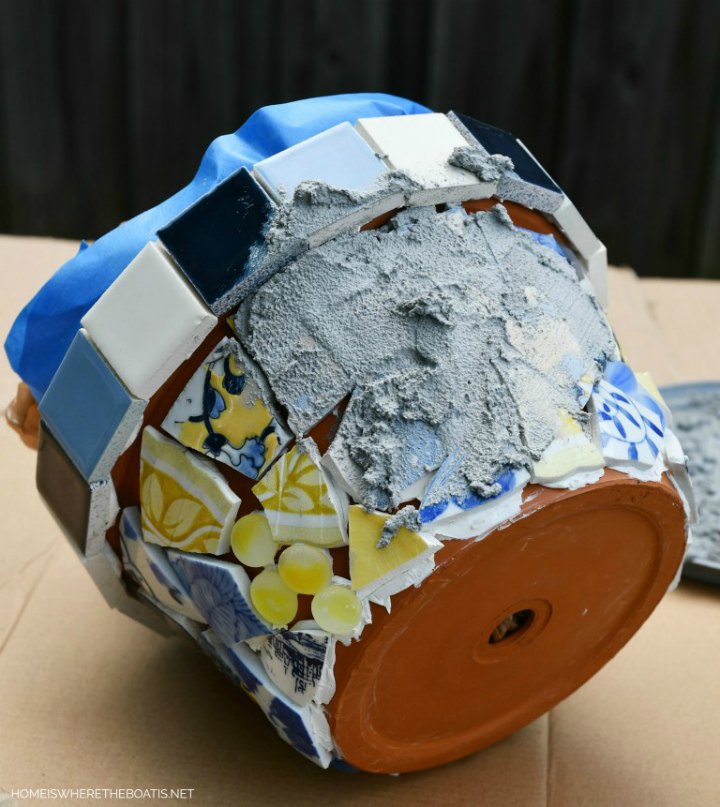
To help create a nice clean edge I used some painter’s tape lining the rim of the pot. I also tucked some plastic bags inside the pots to keep the interior relatively free of grout. This is totally optional but it makes your pots look neater, especially if you’re making mosaic pots for gifts.
You can use a putty knife or a rubber grout float to apply grout to the pot, pressing the grout into the gaps and joints. Rather than a float or knife, I find it easier to use my gloved hand, dipping it into the grout bucket and smearing it onto the pot. If you use this method, make sure you’re wearing rubber gloves that will provide some protection from the sharp edges of the shards, rather than thin latex gloves.
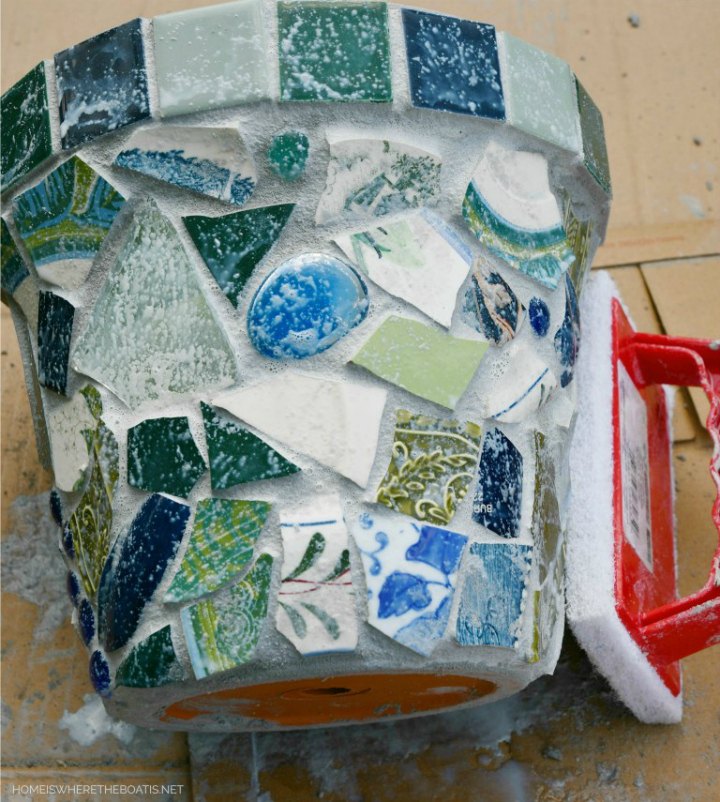
As soon as you have pot covered with grout and worked into the gaps, start removing it with a damp sponge. Use a clean bucket of water, rinsing your sponge out after several passes. Wipe your sponge across the shards, taking care not to remove the grout between your shards. I alternated between a sponge and an old dry towel to clean off the grout and buff the tiles clean.
Once you start grouting a pot, you don’t want to stop as any grout left to dry on the shards is much harder to remove later. Each pot took approximately 30 minutes to grout and to wipe clean. After 30 minutes of drying time, go back and buff away any grout haze with a damp towel from your tile/shards. Allow your pots to cure in the shade and out of the hot summer sun for 48 hours before planting them.
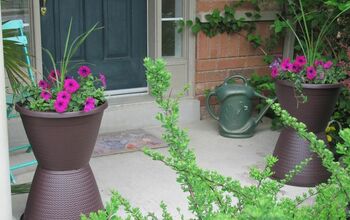
Note: As with any terra cotta pot planted outdoors, you want to empty it and store it safely for the winter, away from freezing winter temperatures to prevent it from cracking.
Always follow the grout manufacturer’s safety guidelines and wear a mask if needed.
Grouting is a messy process so you’ll want to do this outdoors and cover your work surface with newspaper or cardboard for easy clean up. The end result is rewarding, especially for a trash to treasure project!
Materials cost break down per pot:
$3.50 for 8-inch terra cotta pot
$4 of grout ($28 bucket for 7 pots)
$1 or less of caulk (out of a $2.58 tube)
+ cost of mosaic materials, broken dishes, tiles, marbles etc.
Best guess is as little as $10 per 8-inch pot, depending on whether and where you're purchasing mosaic materials or upcycling your broken dishes.
More photos at the blog link below!
Resources for this project:
See all materials


Comments
Join the conversation
-
Oh my !!! They are darling. Especially the one with the green handle !!!
-
CUTE! I have a couple ceramic items that I found at the thrift store years ago and I tripped and broke them after coming out of the store...was totally bummed. I always meant to glue them back together but this would be a better solution since they are already broke. Just need to pick up a pot and the square tiles. Great idea. Thanks for sharing!


Frequently asked questions
Have a question about this project?
Where do you get the tiles for the rim of the pot?
Looks like you covered the top of the rim with grout?
Could you use the grout as the fixing medium for the shards?