


How to Make Faux-Butcher Block Countertops

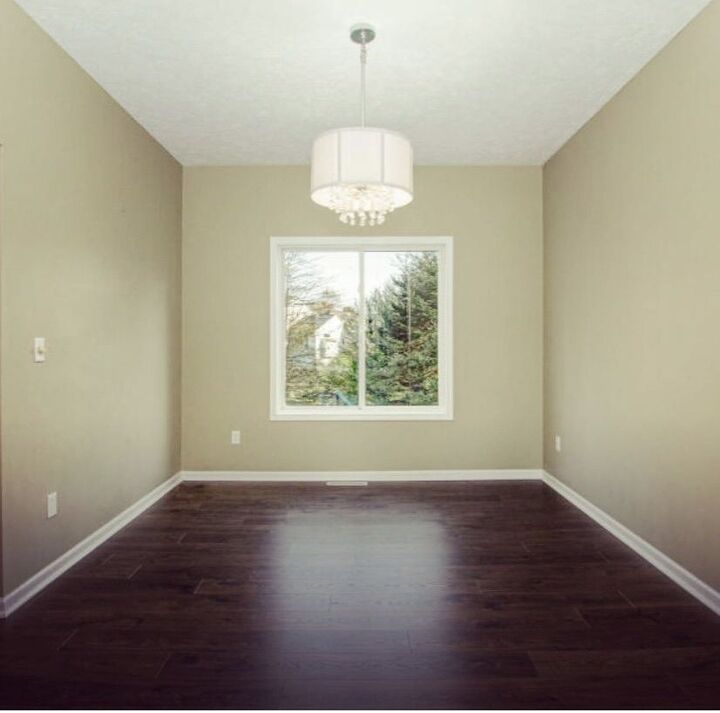
If you missed the last post on steps 1-4, you can read about that here. As a reminder, here is the “before” we started with. Blah. Certainly not a pantry. Lol.
To continue on, it’s time for the DIY faux butcher block countertops!
The pantry room by this point was much easier to visualize with the cabinets in place. Now I just had to create a countertop. I knew I wanted something rustic and wood, like butcher block, as a nice contrast to all the modern colors and styles I was using elsewhere. But I didn’t want to pay for butcher block. I am, above most all things, good at using cheap stuff to make something cool. So after scouring Pinterest, I found a post on how to create the look I was going for, plus I added some of my own ideas.
(This is about to be VERY thorough, so skim if you know what you’re doing better than me.)
To start, I used scrap plywood sheets from my dad that were 0.5 inches thick and 4 ft x 8 ft. I wanted a solid base to my counters and something to connect the cabinets to – maybe this wasn’t necessary, but I wanted it secure since these cabinets were older, plus I knew I’d be using cheap wood for the “pretty” part of the countertops, so I wanted to make sure they would hold together.
Cutting these plywood sheets to the size of your counters and then laying them in place also helps you visualize what the final result will look like. It also helps you be sure about your measurements before you do the complicated butch block top!
Now, about that measuring and cutting…
For the width of your countertop, don’t forget to measure from the back wall to the very front of your cabinets. If you mount your cabinets to the wall like I did earlier, you’ve got that extra 2×4 in the back to consider. So don’t just go by the measurements of the cabinets – go the whole width from wall to front of the cabinet.
Also consider the overhang at the front of the cabinets. Usually 1-2 inches of overhang is standard, but test out what you think will work with your cabinet drawers, handles, etc. If you only want a slight overhang, which is what I did, stick with the measurement from the back wall to the front of the cabinet, because you’ll attach a front 1×2 board later to cover the front edge of the plywood AND the front edge of your “pretty” top layer of the countertop. This will give you a narrow overhang of 0.75 inches (the true width of a 1×2), which works great for my cabinets.
OR, if you want a wider overhang, take the measurement from the back wall to the front of the cabinets, plus add whatever width you want, keeping in mind the 0.75 inches that will be added with the front piece 1×2 board. So, if you want a total of 27 inches wide, cut your plywood at 26.25 inches wide, then with the added 0.75 inches of the front piece you will have your 27 inches.
Make sense? I’m not gonna lie, all this measuring and math took me a while to figure out my first time around. Take your time getting your plywood layer measured correctly – this sets you up for a much easier time when you start to do the top “pretty” wood.
Measuring lengthwise, decide how long you want to overhang the ends of the cabinets. Again, usually 1-2 inches is standard, but if you’ve got a gap between the cabinet and an end wall like mine, you might want it a little longer to reach farther to the wall.
I knew I wasn’t going to bother with anything fancy on the ends against the walls, so I didn’t worry about any additional math to fit a 1×2 board that would make the edge look pretty. I just measured right to the wall and knew I’d put the “pretty” wood on top at the same length.
If you ARE going to see the end of the counters, figure out how much overhang you want, then cut your plywood 0.75 inches shorter on that end. This will leave room for the additional 1×2 board as an edge-coverer (which again will add 0.75 inches of length). If you’re going to see BOTH ends, cut your plywood 1.5 inches shorter to leave room on each end.
OR if you want to do a waterfall edge, measure your plywood length by measuring from one end to the other of your cabinet edges, then adding the width of your plywood. So, if you’re using 0.5 inch plywood, cut your plywood the length of your cabinets plus 0.5 inches. This will give you room to attach your waterfall side later. ALSO CUT a piece of plywood for the side base of your waterfall edge. To measure for this piece, the height will be from your floor to the top of your cabinets where it will meet your countertop plywood base. The width will be the same as the width you did for the countertop plywood base (so from the back wall to the front of the cabinet, or however wide you want the overhang).
I know I gave you a lot of information and it might seem confusing, but once you narrow down which options to go with, it’s not too bad.
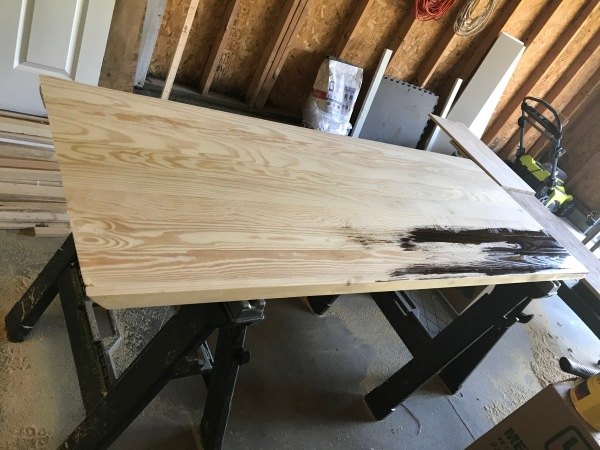
Ok. Once you’ve got your width and length for your plywood, mark it out with a square (and/or a level if you don’t have a long T-square) and make a good thick line with a pencil. If you’ve got a table saw (I don’t…but want one), then cutting the board shouldn’t be difficult. If you don’t have one, I used a circular saw because I have a pretty steady hand. It wasn’t that difficult if you can follow your pencil line.
I did nothing further to the plywood other than sanded away some rough spots on my cut edges so that I didn’t get poked as I continued working. This is the base layer, after all, and you’re not going to see it once your counters are done.
To check measurements, lay the plywood on top of your cabinets and get a good look! Make sure your ends are as long as you want and your overhang is as wide as you want. And if you’re doing a waterfall edge, be sure to see if that side piece fits against the side of your cabinets – mine needed some shaving and adjusting, so no worries if you don’t get it right the first time.
Next, time to make the actual “pretty” top of the counters! I used relatively cheap pine tongue-and-groove from Lowe’s. Yes, they are all fancy and grooved on the top, but to make them faux butcher block counters all you do is… FLIP THEM OVER! The back sides are smooth. Just make sure you make all your cuts with the right side facing up!
For the width… Taking the measurements from my plywood, I used simple math and figured out how many boards I’d need to get the right width. The boards each were 3.125 inches, so with my total width of 25.75, I used 8 boards to get 25 inches width, plus 1 more board that I rip-cut (cut lengthwise) to get that extra 0.75 inches. If you need a weirder measurement, just rip-cut whatever extra width you need on that last board. I would suggest using a table saw for this, but again I did it with a circular saw and it wasn’t that hard – follow your pencil marks when you measure and make good lines! This board should go along the back wall so that it’s different width won’t get noticed as much, and you also want it there because it won’t have the tongue-and-groove option anymore since you’ll cut off the groove. BE SURE to cut off the groove side, not the tongue, or it won’t attach to your other boards in front of it.
Also to consider for your width, you’ll want to cut off the “tongue” of your front piece of wood. This will let you attach the 1×2 to the front to make your covering edge piece/overhang. I again found this pretty easy with a circular saw, but a table saw would be easier. (I really should just get one of those things.)
If you’re doing a waterfall edge, use the plywood you cut for your waterfall side base. Treating this as you did the countertop plywood board above, do the same steps to figure out the width you’ll need for the waterfall edge side.
For the length of your countertop boards… I’m not sure if these come longer than 8 feet. I personally needed like 12 feet for my narrow cabinet wall, so I just staggered the pieces on both ends and gave myself pieced-together length that way. It also looks pretty cool, fortunately.
If you’re not bothering with anything fancy for the countertop ends that go against a wall, cut your length exactly at the same length as your plywood base. You’ll just line them up and it’ll look great from the top.
If you ARE going to see your ends and you want that 1×2 end piece…still cut your length exactly at the same length as your plywood base. (See? I told you it would get easier if you did the plywood layer correctly!) The ends will line up and you can attach the 1×2 board to cover both, leaving yourself a nice edge piece.
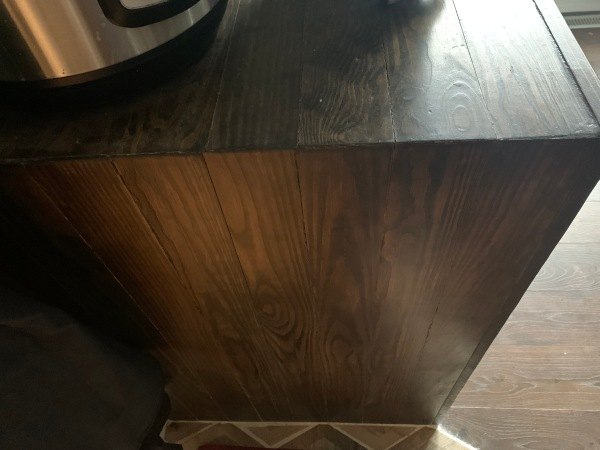
If you’re doing the waterfall edge, FIRST MAKE SURE you have the smooth side of the wood facing up, not the grooved side. Then take the height of your plywood piece plus add the “actual width” of the tongue-and-groove boards, which in my case was 0.6875 inches…or whatever measurement was close enough on my tape measure, frankly. Mark your board at this length, then use a miter saw to cut that end at 45 degrees. So, the long side should be the smooth side facing up/out, and the shorter side should be the grooved side facing down/in. (This is for the countertop top. When cutting for your waterfall side, do the same with those pieces. So, the two 45-degree angles should line up to make a 90-degree angle for the countertop corner edge.)
Once everything is cut, lay out your plywood on sawhorses or in some manner that will allow you to get underneath to nail everything together. If you’re doing the waterfall edge, lay out this plywood separately and follow all the same steps as below for this side piece, but it will be attached to the overall counter later, once the counter is installed.
Next, lay out your tongue-and-groove boards on top of the plywood so the correct ends are where they should be. (You might also want to do this as you go to check your work as you cut your boards.)
Some of the boards might be a little warped, but arrange them until they are as good as they’re going to get – you can forgive a lot with the nailing process in a minute. Remember to put your weird-width board in the back and save your tongue-less board for the front. Also make sure you like the pattern of the wood grain when they’re all lined up. Once, you’re satisfied, connect the tongues and grooves together. Again, some may be warped and not line up perfectly, but do the best you can.
Now is when I grabbed my trusty nail gun. Starting with my front board, I made sure it was lined up and square with the plywood layer. Holding it in place with clamps, I used 0.75 inch brad nails from underneath the plywood and shot them up to hold the tongue-and-groove board. I did this in pairs in a staggered pattern every foot or so.
Once I was sure the front board was secure, I removed my clamps and double-checked that the next board was in place in the tongue-and-groove and also on the ends. I then clamped the ends. Then I went under and nailed that board in place too.
I continued this process until the last, back board, which fortunately lined up with the back of my plywood evenly. If it doesn’t line up when you go to clamp it because it’s too wide, cut more off. If it’s way too narrow because some measurement was off somehow, cut a spare board wider. But if it’s too narrow by only a little, either live with a slight gap in the back or else space it out a little from the last secure board and you can fill it in with wood putty in a minute.
Now for the end/front/edge 1×2 board pieces. Simply cut them to length. If you have a front piece and end pieces, I would cut them at 45-degree angles to make nice corners.
Start with your front piece. I held my cut-to-length 1×2 board level with the front tongue-and-groove board (although, again, the tongue should be removed), and used my nail gun to use the same nails and secure it in place. I did this every foot or so, knowing how rough we were likely to be on the front of the countertop. There might be a gap where this board meets your front top piece, but wood putty will solve this. You could also use wood glue if you don’t like nail holes showing, but I covered mine just fine with wood putty and now you can’t see them at all.
If you have end pieces, attach them the same way, being careful to line up your corners as best you can, although putty will forgive this a little too.
For a waterfall edge, leave off the front edge piece until you know the whole thing fits in place against your countertop.
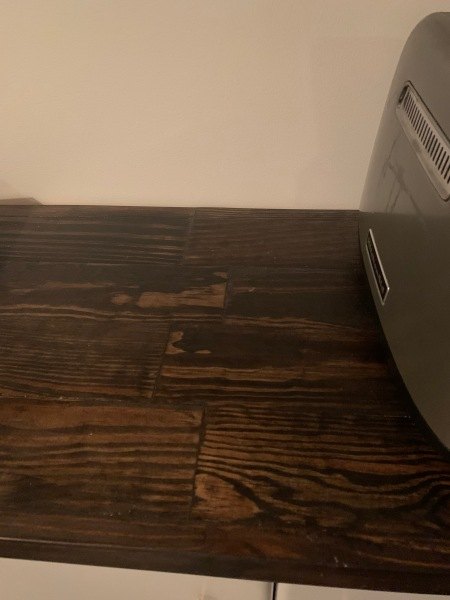
Once all your boards are secured, it’s time to use wood putty. I was going to skip this step and just stain it, but I’m glad I didn’t. The wood putty makes all the cracks more smooth, fills in any chunks missing from the wood, and makes it overall look like a unified piece of countertop. Simply follow the instructions and wait for it to dry. Once it is dry, sand the putty and the whole countertop as smooth as you can.
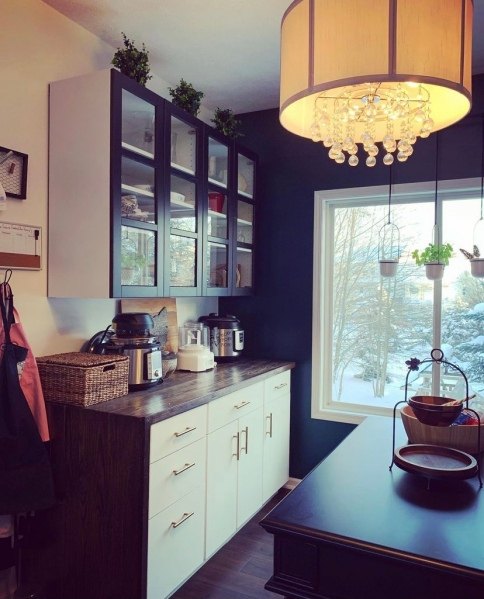
Once the putty is dry, it’s time to stain! This is when it really starts to look like your new faux butcher block countertop. I picked a walnut stain because I used this in many other rooms and it ties our house together. It also looks good against golden hardware. Follow the instructions of whatever stain you use, but I ended up doing 2 coats to get the look I wanted.
Once the stain is dry, it’s time to install! I had my husband help with this part because these babies were heavy. But this really was the simplest step. We put the counters on top of the cabinets, wiggled them around to get the right position, and then I crawled underneath and screwed them secure to the counters by the hardware that was already with my base cabinets. For the narrow cabinets that were actually uppers built into the floor and wall, I screwed right through the top insides of the cabinets into the plywood base of the countertop. That really helped secure everything in place. Easy peasy!
Then came the waterfall edge. I’ve spared you a lot of trouble (believe it or not – ha!) by giving the instructions that I struggled to figure out as I went in making that thing. But basically, take the side piece you’ve assembled and cross your fingers that it fits. If it’s too tall, you can cut off the bottom end with a table saw…or circular saw. If it’s too short, you can add wood to the bottom edge and stain it, or you can just secure the side piece in place so that it doesn’t quite touch the floor. Once you’ve got it where you want it, screw through the inside of the cabinet into the plywood base of the waterfall side. Then attach the 1×2 to the front edge with your nail gun so that the 45-degree angles line up with your front corner.
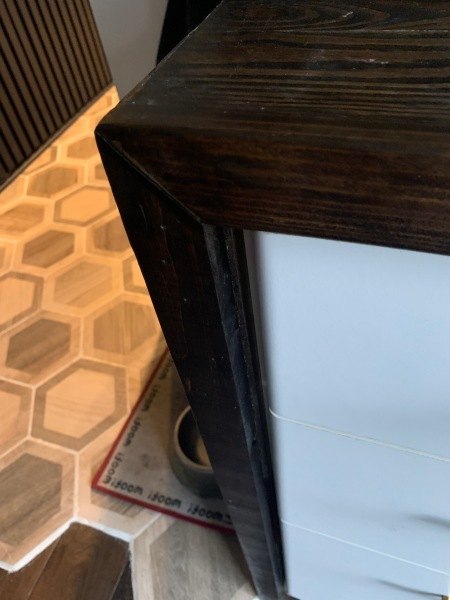
Hopefully you’ll be luck and all your 45-degree angles will line up exactly to clean, beautiful 90-degree corners. However, mine certainly did not! But after applying wood putty, it all looks terrific and you can’t hardly notice anything was ever off.
So that’s how I built my countertops! It took a lot of little steps, but really it goes pretty quickly once you figure out what you’re doing.
Adding accessories and decorative touches was the REALLY fun part of my pantry reno, so I’ll finish up this DIY project next week with fun shopping and decorating tips! If you haven’t already, be sure to subscribe to my blog so you don’t miss it!


Frequently asked questions
Have a question about this project?