


The Ultimate DIY Guide To Creating Your Own Hanging Plant Stand

$15
2 Hours
Easy
You have to try this! These are easy, beautiful and relatively inexpensive (depending on who you ask) to make! These handmade DIY hanging plant stands are perfect gifts for birthdays or the holidays.
{
"id": "4024684",
"alt": "",
"title": "",
"video_link": "https://www.youtube.com/embed/kScb3qVtA2Y",
"youtube_video_id": "kScb3qVtA2Y"
}
{
"width": 634,
"height": 357,
"showRelated": true
}
Check out the HOW-TO VIDEO above and the tools, supplies list, and instructions below! As always, if you love this tutorial, SHARE WITH YOUR FRIENDS and pin it to your favorite boards!
***When it comes to wood, be sure to use the HEAT treated wood and NOT the PRESSURE TREATED wood. Some pressure treated wood has had levels of arsenic in it in the past and was found to be unsafe to use for projects like this or projects used indoors. Although things seemed to have changed over the years, I personally wouldn’t chance it.***
Tools Needed:
Saw (Hand saw or Miter saw- which is what I used)
Drill
Drill Bit to Pre-Drill holes (preferably with a counter-sink)
Screw Driver Bit to fit the screws you picked out
Tape Measure
Speed Square (To mark your cuts and keep them straight when marking them)
Pencil
Supplies List:
(1) 2 x 6 x 4 ft pine board (The smallest length of 2X6 that Home Depot carries is the 8 ft lengths so I bought that since I was making more than one of these.)
(1) 1 x 6 x 8 ft common pine board (The smallest length of 1X6 that Home Depot carries is the 8 ft lengths so I bought that since I was making more than one of these.)
(1) 2 x 4 x 8 ft pine board
(4) 1 1/2 inch Multi-Purpose Screws
(12) 2 1/2 inch Deck Screws
Stain Color of Your Choice- I used Rust-Oleum Stains for mine!
Kilz Klear Water Based Primer, Binder, and Sealer or any other WATER BASED outdoor sealer that you like
(1) large ceiling hook
If you are planning to stencil a design on the front you will also need these supplies:
Chalk Paint or Acrylic Paint of your choice– I used Heirloom Traditions Chalk Paint in the shade Ala Mode (We also get a coupon code when shopping online from their website! Use code “HEIRLOOMRULES” to get it cheaper!)
Flat Acrylic Paint Brush
Oracal 631 Vinyl or preferred stencil material
Silhouette Cameo or Preferred Craft Cutting Machine
Transfer Tape
Xacto Knife
Squeegee or Burnishing Tool

Instructions:
1. Cut your wood! You will need to cut three (3) 16 inch pieces from your 2×6 board (Two pieces will be joined together for your bottom platform and one will be for your top piece.) Cut three (3) 16 inch pieces from your 1×6 board. Cut two (2) 32 inch pieces and one (1) 12 inch piece from your 2×4board. Use your speed square, tape measure, and saw to measure and cut your wood.
Altogether you should have made 9 cuts of wood.
(3) 16 inch in length- 2×6
(3) 16 inch in length- 1×6
(2) 32 inch in length- 2×4
(1) 12 inch in length- 2×4
2. Stain your wood in the color of your choice. Allow to dry for at least 24 hours.
3. Grab two of your 2×6 pieces and set them next to each other so that they are touching. You are going to use these as your base so that it is nice and sturdy! Next grab one of your 1×6 pieces and your drill. (You are going to want to pre-drill your holes so that it is easier for you to screw in your screws without your wood splitting.) Center your 1×6 piece on top of the middle of your two 2×6 pieces and drill your holes so that there are a total of 4 holes. You want to make sure that you place them so that your 1×6 will be attached to BOTH pieces of your base!
4. Using your screw bit, screw your 1 1/2 inch multipurpose screws into the 4 holes that you just drilled. This will make it so that your base pieces are now attached together, and also attached to your 1×6 piece.
5. Grab your 12 inch 2×4 piece and center it on your base that you just built. Pre-drill two holes on either end of your 2×4 piece. Using your screw bit, screw two of your 2 1/2 inch deck screws into the holes you just drilled into the 2×4 piece.
6. Next grab one of your long 2×4 pieces. Match it up to one side of your smaller 2×4 piece that you JUST attached to your base. Once again pre-drill two holes into the side of your long 2×4 piece going INTO the end of the smaller 2×4 piece (Please see video below as this part can be slightly confusing when reading). Do the same to the other side of the smaller 2×4, and attach the other long 2×4 to the smaller one in the same fashion.
7. Grab your remaining 2×6 piece and find the very center of your piece using your tape measure. Attach your ceiling hook by screwing it into the center. (I did mine by hand.)
8. If you are painting a stencil for a design or message on your plant stand, continue reading, otherwise skip to step 14.
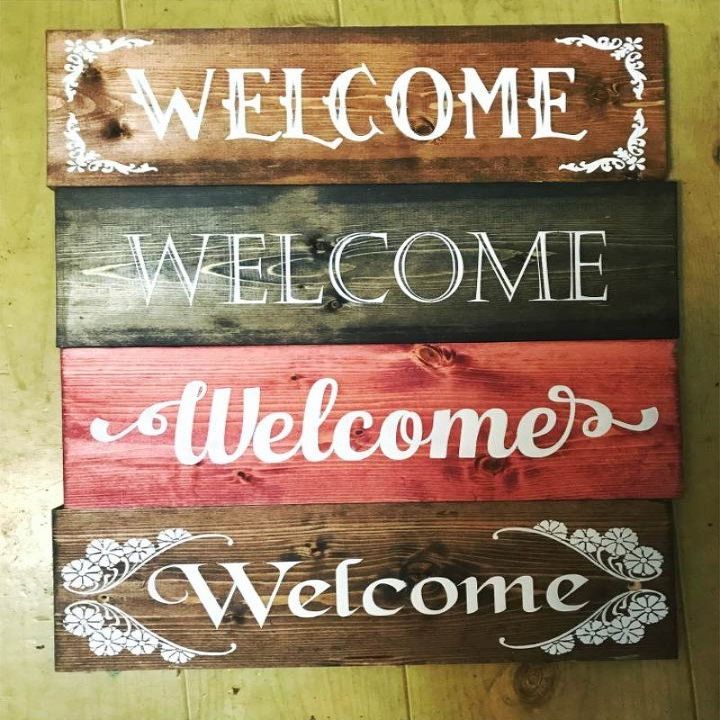
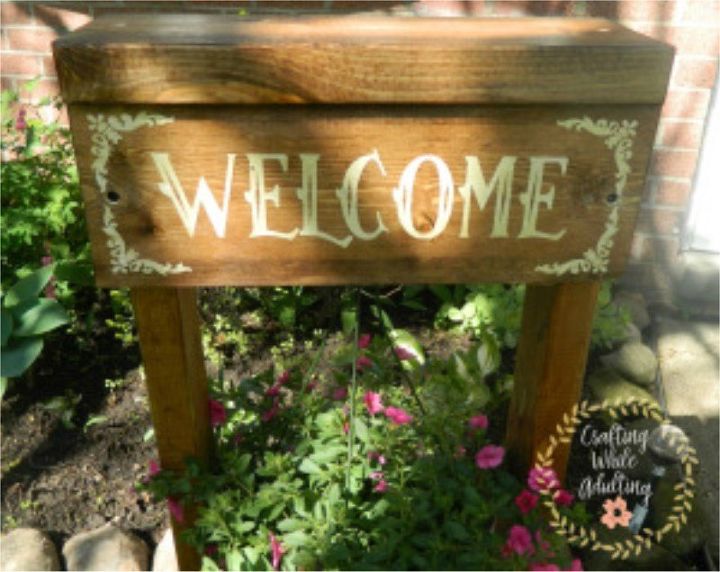
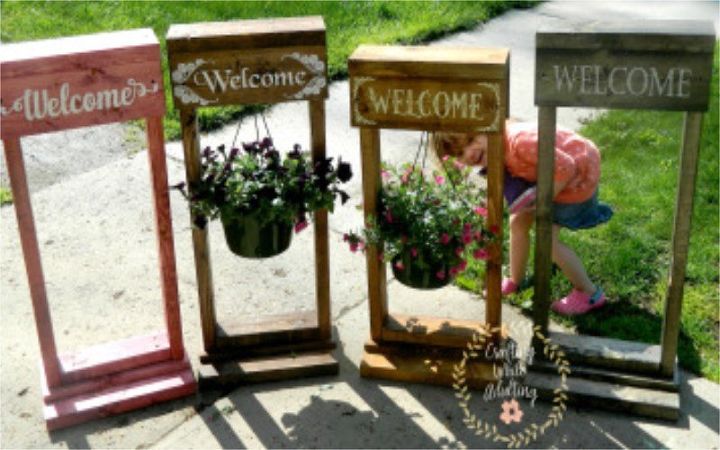
SIDE NOTE** I created some "welcome" designs for those that are interested. They are the ones pictured above! You can find those here at the following link:
https://thehungryjpeg.com/product/67024-welcome-design-pack-of-4-cutfiles/DeniseN/
9. Create or open your design in your design software and cut your stencil out on your vinyl. Remove design from the paper backing by lifting up on your transfer tape. Apply your stencil to one of your leftover 1×6 pieces using your transfer tape and burnishing tool. Remove transfer tape.
10. Weed (the process of removing the vinyl that you DON’T want used in your design) your stencil using your XACTO knife or weeding tool.
11. Apply transfer tape to your design using your squeegee/ burnishing tool.
12. Remove design from the paper backing by lifting up on your transfer tape. Apply your stencil to one of your leftover 1×6 pieces using your transfer tape and burnishing tool. Remove transfer tape.
13. Using your chalk paint and your flat brush, paint over your stencil (do several coats with some dry time between coats) then remove your stencil immediately after finishing your last coat. Don’t let your last coat of paint dry on your stencil before removing it. You can see one of my past tutorials/videos on stenciling techniques HERE.
14. Place one of your 1×6 pieces at the top of your plant stand, running parallel to the long 2×4 pieces. (These will be your face plates for the front and back of your stand). Pre-drill two holes into the 1×6 pieces going INTO the edge of the 2×4 pieces, one for each side, (once again please see video). Screw in your 2 1/2 inch deck screws into the two holes that you just made. Do the same for the 1×6 on the other side.
15. Grab your remaining piece (which should be the last 2×6 piece that you put your hook into ) and put it on top of your stand with the hook facing down. Pre-drill your holes (2 of them) into the 2×6 piece, going into the two long 2×4 pieces. Screw in your remaining deck screws.
16. Seal your plant stand with your water based outdoor sealer! I prefer Kilz Klear for my outdoor sealing purposes. You will want to use water based sealer because oil based tends to cause white to turn yellow over time! Water based sealers keep your white paints truer to color for longer!
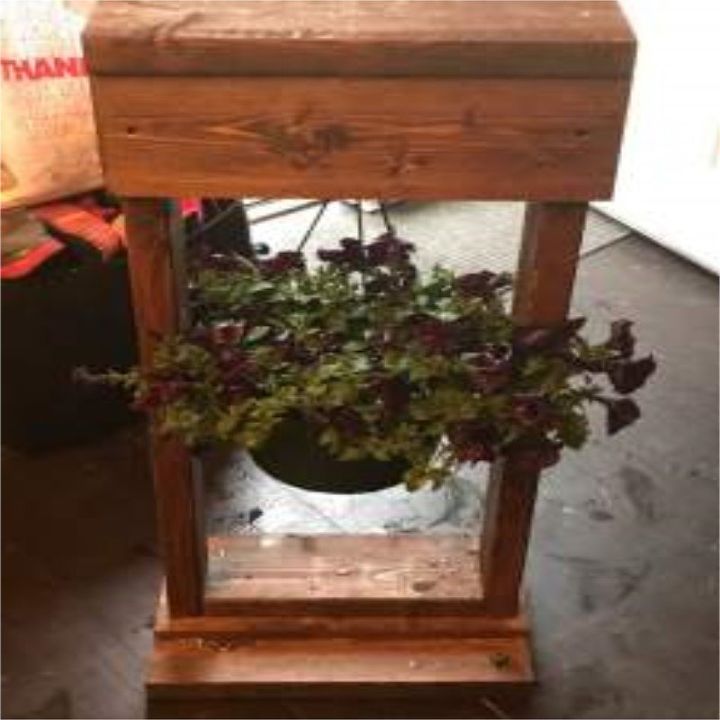
17. Attach your hanging plant basket and marvel at the beautimous plant stand that you just built yourself!
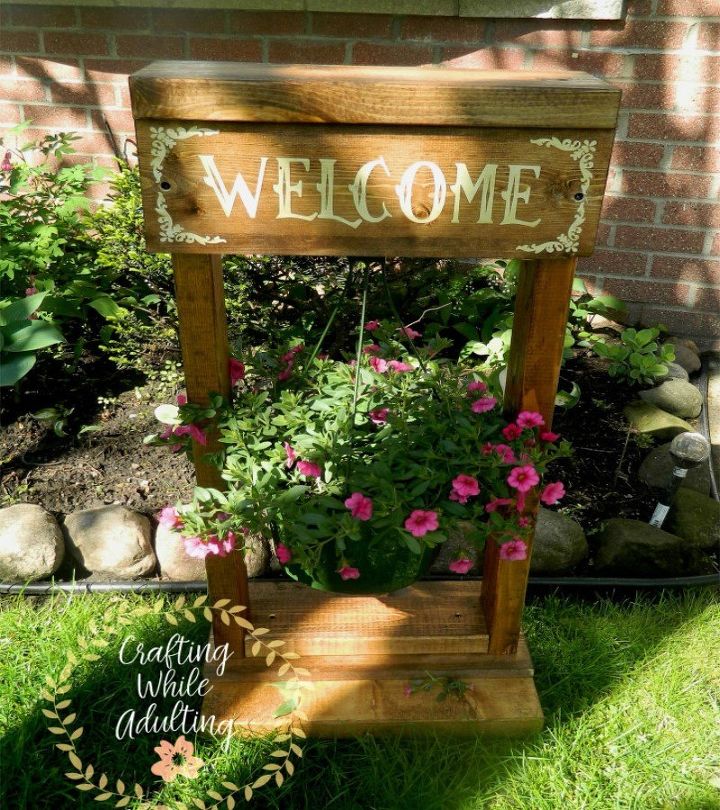
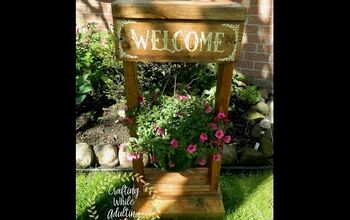
Look how beautiful these look!
You can make them wider/taller/shorter depending on your basket sizes! Just add/subtract the same number of inches across the board when changing the sizes. For example, say that you want to make them wider, you would want to add however many inches to all of the 1x6's and 2x6's so that all match up. Super simple!

Look at how sturdy these things are! Both kids were leaning and hanging on these bad boys and none of them tipped over!
Did you love this project? If so, be sure to share with your friends and pin it to your favorite DIY pinterest board!


Frequently asked questions
Have a question about this project?