


3 Non-Toxic Household Ingredients to Unclog Your Drain in 4 Easy Steps

The only time I remember to clean the drains is when water starts going down slowly. Then I freak out! (Plumbers are one of the least favorite people in my “contacts” list.) Sounds familiar? But keeping the drain clean ’n smooth is easier than you think: All you need to do is to use a couple of my two favorite cleaning ingredients regularly. So. Ready to save some money on plumbing? Read on to find out how to unclog a bathroom sink or tub!
I’m sure you’re thinking: Why should i bother? My DranO -or commercial drain opener - works as well.
But let me tell you something:
drain openers (especially the Caustic type) are amongst the most toxic cleaning products out there. Think about the fumes that you - or your family - will breathe! Besides, anything that goes onto the drain will end up polluting our water systems.
Plus if you have an enameled old iron sink or bathtub and use a caustic opener you’ll likely get yellow spots from the drain opener.
So, why not trying? This is a quick, easy, and non-toxic method that takes only a few more minutes than commercial openers.
Let’s get started.
STEP 1: PREVENTION. USE BASKETS & STRAINERS IN ALL OF YOUR DRAINS
I’m sure it’s not the first time you’ve heard it: prevention is key to avoid big problems.
But how can you prevent getting your drain clogged?
Easy: Use a HAIR BASKET in your shower drain and a STRAINER - ideally with a fine mesh - in all others. It’ll prevent items (large and small) from falling into the drain.
And the obvious: don’t throw paper or let hair or soap go into the drain. They’ll make a mess!
But let’s just assume your drain is going slowly and you dread calling the plumber as much as I do. Here’s something you can try!
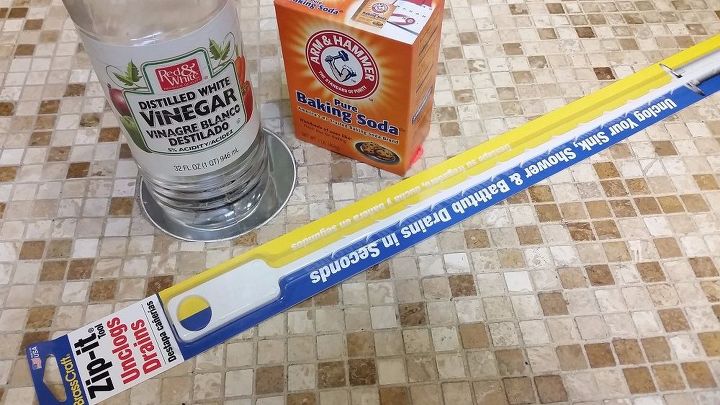
STEP 2: GATHER YOUR MATERIALS
If the reason of a slow drain is just hair and other goo, or just build up, you can clean it easily with the following materials:
— Zip-It tool
— Baking Soda: 1/4 cup
— Distilled White Vinegar
— Hot water
You’ll also need:
— Pot to heat the water
— Paper towels
— Small brush (optional)
— vinyl or plastic gloves (optional)
— kitchen mitts or small towel (optional)
— Zep Drain Care Build-Up remover (optional)
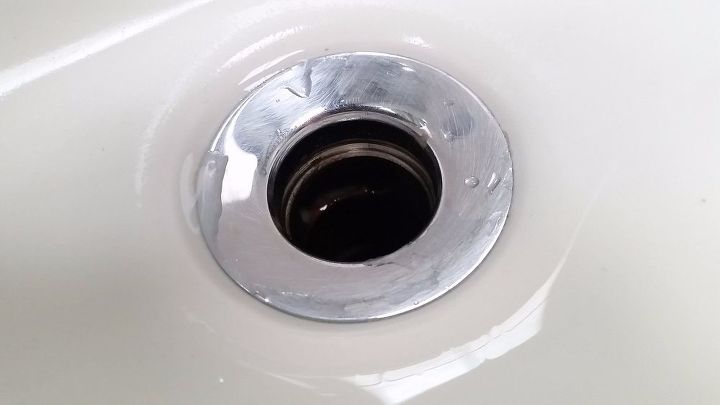
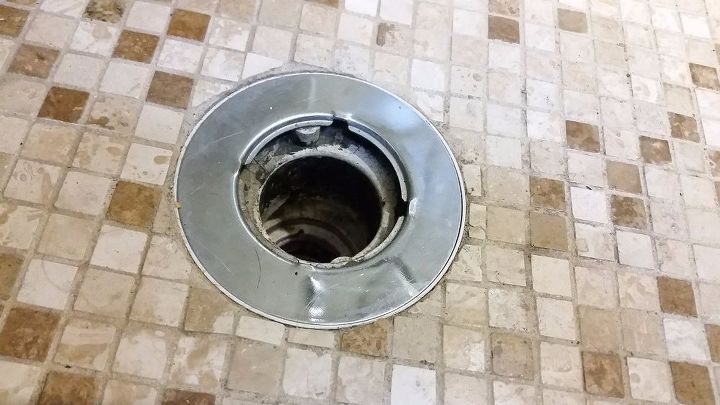
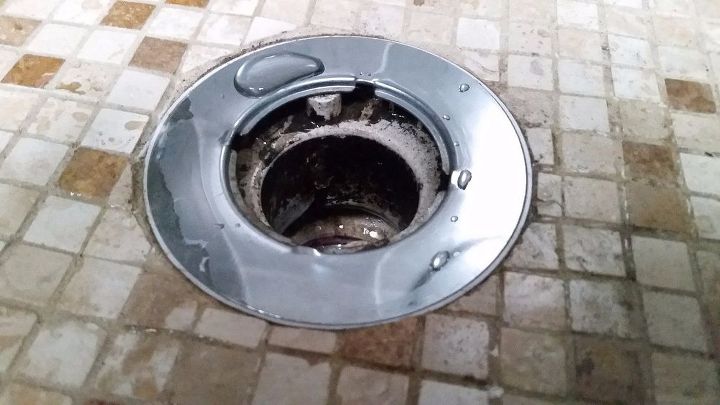
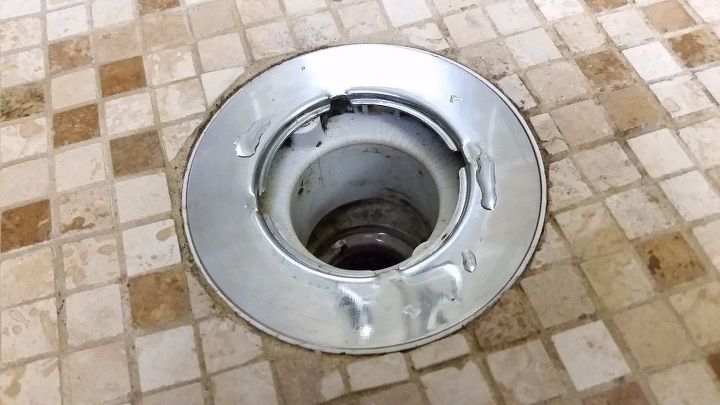
Quick FYI > I cleaned both the shower and sink drains, so you’ll see pictures of both to illustrate my process. You can do one or more at a time, whatever is easier.
STEP 3: LET’S GET THE DRAIN READY!
I came across this handy tool just recently: Best $2.5 ever spent!
It even comes with a curved end to fit the elbows. You can get it at the Home Depot or Target, and it’s also available online.
But before you use the ZIP-IP, it’s better to unscrew or remove the stopper from the drain. A screw driver or pliers will help to get it out. I won’t get into details here - want to get to the cleaning part! - but you can find plenty of info on how to do this on the web.
CAUTION: DON’T USE BLEACH, DRAIN OPENER or other irritant before you use the Zip-It tool. It’ll sure splatter.
Now, Zip-It may not work with all drains (cross drains are a bit more difficult for the tool) but I’d say still worth to try. It worked well in our cross one.
TIP: If you don’t have a Zip-It tool or it doesn’t work perfectly, you can try with a screw driver or tweezers instead to remove debris.
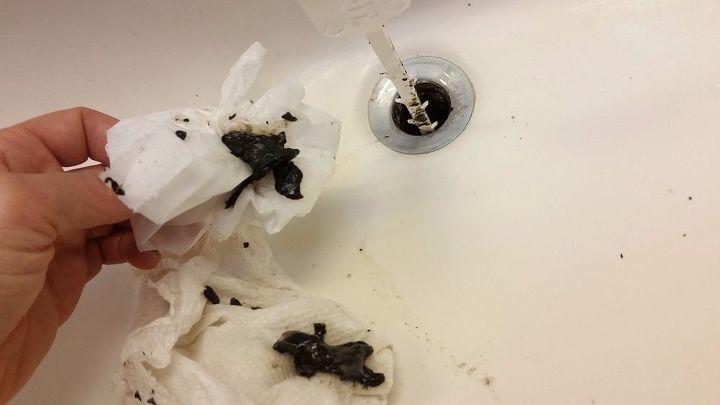
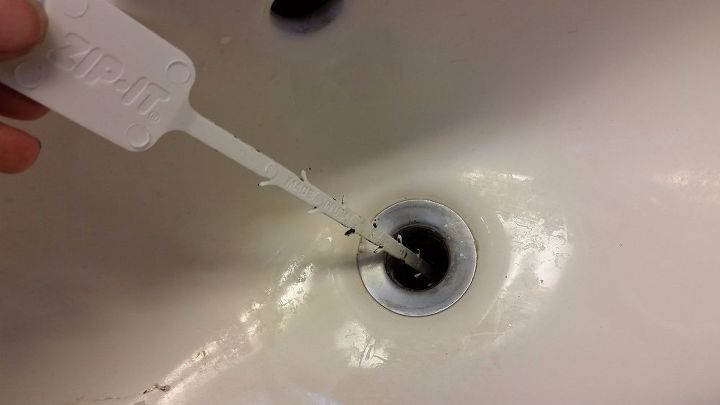
STEP 4: READY TO ZIP-IT?
Before you get all excited with your new Zip-It, let me warn you:
You’re likely to get indescribable “treasures” out of your drain so if you can’t stomach yucky goo, hair and other niceties, get hubs to do the dirty job.
TIP: if you have allergies, use goggles to protect your eyes and gloves to avoid goo in your hands.
Now we’re ready! Put the tool all the way in until the handle meets the top of the drain. Then SLOWLY pull back.
TIP: SLOWLY is the key word here to avoid splashing debris!
Insert Zip-It in the drain at the 3, 6, 9 and 12 o'clock position and repeat as needed.
TIP: If the Zip-It only goes half way down or less, the pipe is likely to have an elbow. Get the tool with the bent tip, or try the screw or the tweezers instead.
Now to the easy part! :)
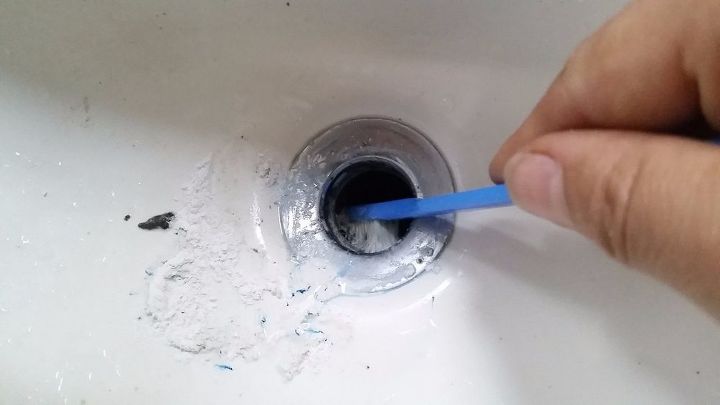
STEP 5: LET’S ADD BAKING SODA
Once you’ve gotten rid of debris, it’s time to clean the pipes! First step is adding baking soda:
Pour 1/4 cup directly onto the drain.
TIP: use your fingers to remove any clumps so it goes easier onto the drain
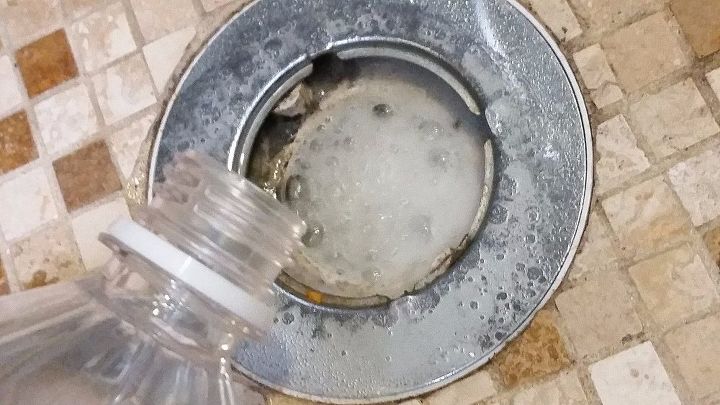
STEP 6: HERE GOES THE VINEGAR
Get your bottle of white vinegar and start pouring until it bubbles up. Wait until it stops and pour a little more again, once or twice.
Get your timer, and set it up for at least 15 minutes.
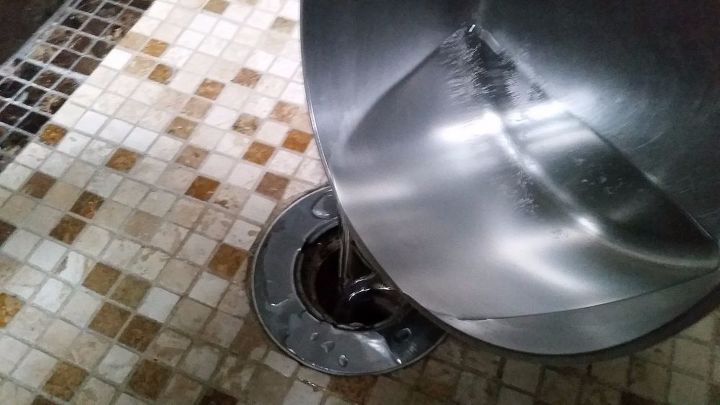
STEP 7: HOT WATER IS (ALMOST) LAST
While you’re waiting fill your pot with tap water, turn the flame on and keep it there until it’s pretty hot. It doesn’t need to be boiling.
TIP: A medium size pot is good. You’ll have to take it to the sink, so make sure it’s NOT TOO HEAVY and EASY TO CARRY!
You can also use kitchen mitts or a kitchen towel to grab the hot pot better.
The 15 minutes will be up by the time your water is hot! Get your mitts on, take the pot with water and CAREFULLY POUR the hot water onto the drain.
TIP: POUR SLOWLY to prevent splashing hot water.
Your drain should be clean now, but I like to do a couple of things to make it EXTRA CLEAN.
STEP 8: REPEAT (IF YOU FEEL LIKE IT!)
Though it may not be necessary, considering you’re all set it’ll only take another 15 minutes to do it again.
So once you’re done, feel free to repeat the procedure - STEP 5 thru 7 - again.
I’m glad I did it! Because, really, how often do I clean my drains?
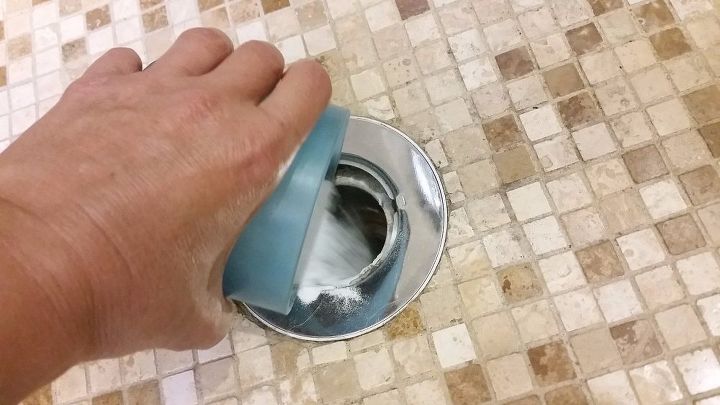
STEP 9: WANT TO CLEAN THE OPENING TOO?
If you feel inspired or in cleaning mode, grab a small brush or toothbrush and dip it in baking soda or Bon Ami cleaner. Start brushing the opening to remove the debris still in there.
I can’t remember when was last time I cleaned the drains, so there was a lot to remove!
Scrub a little more and rinse with water. No need to heat it this time!
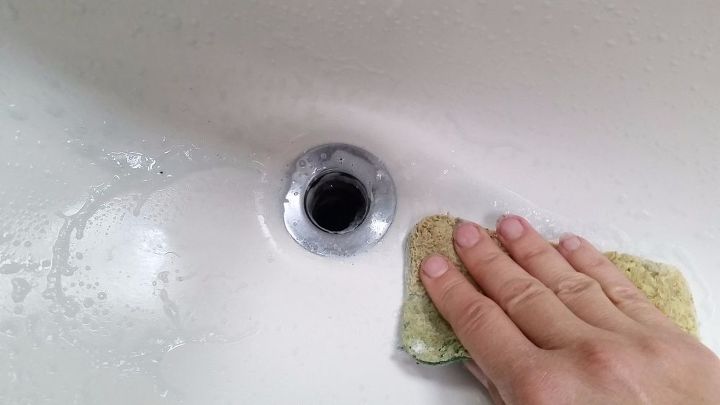
STEP 10: LET’S WRAP THIS UP & CLEAN THE SINK
You don’t have to, but after pulling all the goo not even the hot water left the sink clean.
So if you felt like wrapping up this cleaning-maintenance project nicely, get a scrubber and dip it baking soda or Bon Ami to give that sink a little extra love.
Tired of cleaning?
Not a problem. Pat yourself in the back, because you’ve saved a call to the plumber.
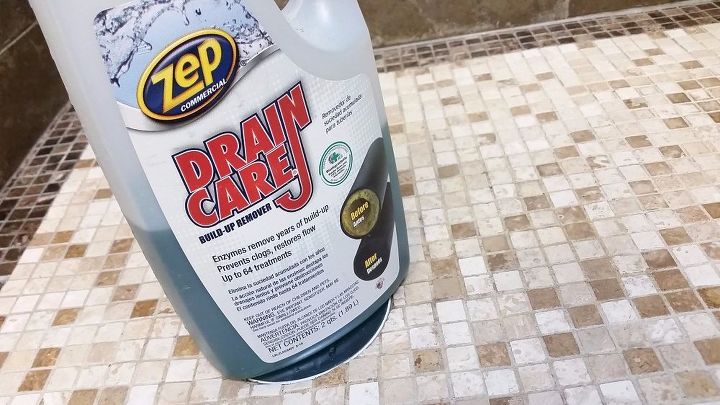
STEP 12: DRAIN CARE IS THE WAY TO GO!
Let me say it again: baking soda and vinegar is enough but since I have this BIODEGRADABLE DRAIN CARE build-up remover, I’m going to use it last.
It’s safe for all plumbing systems and goes a long way: you only pour a bit at night, for three days in a row, and it’ll keep your drains nice and clean.
Got mine at the Home Depot, but it’s also available online. I’ve been using it for years as my last step and never had a clogged drain!
And that really wraps it up.
If you enjoyed this post, and want to receive updates, follow me.
And for more Vinegar & Baking Soda cleaning concoctions, check my other posts.
— Easy GROUT CLEANER:
— No-Rub Magic DIY CLEANER & DEGREASER: http://www.hometalk.com/diy/clean/ovens/diy-no-rub-magic-cleaner-degreaser-for-your-kitchen-hood-23159738
— DIY SOAP SCUM REMOVER for Your Glass Shower Doors: http://www.hometalk.com/diy/clean/bathroom/3-ingredient-green-diy-soap-scum-remover-for-your-glass-shower-doors-21433429
Happy Cleaning!
Resources for this project:
See all materials


Comments
Join the conversation
-
Do not put baking soda in your drain. Even if you rinse it down, it will clog your drain because it hardens. I did that to my bathroom sink and I had to get a plumber to scrape out the baking soda. It attaches itself to the sides of your drain, causing the pipe to have a smaller diameter. Don't use it.
-
Bi-Carb is Baking Soda in the United States


Frequently asked questions
Have a question about this project?
What takes the smell out of drain
I got my Zip-It at the dollar store, in the hardware/cleaning section. It cost me $1 ! Love the cleaning detail (I can be a perfectionist, sometimes)!
What is the fastest and easiest way to clean soap scum from shower?