


Gingerbread House Recipe & Tablescape
There is more that one gingerbread house recipe out there. A few with molasses, and a few with corn syrup. Although I initially wanted to use molasses in my gingerbread, making it that way didn’t hold up. It crumbled so easily and I wasted a ton of dough.
After a few more attempts I realized that corn syrup helped keep the dough softer and more playable for rolling and shaping, yet it also cooked crisp and strong.
Construction Gingerbread
These gingerbread houses are made from what’s called “Construction Gingerbread.” It is edible, but a lot more crisp than the regular gingerbread the typical gingerbread man is made from. I was afraid it wouldn’t taste as good, but honestly, I love it! Especially dipped in coffee to soften it up a bit.
Another bonus with this recipe, no refrigeration needed. I’ll share the recipe, and then how I constructed, frosted, and made the tablescape.
-
1/2 cup brown sugar -
1 1/2 Tbsp ground cinnamon -
1 Tbsp ginger -
1 tsp cloves -
1 tsp nutmeg -
dash salt -
2/3 cup + 2 Tbsp corn syrup -
6 Tbsp butter - room temp -
1 Tbsp vanilla -
2 1/4 cup flour -
*add in more flour if dough is too sticky. Do this in the mixing bowl or out on the counter, sprinkling it with flour until it's easy to roll. If too dry, add in a small amount of corn syrup until a good rolling consistency.
- Preheat oven to 350ºF
- Cream together butter and brown sugar. Once fluffy, add in spices, stir.
- Slowly mix in corn syrup and vanilla until combined.
- Add in flour 1/3 cup at a time.
- Remove from mixing bowl and place on floured counter. Knead until forms a ball.
- Roll out to about 1/4 inch thick.
- Cut out.
- Using a spatula or other flat kitchen utinsle, transfer to a baking sheet lined with partchment paper.
- Bake for 15 mintues for larger pieces. 8 minutes for smaller pieces.
- Let cool on a flat surface so they don't lose their shape.
- Once completly cool, assemble houses.
Before we go any further, make sure you’re following me over on Instagram as I share all my crafting and baking in real time. We have a blast over in stories!
I used the gingerbread cookies cutters below, and also modified them a bit and made some smaller sizes as well.
One of my favorite cookie baking friends shared this tip with me, and it was a game changer when assembling my houses. She said to use a zester to file the edges of your house so they go together seamlessly. Often when baking you’ll see the sides are a little uneven, or you have an edge or a swoop where there wasn’t suppose to be one. Using a zester allows you to easily remove these little issues and the roofs and sides go on flat and flush.
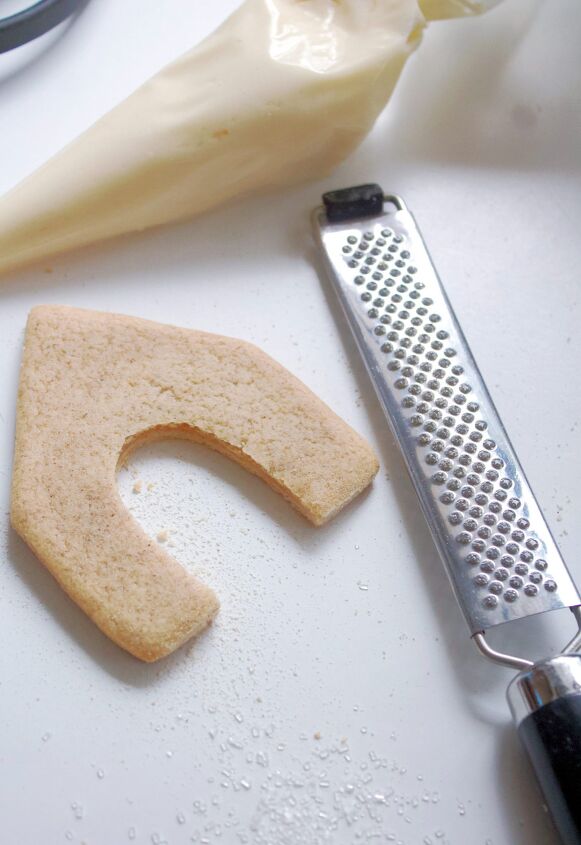
Game. Changer.
Just be carful of your knuckles because zesting those isn’t fun.
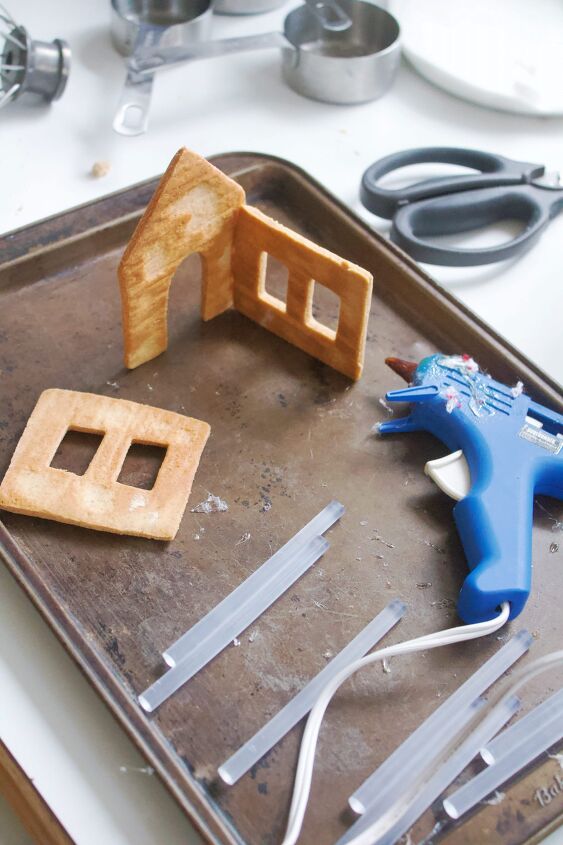
Another tip a friend of mine over on Instagram shared, was to assemble the houses with a hot glue gun. After all, you’re not eating them, and gluing them together means no down time waiting for the frosting to dry. The glue holds the houses together firmly, yet if you make a mistake, it’s forgiving. Let it dry and slowly peel off the house. It should pull away easily.
After assembling the houses I whipped up a batch of my favorite butter cream frosting, which worked perfectly for decorating the houses.

-
1 cup butter -
3 to 5 cups powdered sugar -
1 Tbsp vanilla extract -
1/4 tsp salt -
4 Tbsp heavy cream
Mix room temperature butter until a whipped consistency. Slowly add 1 cup powdered sugar and mix to combine.
Whip up the easy, classic buttercream and place in a piping bag with a medium round decorating tip or a small cut in the end of the frosting bag.
I went over all the hot glue with buttercream, giving it the illusion it was frosted together. After that I went down to a smaller round tip, and started decorating the houses and roofs.
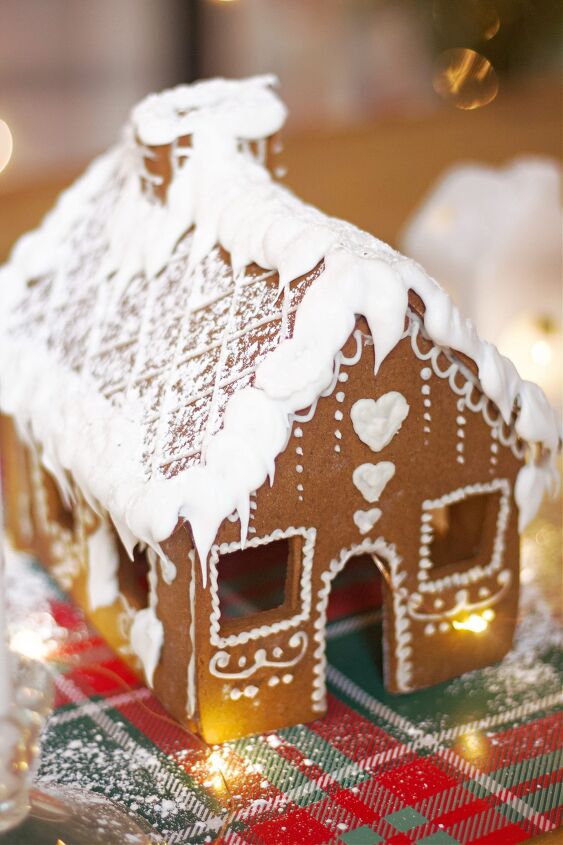
All I did was search Pinterest for Gingerbread houses, and found some house patterns I liked and freehanded them onto my houses. They didn’t turn out perfect, I’m not a expert froster anymore, but still, they were so fun to work on. And truly, no one is going to see the frosting smudge on the corner of your house, or the drip on the roof. There’s going to be so much to look at in your village they’re just going to be in awe.
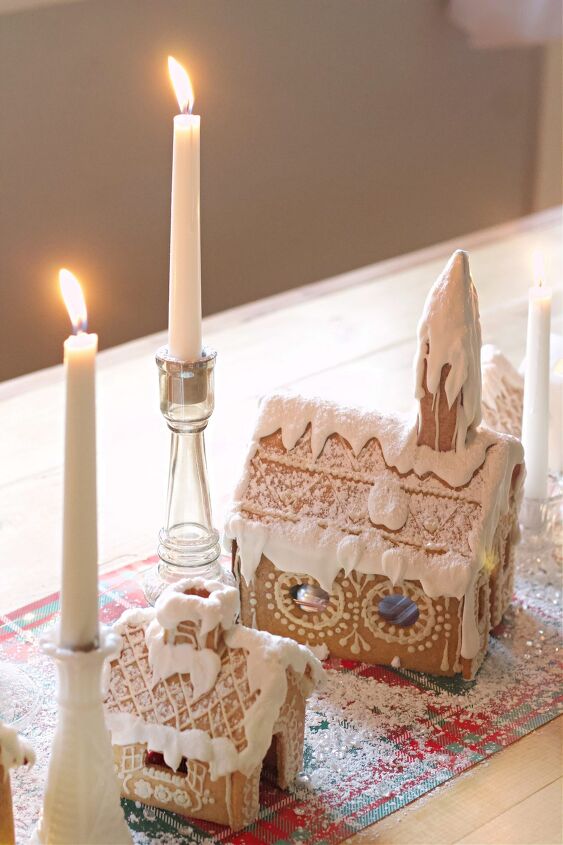
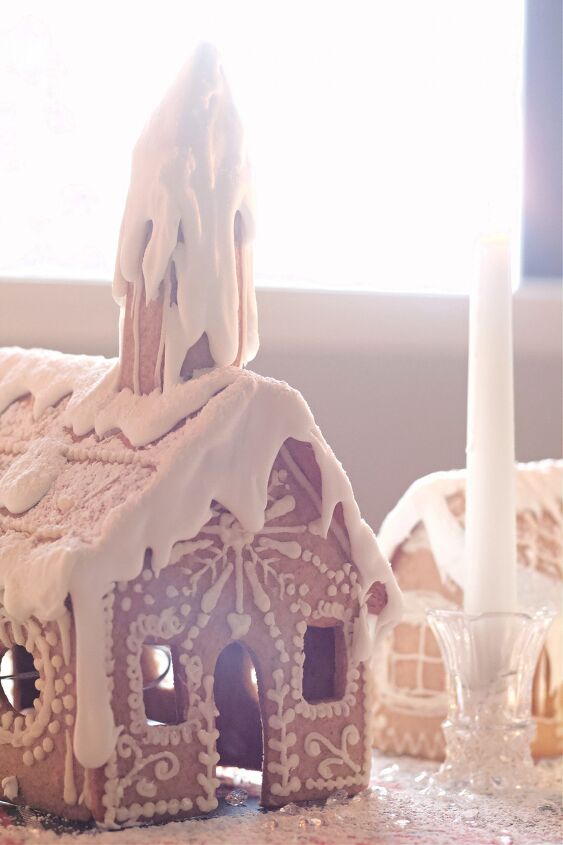
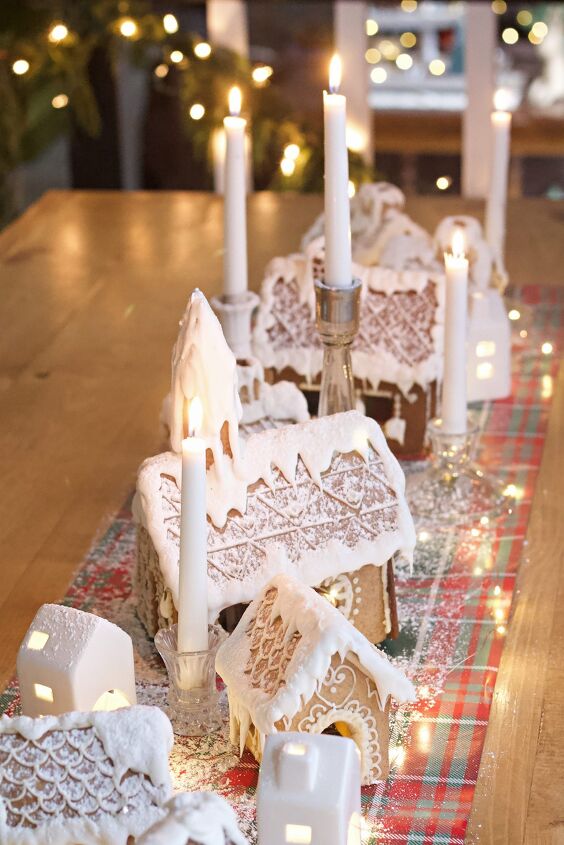
Once the houses are decorated, it’s time to add the snow, or Royal Icing as it’s truly called. This is what takes your gingerbread houses to the next level. The snow is so romantic, so soft and beautiful, and so . . . snowy! It truly looks like the snow you see outside on a fresh winter morning!
-
3 egg whites -
2 cups sifted powdered sugar
- Beat egg whites in a mixer or with a hand mixer until they begin to turn white in color. Slowly add in powdered sugar 1/4 cup at a time. Play with the consistency. Some like thier snow with more definition, and may want to add a little more. Others might like their snow soft, which may mean a little less sugar.
- Use immediately, it will dry and form a shell coating fast. If not using right away, cover with a wet cloth or plactic wrap.
Work quickly once you’ve added the royal icing to a large tipped pipping bag. The frosting will dry within a few minutes once pipped out of the bag. Add to your house in small circular motions, pulling down to make melting snow. You’ll get the hang of it once you do one or two houses!
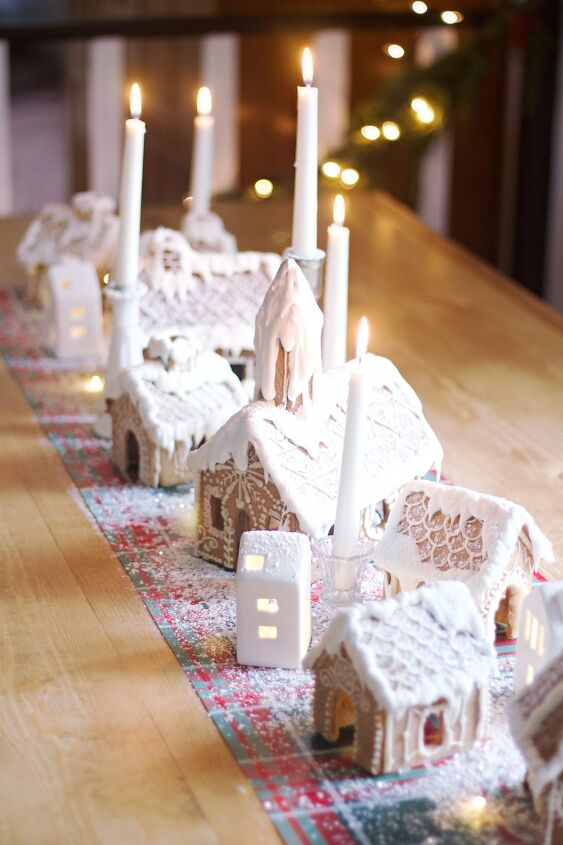
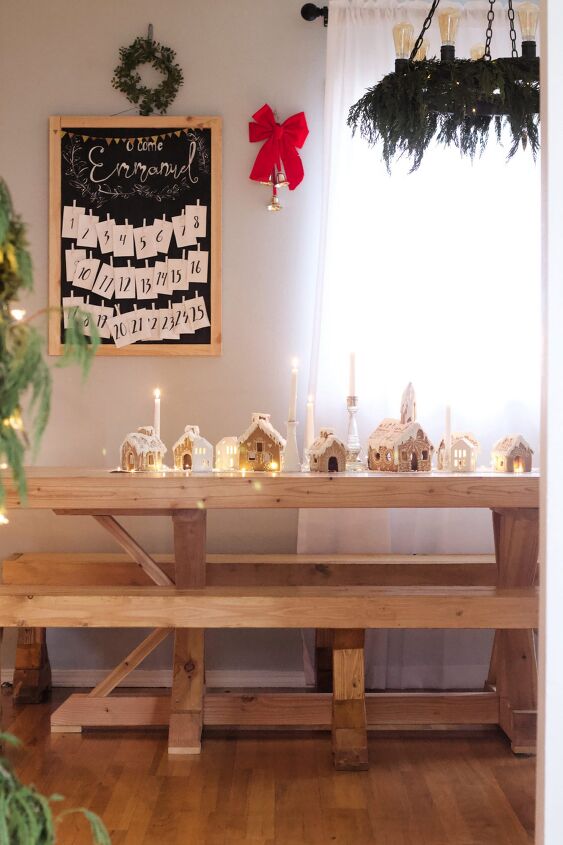
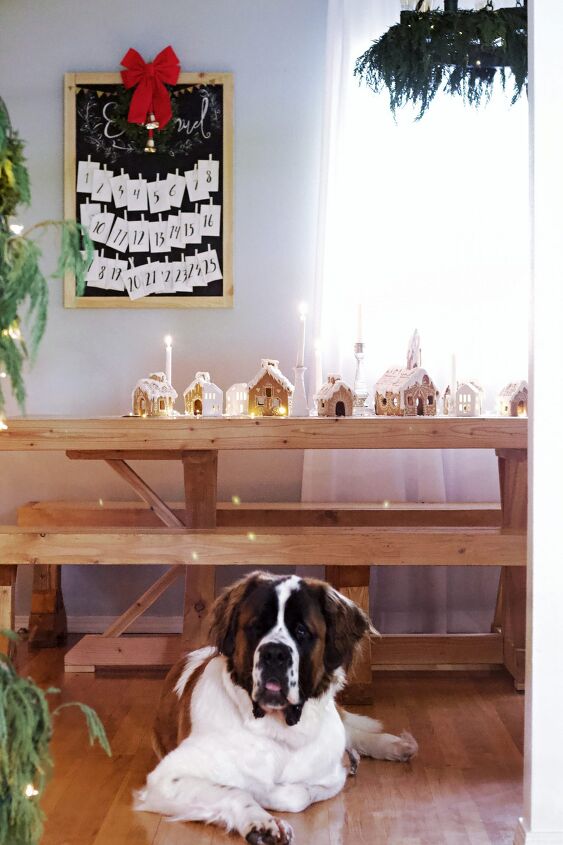
To make the tablescape, I cut out a section of wrapping paper a foot and a half wide, by 5 feet long. Depending on your table you might want to change the dimensions a little.
Once I had the paper down, I started in the center and worked my way out on each side, staggering the houses. I put the church and larger houses towards the middle, and smaller houses around those.
To make the church steeple I freehanded some longer rectangle pieces myself, and some narrow triangles, and assembling them. They didn’t look great solo, but covered in snow it’s perfect.
Once the houses are staggered how you think they look best, it’s time to fill in a little. Now, you can leave as is, and they’d be just as stunning, but I wanted to create a complete white winter wonderland.
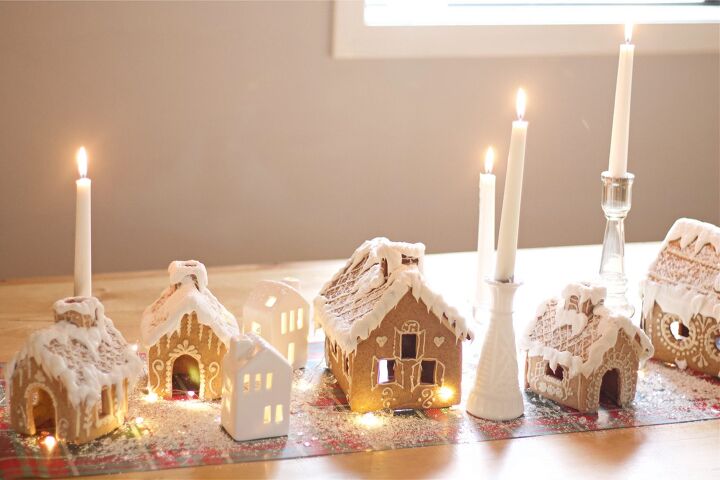
At first I added in bottle brush trees and little village items, but for me, it was becoming too busy. I wanted the perfection of a simple snowy Christmas morning.
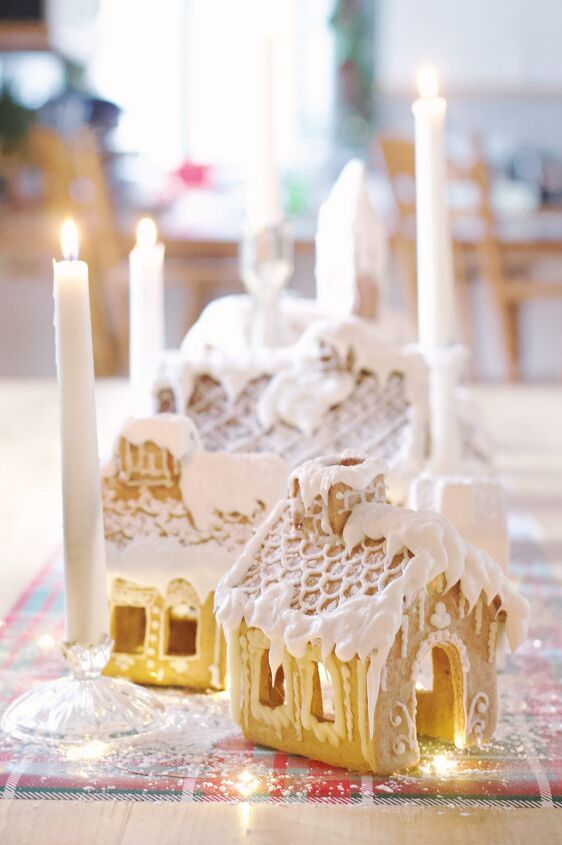
My vision was for sparkle and lots of white. I grabbed all the glass and white candlestick holders I had, staggered them throughout the village.
I was onto something.
Along with the candles, I threaded remote controlled twinkle lights in-between and around the gingerbread houses. Then to add even more white, I brought up some small ceramic houses I had and staggered those too.
Getting closer.
To finish it off, because I didn’t want it to become too busy, I dusted the top of it all with powdered sugar, large flake silver glitter, and small, plastic diamonds.
Perfection.
Do you traditionally make a gingerbread house? Would you consider making a village? I’m thinking about a city next year! It was so fun and the look your guests have when they walk in on your tablescape is simply the best. They get that Christmas magic look in their eyes, and it’s priceless. I love bringing joy and the Christmas spirit to everyone who enters my home. And a Christmas village helps with that a lot!

Comments
Join the conversation
-
very beautiful, but I bet many hours went into this! Merry Christmas
-
It looks lovely! I might try battery tea lights in a couple of the houses, too.


Frequently asked questions
Have a question about this project?
So pretty but all that money and time invested and not being able to eat the gingerbread just doesn’t make sense to me. I might be wrong but isn’t royal icing typically used in gingerbread houses to secure the pieces because the icing hardens to fast? Someone comment please if that’s right or wrong.
P.S. I LOVE gingerbread (the gentle kind and not the kind that tastes so strong it sticks to your tongue). I’ve wanted to make a gingerbread house for years but the weirdos I live with won’t eat it. 😔 🤦🏻♀️😏🙄☹️
I love it. Great job. They don't look like they have been baked. They look professional. What are you going to do with them after Christmas? I'm afraid to ask!