How to Make DIY Decorative Boxes, Step by Step

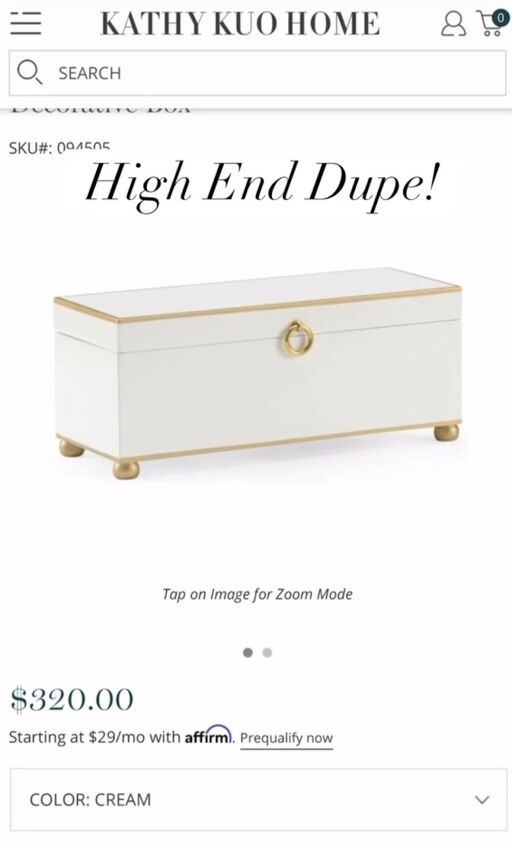
Let me show you how to make DIY decorative boxes. I wondered if I could dupe this $320 decorative box for a fraction of the cost.
I found a wedding card box on clearance at Michael's for only $10. In this tutorial, I'll guide you through the process of transforming a $10 clearance wedding card box into a stunning decorative piece, saving you hundreds of dollars.
DIY decorative boxes
- Wedding card box (or any wooden box)
- Wood putty
- Sandpaper
- White gloss restyling spray paint
- Blue painter's tape
- Gold rub and buff
- Rag
- Drill
- Round quartz knob
- Gold spray paint
- Wooden rounds (4)
- E6000 adhesive
Steps
Step 1: Prepare the Box
Remove the original latch and fill in any holes with wood putty. Sand the box until it's smooth, ensuring a perfect surface for painting.
Step 2: Paint the Box
Apply two coats of white gloss restyling spray paint.
Allow the paint to dry for at least one hour.
Step 3: Create Gold Stripes
Tape off the top and bottom of the box with blue painter's tape.
Use gold Rub 'n Buff on a rag to create sharp gold stripes between the taped areas.
Step 4: Add a Knob
Drill a new hole in the center of the box.
Insert a round quartz knob purchased from Ross into the new hole.
Step 5: Create Feet
Spray paint four wooden rounds in gold.
Apply E6000 adhesive to the rounds.
Place the rounds strategically on the box to create feet.
DIY decorative box
There you have it—a beautiful and budget-friendly DIY decorative box. Your stylish creation cost only $23.50.
Whether you're crafting for yourself or as a thoughtful gift, this project proves that creativity doesn't have to break the bank. Share your own ideas and projects in the comments below, and happy crafting!
Follow @lisa_burningham on TikTok for more DIY ideas.









Frequently asked questions
Have a question about this project?