DIY Pebble Bowl

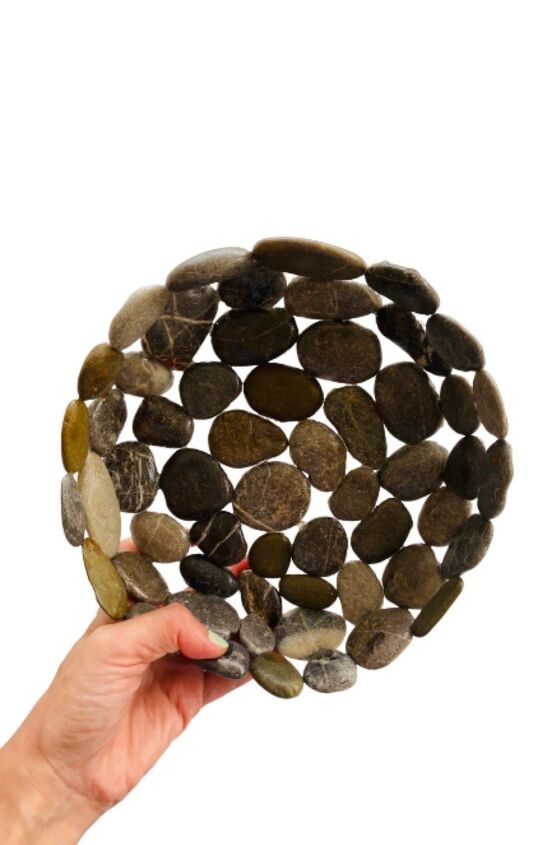
This pebble bowl is my most loved project at instagram. Hope that you will also love it!
If you want to give it a try, keep reading:)
Hometalk Recommends!
Collect pebbles, try to find flat, light ones. I collected pebbles of similar color, the dark grey ones.
Make sure you wash them throughly and leave them to dry.
Grab a bowl for acquiring the shape you like. I used a strainer as its holes prevented stones from sticking to it.
Start building your bowl with the base. I used superglue with activator spray for a strong hold. It is a set of one superglue and one spray for those unfamiliar with it. E6000 or any glue with a strong hold may also work for this craft.
If you do not have experience with this glue, you need to apply superglue to one stone and spray to the other for an instant strong hold.
Glue the pebbles only at the joints, make sure that you do not apply the glue to the strainer.
Check every 3-4 stones if they stick to the strainer by gently sliding the stone groups.
Keep building your bowl up and around the strainer.
Once it is your desired shape, carefully remove your pebble bowl from the strainer.
If you have paid attention to glue the stones only at the joints and checked it regularly, you will not have any problems at this stage. It will come out easily.
For a finishing touch, apply spray varnish at the front and back of your bowl. This will add a nice shine and definitely upgrade your craft to a designer decor.
Now, your bowl is ready to add a nice natural touch to any venue.
Proud me and my lovely craft :)
Do you like this easy craft of mine? I would be happy to hear your views. You may watch the video tutorials of all my projects at my instagram account @handmade_selen
Best,
Selen
Enjoyed the project?
Resources for this project:
See all materialsComments
Join the conversation
-
 Gail Sheldon
on Jul 29, 2023
I think that this project would make lovely plant pot covers using another pot for the base. Make it the same size and slide in the potted plant.
-
-
 Victoria Breitner
on Sep 18, 2023
I'm going to do this using a silicone baking mold and epoxy resin!!! Should come out nice...thanks for the inspiration!
-











Frequently asked questions
Have a question about this project?
Another Peggy and I have basically have the same ? You said to put super glue only on the edges then spray the other side. Is that with the spray that has super glue on it? You dont mention a tube of super glue in your materials so how do you just put super glue on the edges?
I too need further info regarding the super glue bonding. I really want to make this. Could you please help me get it clear. Are there two different bonding agents? Do you do both sides and back at the same time?
Do you have a tutorial class you do ?