DIY Spring Mini Wood Riser

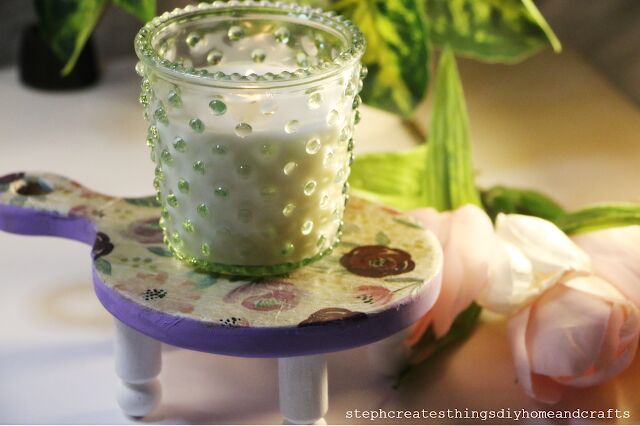
Create a charming Spring mini wood riser with this easy DIY craft. It is perfect for adding a touch of seasonal decor to your home. You can get step-by-step instructions and unleash your creativity today. This craft is beginner-friendly, and I was able to create it in around 30 minutes. If you're ready, let's begin creating your very own Spring mini wood riser.
Watch the Video tutorial here!
Material List
One mini round chopping board
I picked mine up at Hobby Lobby on sale from $7.99 to $4.79
One pack of tissue paper - Mauve floral $ 1.49
Purchased mine at Hobby Lobby
Paint
I'm using white, and a light lavender color
Mod Podge
Paintbrush
Hot glue or E6000- I ended up using my E6000 adhesive
One pack of wood pegs
Purchased mine at Hobby lobby
My total cost for this project was around $7
Step 1: Applying Mod Podge on the cutting board
Begin by taking your paint brush and applying a layer of your Mod Podge onto the top surface of your cutting board.
Step 2: Applying the tissue paper
Place a layer of tissue paper on top of the Mod Podge and smooth out any wrinkles or bubbles.
After placing the tissue paper on top, use a paintbrush to apply a layer of Mod Podge. To speed up the drying process, use a heat gun or blow dryer on low heat.
After your Mod Podge has dried completely, use scissors to trim any excess tissue paper around the outer edges of your cutting board. Alternatively, you can use a sanding block. If you prefer to have a little tissue paper left around the outer edge, scissors are a good choice.
Once you have trimmed the excess paper, apply a layer of Mod Podge to the entire cutting board, including the outer edges. This will help to secure any remaining tissue paper. Allow the Mod Podge to dry completely before using the cutting board.
Step 3: Applying acrylic paint to the cutting board and pegs
Now that you've prepared your project board, it's time to apply the paint. Start by using your purple paint and apply it around the outer section below the tissue paper. It's recommended to apply around two coats of paint for better coverage.
After that, flip your board and apply the purple paint to the bottom side of the board. Make sure to cover the entire bottom surface with the paint. Once you're done, set your board aside and let it dry completely.
Next, flip your board and apply your purple paint to the bottom side of your board. Be sure to completely cover the bottom surface with your paint.
Set your board aside, and allow it to dry.
Take your wooden pegs and apply two coats of white paint to fully cover each peg.
Step 4: Adding the pegs to the cutting board
After your wooden pegs have completely dried, flip your cutting board over and attach them using hot glue or any other adhesive you prefer. I used E6000 as my adhesive of choice. Wait for the pegs to dry, then flip the board over. Your mini wood riser is now complete and ready for use.
I'm using mine to display candles, but I'm curious to know what you plan on using yours for. Please leave a comment below and let me know!
Thank you so much for stopping by. I'll see you soon.
You might also enjoy
DIY Valentine Wooden Heart Riser
https://stephcreatesthingsdiyhomeandcrafts.blogspot.com/2022/02/diy-spring-mini-wood-riser.html
Pin/Share/Save
Enjoyed the project?

Comments
Join the conversation
-
 Amanda Connelly
on Feb 09, 2022
This is so cute! Would make a great little riser for a small plant, too!
-
-
 Woodpeckers Crafts
on Mar 15, 2023
This is adorable!! So so cute!
-








Frequently asked questions
Have a question about this project?
If you burn the candle, would the heat causes it to stick to the board?