


Farmhouse-Style Lanterns

11 Materials
$25
1 Hour
Medium
Lanterns are fun accessories to include in both your winter and summer décor. Add 'farmhouse style' to the equation and you can make a rustic version with only scrap wood, a few tools, and some paint!
{
"id": "4619796",
"alt": "",
"title": "",
"video_link": "https://www.youtube.com/embed/AZMvanOPzms",
"youtube_video_id": "AZMvanOPzms"
}
{
"width": 634,
"height": 357,
"showRelated": true
}
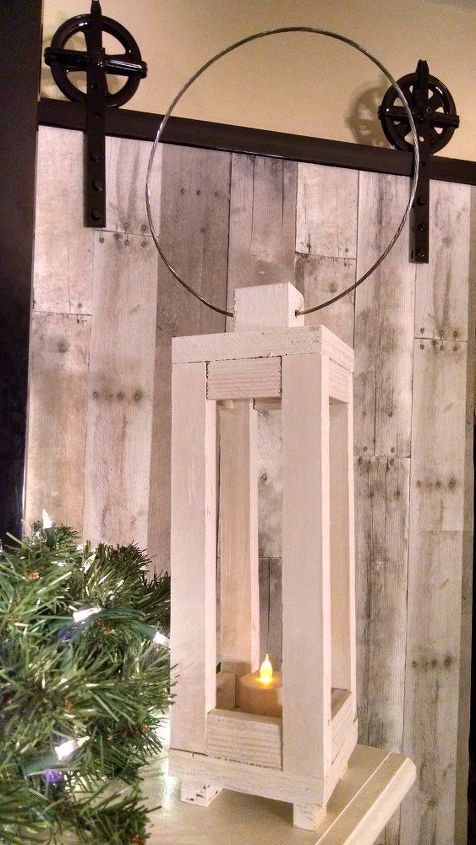
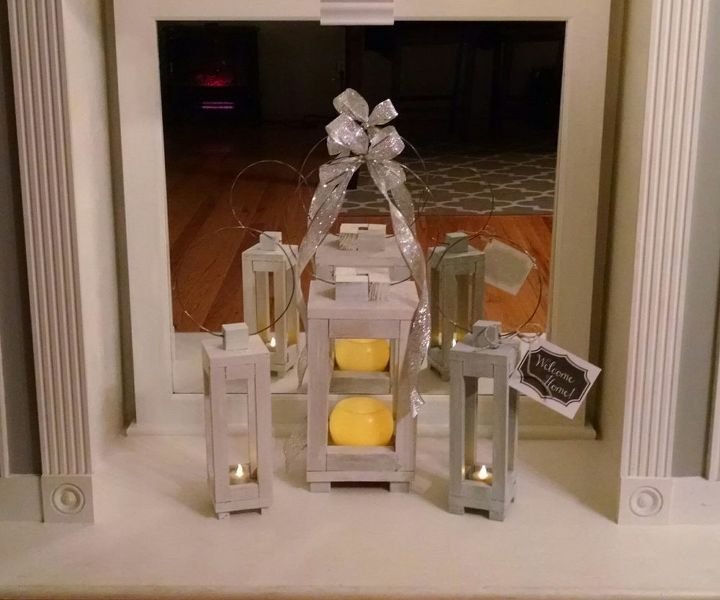
These are perfect for everything from lining a walk way, adding accents to a mantle, or giving away as housewarming gifts!
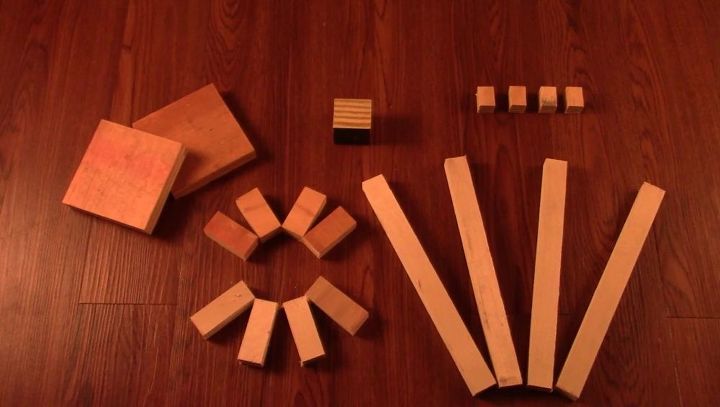
First, cut your scrap wood to size with your table saw, your miter saw, or both. I'm using 3/4 inch thick plywood for almost everything so my measurements are based on that thickness.
Two pieces cut to 4 inches by 4 inches
Four pieces cut to 3/4 inch wide by 10 inches long
Four pieces cut to 1 inch wide by 2 inches long
Four pieces cut to 1 inch wide by 2 and a half inches long.
Four pieces cut to 3/4 inch wide by 1 inch long
And one piece of a ripped 2x4, cut to 1 and a half inches long
With your scrap wood cut, you are ready to assemble!
Dab a bit of hot glue on each corner of one 4 x 4 and glue the 10 inch pieces to each spot. Turn the piece over and shoot a nail into each corner to secure. Do the same thing on the other end with the other 4 by 4 piece.
Glue the four 1 inch long pieces on the bottom as feet and follow by shooting a nail into each.
Next, glue in the 4 bottom lip pieces - two 2 inch pieces and two 2 and a half inch pieces. Let the glue set and then do the same thing for the upper lip pieces. As these pieces are pretty small and you'd be shooting the nail in from the 4x4, I recommend skipping the nail step with these pieces. It's not worth the risk to your fingers.
Move on to the top of your lantern and glue your ripped 2x4 piece in the very middle.
After you've got your lantern assembled, fill the nail holes with wood filler and let dry. Lightly sand over the top to remove the excess.
Time to paint! Paint your lantern inside and out - this hides the filled nail holes and will pull everything together if you used mismatched scrap wood like I did.
Drill a hole thru the top 2x4 piece. Cut a length of tension wire with the snips and run it through the hole to make a handle. Bend it with the pliers, if needed, to keep the ends in place.
If you'd prefer a larger version of this lantern, double the size of the 4x4 and cut two 8 inch by 8 inch pieces for the base and the top. Use ripped 2x4s for the rest - 12" long for the four side pieces, 5 inches long for the 4 upper and 4 lower lip pieces, and one inch pieces for the 4 feet. I also used 4 - 2 and a quarter inch pieces to make a more substantial, square shaped top piece.

Add a flameless candle and you're done! Those small scrap wood pieces have never looked better!


Frequently asked questions
Have a question about this project?