275K Views
The Easiest Way to Get a Faux Shiplap Wall

by
Rob & Courtney M, Hometalk Team
(IC: paid contributor)
5 Materials
$9
1 Hour
Easy
Low on funds and want to try something different in your home? This is the perfect little project to give any accent wall in your house a facelift without breaking the bank!
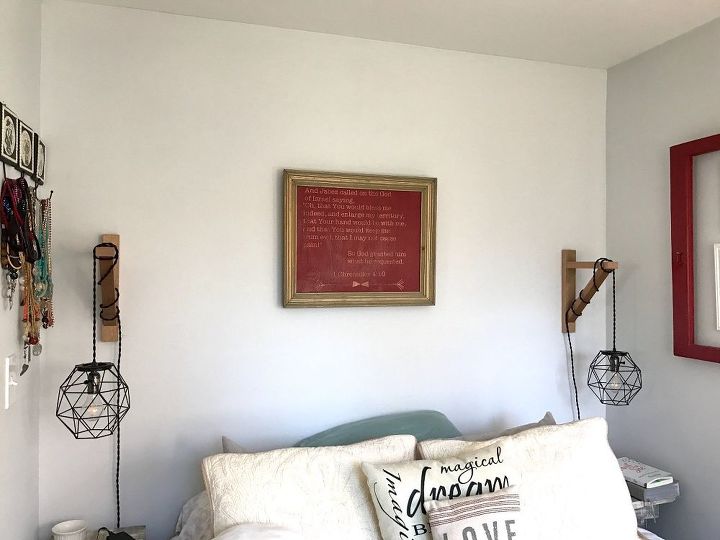
BEFORE: We have a little alcove in our bedroom that needed some attention. Once Rob gets some down time, he wants to make us a headboard (and possibly a bed frame...he made Bo's toddler bed and it's so amazing!) but for now, I felt this little wall could use a character.
SUPPLIES: -pencil -level -paint roller -paint pan -clear paint sealer
STEP 1: Measure the Lines I decided not to create a trim for my wall, so I started my lines by measuring from the ceiling. I measured every 6 inches as most things I read stated that shiplap is usually 6 or 8" wide.
STEP 2: Draw Lines Next, using my level, I drew the lines that would become my shiplap slats. You can choose to do shorter slates that are off set (not sure of the word to use to describe this, but basically like a brick effect, much how the side of a brick house or building looks when they are laid--does this make sense?). My wall is roughly 7' wide whereas shiplap slats come 12' long (I looked this info up before drawing my lines), so I figured continuous slats would be fine.
STEP 3: Darken and Shade Lines After all of my lines were drawn out, I went back and darkened them, then shaded them. I used the side of my sharpened pencil, adding slight pressure on the line, then lightening my pressure a little to create a shade. Because one of the previous owners of our house must have used wallpaper at some point on this wall (our house was built in the 60's), it's not totally smooth which messed up my shading, but I tried to work with it anyway.
Here is a close up of me darkening my lines.
As I darkened my lines, I went back with my finger and smudged the lines so they weren't so granulated and looked a little more natural (as natural as I could get with a pencil, that is!).
I continued step 3 until my entire wall was finished.
STEP 4: Apply Sealer Finally, I applied one coat of paint sealer, so that I didn't experience any unwanted smudging or smearing of my pencil lines. I couldn't find a non-glossy paint sealer for walls ANYWHERE, so I just went with this clear gloss sealant. You can't tell much of a difference in the finish with the rest of my light grey walls, so I'm not too worried about the gloss after all.
I'll admit I wasn't crazy about it at first, but once I backed away and saw the whole look, I could see the full effect, and I started to warm up to this little experiment. I feel like the faux shiplap completes the blank wall behind our bed and gives our little alcove a cozy feel.
{
"id": "4093831",
"alt": "",
"title": "",
"video_library_id": "8167",
"thumbnail": "https://cdn-fastly.hometalk.com/media/2017/07/31/4093831/the-easiest-way-to-get-a-faux-shiplap-wall.jpg"
}
{
"width": 634,
"height": 357,
"showRelated": true,
"noautoplay": ""
}
[{"sources":[{"type":"video\/mp4","src":"https:\/\/video-cdn-prod.b-cdn.net\/hometalk\/2023\/02\/01\/23965\/23965_source-406.mp4","label":"406p"},{"type":"video\/mp4","src":"https:\/\/video-cdn-prod.b-cdn.net\/hometalk\/2023\/02\/01\/23965\/23965_source-720.mp4","label":"720p"},{"type":"video\/mp4","src":"https:\/\/video-cdn-prod.b-cdn.net\/hometalk\/2023\/02\/01\/23965\/23965_source-1080.mp4","label":"1080p"}],"poster":"https:\/\/cdn-fastly.hometalk.com\/media\/videos\/2023\/02\/01\/23965\/thumbnail.jpg","media":{"video_library_id":23965,"thumbnail":"https:\/\/cdn-fastly.hometalk.com\/media\/videos\/2023\/02\/01\/23965\/thumbnail.jpg"}},{"sources":[{"type":"video\/mp4","src":"https:\/\/video-cdn-prod.b-cdn.net\/hometalk\/2022\/04\/28\/17453\/17453_source-406.mp4","label":"406p"},{"type":"video\/mp4","src":"https:\/\/video-cdn-prod.b-cdn.net\/hometalk\/2022\/04\/28\/17453\/17453_source-720.mp4","label":"720p"},{"type":"video\/mp4","src":"https:\/\/video-cdn-prod.b-cdn.net\/hometalk\/2022\/04\/28\/17453\/17453_source-1080.mp4","label":"1080p"}],"poster":"https:\/\/cdn-fastly.hometalk.com\/media\/videos\/2022\/04\/28\/17453\/thumbnail.jpg","media":{"video_library_id":17453,"thumbnail":"https:\/\/cdn-fastly.hometalk.com\/media\/videos\/2022\/04\/28\/17453\/thumbnail.jpg"}},{"sources":[{"type":"video\/mp4","src":"https:\/\/video-cdn-prod.b-cdn.net\/hometalk\/2023\/08\/02\/28099\/28099_source-406.mp4","label":"406p"},{"type":"video\/mp4","src":"https:\/\/video-cdn-prod.b-cdn.net\/hometalk\/2023\/08\/02\/28099\/28099_source-720.mp4","label":"720p"},{"type":"video\/mp4","src":"https:\/\/video-cdn-prod.b-cdn.net\/hometalk\/2023\/08\/02\/28099\/28099_source-1080.mp4","label":"1080p"}],"poster":"https:\/\/cdn-fastly.hometalk.com\/media\/videos\/2023\/08\/02\/28099\/thumbnail.jpg","media":{"video_library_id":28099,"thumbnail":"https:\/\/cdn-fastly.hometalk.com\/media\/videos\/2023\/08\/02\/28099\/thumbnail.jpg"}},{"sources":[{"type":"video\/mp4","src":"https:\/\/video-cdn-prod.b-cdn.net\/hometalk\/2023\/07\/12\/27490\/27490_source-406.mp4","label":"406p"},{"type":"video\/mp4","src":"https:\/\/video-cdn-prod.b-cdn.net\/hometalk\/2023\/07\/12\/27490\/27490_source-720.mp4","label":"720p"},{"type":"video\/mp4","src":"https:\/\/video-cdn-prod.b-cdn.net\/hometalk\/2023\/07\/12\/27490\/27490_source-1080.mp4","label":"1080p"}],"poster":"https:\/\/cdn-fastly.hometalk.com\/media\/videos\/2023\/07\/12\/27490\/thumbnail.jpg","media":{"video_library_id":27490,"thumbnail":"https:\/\/cdn-fastly.hometalk.com\/media\/videos\/2023\/07\/12\/27490\/thumbnail.jpg"}},{"sources":[{"type":"video\/mp4","src":"https:\/\/video-cdn-prod.b-cdn.net\/hometalk\/2022\/04\/21\/17359\/17359_source-406.mp4","label":"406p"},{"type":"video\/mp4","src":"https:\/\/video-cdn-prod.b-cdn.net\/hometalk\/2022\/04\/21\/17359\/17359_source-720.mp4","label":"720p"},{"type":"video\/mp4","src":"https:\/\/video-cdn-prod.b-cdn.net\/hometalk\/2022\/04\/21\/17359\/17359_source-1080.mp4","label":"1080p"}],"poster":"https:\/\/cdn-fastly.hometalk.com\/media\/videos\/2022\/04\/21\/17359\/thumbnail.jpg","media":{"video_library_id":17359,"thumbnail":"https:\/\/cdn-fastly.hometalk.com\/media\/videos\/2022\/04\/21\/17359\/thumbnail.jpg"}}]
Enjoyed the project?
Resources for this project:
See all materials
Any price and availability information displayed on [relevant Amazon Site(s), as applicable] at the time of purchase will apply to the purchase of this product.
Hometalk may collect a small share of sales from the links on this page.More info
Published November 25th, 2016 9:59 AM
Comments
Join the conversation
2 of 126 comments
-
-
 Leslie
on Feb 23, 2021
Hi Courtney, What a lovely job you did in the room makeover. It is small and you did everything right in my mind. I have one suggestion for your consideration. It is a tool artists use when working with pencil, charcoal or pastels. It is a smudge stick and you can get them in most craft and art supply stores, OR you could have used Q-tips to gently smudge the lines.
https://www.google.com/search?client=safari&rls=en&q=artists+smudge+stick&ie=UTF-8&oe=UTF-8
-











Frequently asked questions
Have a question about this project?
Did you not do vertical lines alternating in the "boards"?
Love the wall, but what I would like to know is where did you get tree plaque?
Thanks!
I was wondering if the pencil lines don't smudge when you roll over them with the sealant -