


How to Grow Avocados From Their Pits

By Hannah Twietmeyer
How convenient would it be if you could grow avocados in your own yard? The good news is that you can—with a bit of a catch. The conditions, things like soil and climate, need to be pretty specific for a successful fruit-yielding tree. But if all checks out, you could have your very own avocado tree, and with a little TLC and patience, even some avocados. Luckily, we’ve laid out everything you need to know before trying to grow avocados in this helpful guide.
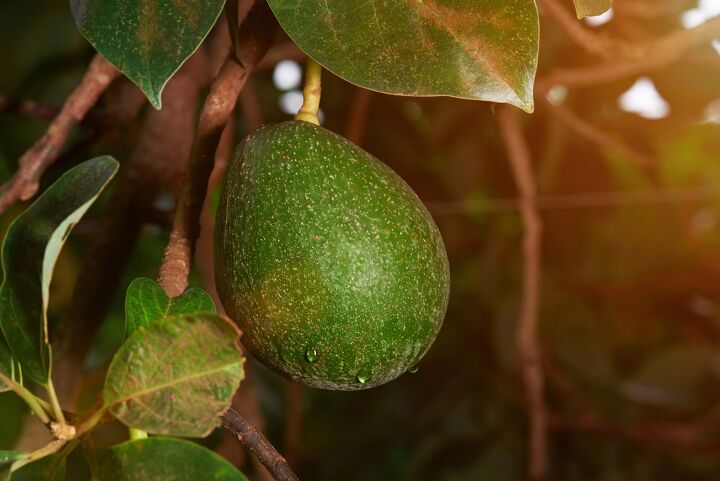
Photo via Shutterstock
About Avocados
Did you know that avocados are actually considered to be large berries? The piles of green varieties you see in a grocery store’s produce section are the fruits that bloom and flower from avocado trees, which are 40- to 80-feet-tall tropical evergreens (per Texas A&M University). Most avocados are grown and harvested in areas with a warm climate—think California, Florida, and Hawaii in the United States, then Mexico, which leads the world in avocado production. Keep in mind that the growing process for commercially produced avocados is going to look a little different from what you’ll be doing at home, but both methods start with a seed.
Species of Avocados
These are the three main species of avocados, but further hybrids and subsequent varieties exist in the hundreds:
- West Indian—tolerate almost no subfreezing temperatures and fruits take less than eight months to mature. Fruit is very large, low in oil, and mild in flavor.
- Mexican—the most tolerable of colder climates, with mature trees able to tolerate temperatures around 20 degrees Fahrenheit; takes about six months for the fruit to mature. Fruits range between eight and 12 ounces, are generally green, purple, or black, and have very thin skin.
- Guatemalan—can tolerate growing temperatures between 26 and 30 degrees F, and take around 18 months for the fruit to mature. Fruit is intermediately flavored and sized.
Hass avocados—the most popular type of avocado for cooking and eating—is a cultivar, a variety of the three main species. This is the type you probably use in your homemade guacamole recipe. Other popular varieties include Fuerte, Bacon, Macarthur, and Shepard.
The Growing Process
Typically, the growing process starts with site selection. Avocado trees need specific soil, water, and temperature requirements in order to grow; we’ll get into this in detail in the section below, “How to Care for an Avocado Plant”. Seeds—the round pit inside an avocado—are planted in pots to grow into seedlings. Once they reach a suitable size, around a foot or two in height, avocado seedlings need to be grafted, or propagated, with an existing piece of a mature avocado tree if you’re looking to harvest fruit. We’ll take you through a step-by-step process of grafting an avocado a few sections down.
Once a seedling has undergone the grafting and healing process, it is transplanted into the growing site. It is staked for several months, and after that, patience is key. Your tree will grow to maturity, undergo pollination, and, if all is well, produce fruit somewhere between three and 10 years after.
Pollination
When the time comes for an avocado tree to start producing fruit, it will do so in one of two flowering methods dependent on the variety of avocado. Knowing the pollination methods of avocados are important to growers, commercial ones especially. Some orchards plant both varieties so that pollination phases overlap, and therefore avoid stalls or problems in fruit production. For pollination success, learn how to attract essential pollinators to your yard or garden.
Texas A&M University shares that the flowers have two pollination types:
- Type A—receptive female flowers open in the morning and then close in the afternoon. They open to shed pollen the next afternoon.
- Type B—receptive female flowers open in the afternoon and then close during the night. They reopen the next morning to shed pollen.
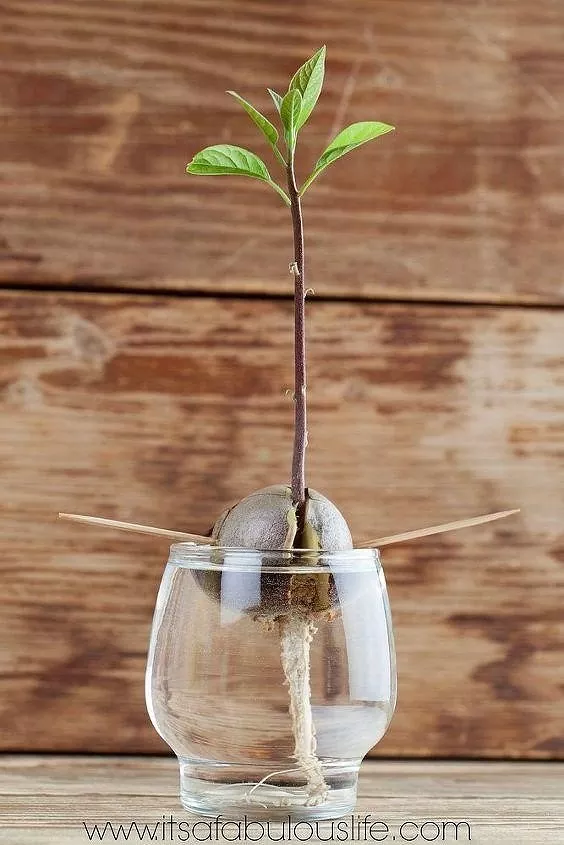
Photo via Amanda Faulkner
How to Plant an Avocado Seed
Because pollination (and usually grafting) is necessary for an avocado tree to produce fruit, the likelihood that your plant will bear avocados is slim to none without both things included in the growing process. Still, sprouting avocado trees make great house decor and conversation starters, so you can still successfully grow one to keep! If you’d like to try and grow fruit, you still want to start with these steps.
Tools and Materials Needed:
- Ripe avocado
- Knife
- Toothpicks
- Drinking glass or plastic container
- Pruning shears
- Water
- Paper towels
Step 1: Collect Avocado Seed
Head over to the grocery store and add some avocados to your cart. Variety doesn’t necessarily matter, unless you are trying to grow a specific type—then choose accordingly. Use a knife to carefully cut your avocado in half, and then gently remove the pit. That’s your avocado seed, so try not to damage it with the knife. Wash the pit and gently dry with some paper towels.
Step 2: Prepare Avocado Seed
Once the avocado seed has dried, carefully insert three or four toothpicks near the pit’s tapered end. The toothpicks can either point horizontally, or at a slightly upward angle, and should be inserted about a third of the way below the tapered end of the seed.
Step 3: Place the Seed in Water
Take a drinking glass or narrow plastic container (the diameter needs to be smaller than the diameter created with the avocado seed and toothpick extensions) and fill it with water. Position the seed so that the toothpicks rest around the rim of the glass, tapered end facing up, and let the base of the avocado seed be submerged in the water.
Step 4: Wait
You should start to notice roots growing out from under the seed into the water, as well as a sprout growing upward between two and eight weeks after initiating the planting process (via MasterClass). During this time, keep the pit in a spot with indirect sunlight. Refill water as necessary, so that the bottom inch of the seed is submerged in water at all times.
Step 5: Prune
After a few months, the stem sprouting from your avocado seed will start to gain some height. When it reaches about seven inches tall, use pruning shears and trim it back down to about three inches tall (per MasterClass). Once it grows some new leaves on top, you’re ready to transplant your avocado seedling into some real dirt!
Step 6: Transplant
To transplant your growing avocado plant, first select a pot that has drainage holes on the bottom. Create a mound of soil at the bottom of the pot (see more on soil conditions in the section below, “How to Care for an Avocado Plant”). Place the roots of your plant on top of the mound, fill in the rest of the pot with soil, and pack firmly until just the stem of the plant is emerging.
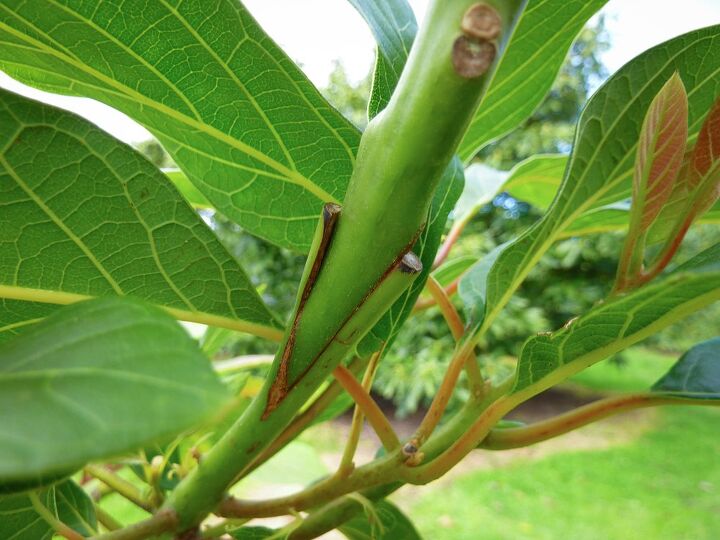
Photo via Shutterstock
How to Graft an Avocado Plant
Grafting is a process that growers use to propagate avocado seedlings to ensure quality, consistent fruit production. The process essentially combines a young plant (the rootstock plant) with the branch of a mature, fruit-bearing avocado tree (the scion) in an attempt to fuse the two together and grow the type of avocado that’s desired. An ungrafted avocado seedling will grow and turn into a full-fledged avocado tree, but that tree needs to be pollinated and likely won’t produce fruit for 10 to 15 years. Even that’s barely a guarantee without the grafting process (per Texas A&M University). If growing avocado fruits is your goal, then follow the steps below to graft your plant.
Materials and Tools Needed:
- Potted avocado seedling, about one to two feet tall (also known as the rootstock plant)
- Thick rubber bands
- Grafting tape or Parafilm
- Grafting knife
- Pruning shears
- Branch material from an existing avocado tree (also called the scion)
- Paper towels
- Plastic bag
Step 1: Choose Your Rootstock Plant
If you’ve successfully grown an avocado tree seedling using the steps above, congrats! Make sure this plant is around two feet tall and sturdy, and you’ll be ready to graft.
Step 2: Collect the Scion Piece
To collect a scion piece, you will need access to a mature avocado tree. When choosing a branch piece from an already existing avocado tree, look for one that is around the same diameter as your rootstock. The best pieces for a scion extension are from mature and hardened branches, not the young, overly supple ones. Look for branch pieces that also have at least three buds ready to develop, but are not yet flushed. Once an appropriate branch is found, cut off a piece about four to six inches in length with your pruning shears, snip off any leaves, making cuts close to the base, and then wrap the scion in damp paper towels. Immediately place it in a plastic bag in a refrigerator until you’re ready to graft.
Step 3: Prepare Your Rootstock Plant
Use pruning shears to trim off the top of your rootstock plant, leaving about 15 inches of the plant intact. At the top end of your stem, across the diameter of the cut surface, use your grafting knife to make a vertical incision about an inch down the stem.
Step 4: Prepare the Scion Attachment
Hold the scion piece upside down so that the growing buds face downward (the end facing upward, essentially the base of your scion, will be the bit that attaches to your rootstock). Place your grafting knife an inch below the top end of the scion and carefully slice upward at a 30-degree angle. Do this to both sides of the scion end, until you create an angled tip that resembles a wedge.
Step 5: Secure Scion and Rootstock Pieces
With both pieces prepared, you're ready to pair them together! Gently slide the base wedge of the scion piece into the incision made into the rootstock stem. Make sure they’re attached as close as possible, but be careful not to create any unnecessary damage.
Once the pieces are wedged together, wrap a cut rubber band around the attachment site, making sure to do so tightly to prevent any air spaces. Secure with a piece of parafilm. Then take the roll of parafilm and begin wrapping around the stem, starting several inches below the attachment site, up and over the top of the scion piece, and back down. This helps prevent damage inflicted by pests and disease and keeps moisture locked inside the cut plant.
Step 6: Look After the Healing Plant
Your grafted avocado plant just went through a lot and needs some time to heal. Keep it in partial shade and provide plenty of water for four to six weeks after grafting. Removing the entire layer of parafilm isn’t necessary, but after that healing window, you can remove the rubber band holding the rootstock and scion piece together. As the plant matures, you can transplant it outside, if your climate permits.
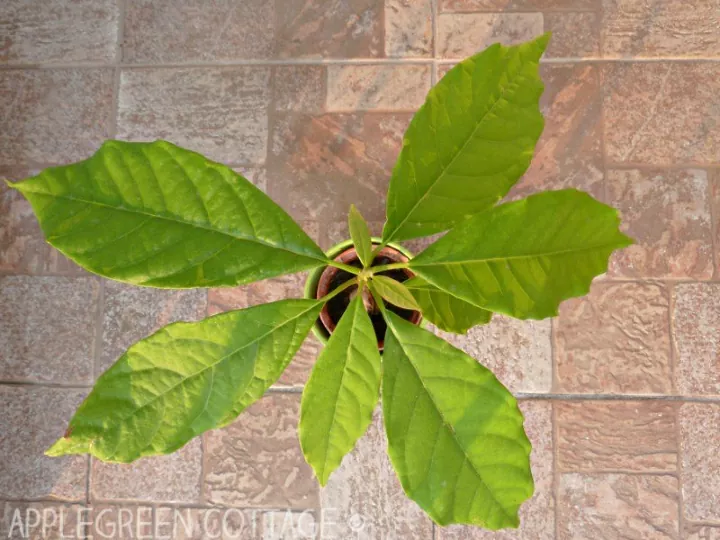
Photo via Damjana
How to Care for an Avocado Plant
Whether you decide to keep your growing avocado tree as an indoor houseplant or have plans to move it outside to your yard in an attempt to grow some fruit in the future, there are several conditions you’ll need to keep in mind for both growing environments.
Environment
Avocado trees are native to tropical and subtropical regions, where the climate is humid and warm. They never go dormant, either, so even one tough winter season can inflict freeze damage to the tree both above and below the ground, potentially killing it (via Colorado State University). If you live somewhere that experiences harsh winters, or colder weather in general, it’s probably best to keep your tree growing inside year-round. Refer to the above section, “Species of Avocados,” for a refresh on the types of avocados and their cold hardiness.
Soil
For successful growth, avocado plants need to be situated in coarse, well-draining soil (via Texas A&M University). If you’re transplanting outside, conduct a quick soil pH test. Avocados will tolerate both acidic and alkaline soils, but they grow best in slightly acidic blends, so try and keep the pH range somewhere between five and seven (via Evergreen Arborist Consultants). Not sure how to do a soil pH test? You can buy a simple kit with instructions that will give you results instantly, or you can test your soil pH with vinegar and baking soda.
For indoor growing, use a well-draining potting soil to fill your pot. Try to keep things on the sandier side; since avocado trees have shallow root systems, they will struggle in heavy, clay-based soils (via Evergreen Arborist Consultants).
Water
Because the roots of an avocado tree grow in the top layer of soil, watering the plant frequently in small amounts is the best form of irrigation if they're growing outdoors ( via University of California). Give potted plants a thorough drink and let the soil dry out between watering. And, as we mentioned earlier, make sure your pot has a drainage hole so the water doesn’t accumulate at the bottom.
A good rule of thumb for potted plants is to keep an eye on the moisture of the soil; if it's wet to the touch, don’t water it until at least the top inch of soil has dried out. And if the leaves of your plant turn yellow, that’s a sign you’re overwatering.
Fertilizer
Fertilizer rich in nitrogen is what you want to stock up on to nourish your avocado plant. Most other essentials, like potassium and phosphorus, are supplied sufficiently in soil, so look for a fertilizer that is high in nitrogen content. Apply one tablespoon of nitrogen fertilizer to the soil around your plant three times a year, and water immediately so the soil can soak it up. Be careful not to overfeed, as high-nitrogen fertilizers can attract bugs.
Avocado trees are also susceptible to deficiencies in zinc and iron, so it’s a good idea to supplement with an additional fertilizer high in those micronutrients, like this nutritional spray.
Pests and Diseases
From mites to snails to beetles, there are a variety of pests that can create problems with your growing avocado plant. The Statewide Integrated Pest Management Program from the University of California has an in-depth list of pests to look out for, but the main culprits are listed below:
- Avocado Brown Mite
- Avocado Thrips
- Branch and Twig Borer
- Brown Garden Snail
- European Earwig
- False Chinch Bug
- Fuller Rose Beetle
- Grasshoppers
- Greenhouse Thrips
- June Beetles
- Omnivorous Looper
- Persea Mite
- Kuroshio/Polyphagous Shothole Borer
- Sixspotted Mite
- Western Avocado Leafroller
For a definitive guide on identifying the pests that have infested your tree, check out the University of California IPM information here.
Generally, you can fend off pests like leafrollers, loopers, and mites by spraying leaves and branches they inhabit with a strong hose, and trimming down branches so that they don’t touch each other. This will help prevent the pests from moving to new branches around your tree. To prevent them from settling in the first place, keep track of your nitrogen fertilizer—too much can lead to higher bug populations. Otherwise, simply try to take care of your tree and keep up with pruning and routine care; they will be able to withstand some pests if they’re healthy.
The most common diseases that affect more mature avocado trees are forms of rot and cankers. Both can be deadly, though some more so than others. Cankers, or discolored lesions and spots, are visibly noticeable on tree trunks and branches. Signs of root rot is yellowing leaves and general decline of the tree (via Evergreen Arborist Consultants). Watering your plant correctly—considering rainfall and the draining properties of your soil—will help prevent root rot. However, if you suspect either of these diseases or other damages to your plant, it’s best to consult a professional at your local garden center for advice.
How to Harvest and Store Avocados
If you’ve successfully grown a fruit-bearing avocado tree, congratulations! That is no easy feat. Now that you have some avocados to harvest, here are a few pointers on the best way to do so.
- You can harvest when the fruit is unripe. When you go to harvest your avocados, it’s okay if they aren't ready for guacamole quite yet. Don’t wait until the fruit is mushy to pick it; you’ll risk damage to your avocados. Unripe, they’ll still be green and hard, and that’s normal. Once you pluck them, though, the ripening process will begin. As the fruit ripens over the next few days, you’ll notice it soften, and the shell will start to turn a purplish-black color.
- Store at room temperature when ripening. Avocados usually take around four or five days to go from hard and green to ripe and dark. During this period of time, try to keep your avocado on a countertop, so it’s able to ripen at room temperature.
- Once ripe, don’t wait too long to snack. Avocados can go from ripe to overly mushy and brown quickly, so try to eat the fruit within a day or two after it ripens. If you need it for tomorrow’s avocado toast, just pop it in the fridge—the cold will stunt the ripening process for a bit, and buy you some more time.
Have you successfully grown some avocados at home? We’d love to know all about it, so please share your experience with us in the comments below!


Frequently asked questions
Have a question about this project?