How to Easily Update Your Kitchen With a Washi Tape Backsplash

I love our little apartment, but the kitchen was missing something.. I didn't want to damage the wall or lose my security deposit - so I came up with this easy, (temporary) renter-approved solution: a DIY washi tape backsplash!
Check out the video to see how I did it, step by step:
More Washi Tape Ideas
Backsplash inspiration
I began searching for inspiration at Home Depot in the backsplash section - I fell in love with this staggered tile backsplash, but I also loved the graphic elements in some of the other backsplashes.
I decided I wanted a pattern to add texture and I wanted pops of silver to brighten up the space. I looked into peel & stick tile - but I knew I wanted a cheap, temporary solution --
Step 1: Empty Counter
Back at home, I started by emptying everything off the counter.
Next stop - Michael's.
To achieve the look I wanted, I purchased a few rolls of washi tape. I wanted my backsplash to be a staggered line pattern with pops of silver.
As you can see there are so many colors & styles to choose from!
Step 2: Measure
Next, I measured my space.. Then, estimate - depending on how much wall you want to cover depends on how much tape you'll need.
I purchased a few rolls of navy blue, a few patterned rolls, and a few rolls of silver. I ended up using a total of 4 & 1/2 rolls.
Step 3: Clean
Back at home- using disinfectant wipes - I wiped down the entire surface so it was free of any grease or cooking splashes that may be on the wall.
Step 4: Apply
Next, I began applying the tape. The great thing about washi tape is if you don't like where you placed a piece - you're free to move it around!
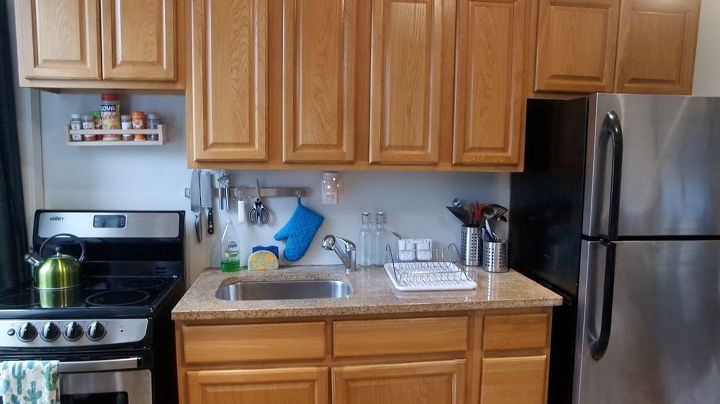
Since my wall was already a light gray I decided to incorporate my wall in the backsplash - so I layered pieces around it.
Step 5: Cut around details
Using an exact-o knife I cut around the spice rack, metal strip and the plug that were already in place.
DIY washi tape backsplash
I love my new backsplash -- it really ties the space together and gives it a finished look! It also added the modern touch I was looking for! It was so easy and completely one of a kind ;)
I didn't seal it to keep it renter approved - but i've been amazed as how well it's held up through cooking and washing dishes! It still looks good as new!
Are you a renter looking to transform your space
Washi tape wall design
Have a blank wall in another room? Try this!
Using the same washi tape I added an accent wall to my room! :)
I hope this inspires you to find renter solutions (all over your apartment)!
Enjoyed the project?
Resources for this project:
See all materialsComments
Join the conversation
-
 Sheros
on Mar 23, 2023
I am fortunate enough to rent a whole house where my landlord lets me do whatever I want. He loves all the changes I have made. And no, it will not affect my damage deposit, its in my rental agreement I can pretty much do anything but structural changes. Although I could tile, I am going to try this in a couple of places. I like changing things up but don't want to spend a fortune doing it...Thanks for the idea.
-
-
-









Frequently asked questions
Have a question about this project?
How is this to keep clean? I can't imagine it would hold up very long, but I could be wrong.
When you peel it off the wall, won't the top layer off the wall board peel off with it?
Was this project time consuming? Looks like it might be. And in the long run, how long will it hold up? Otherwise, you did a great job with it.