


Clever Ways to Organize Your Pantry
Do you store your food so you can easily find what you need? Can you make a grocery list with just a glance at your shelves?? If not, I can help! I have so many clever ways to help you organize your pantry!
For more organization ideas from An Organized Season, click HERE!
Don’t have a pantry?
No worries, you can modify my tips if you store food on the shelves in your cabinets.
We’ll start with an easy strategy to organize whatever space you have.
Then, I’ll show you clever and inexpensive ways you can organize and label the items in your pantry or cabinets.
Last, but not least, I’ll show you how I organized my pantry!
So what are you waiting for?
Let’s start organizing!
USE THE 6/P STRATEGY TO ORGANIZE YOUR PANTRY
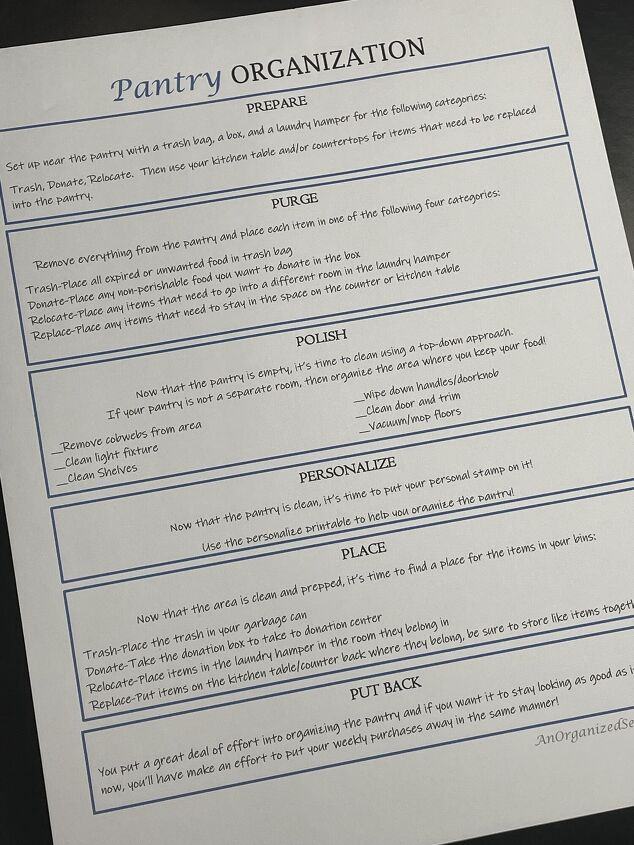
The 6/P Strategy makes organizing any space very simple. Just follow the following six steps that start with the letter P and you’ll be organized in no time!
PREPARE
Bring a trash bag, a cardboard box, and a laundry hamper into your pantry. Clear everything off of your kitchen table.
PURGE
Remove everything from the pantry and sort all items into one of the following categories:
- Trash-place all expired or unwanted food in the trash
- Donate-place any non-perishable food you want to donate into the cardboard box
- Relocate-put any items that don’t belong in the pantry into the laundry hamper
- Replace-place any items that need to stay in the pantry on the dining table and group like items together:
canned goods, baking supplies, bottled beverages, breakfast items, pasta and sauces, snack foods, bread, potatoes, onions, you get the idea! It’s important to always have room/bin for back stock.
POLISH
The pantry is empty, so let’s get it clean by starting at the top and working your way to the bottom!!
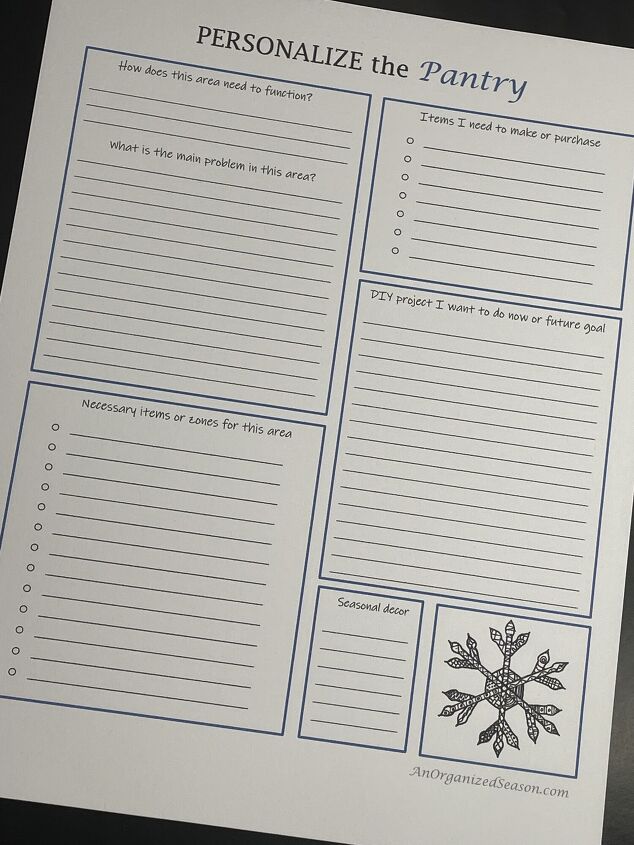
PERSONALIZE
Everyone’s pantry will be different based on the number of people in your family and your food preferences. Ask yourself the following questions to help you determine the best way to personalize your pantry:
- How does the space need to function for my personal needs? Will I only store food or do I need to store appliances here as well?
- What are the necessary items I need to put back into the space? How many categories of food do I have?
- What items do I need to make or purchase to contain the items in my categories? Suggestions: boxes, bins, plastic containers, food storage containers.
PLACE
Now it’s time to place items back in the pantry in an organized manner.
- Discard the trash bag you filled up!
- If you have food to donate, don’t wait around, take it to the food pantry nearest you!
- If you have items that belong in another room, deliver them now.
- Replace the items on your dining table back to the pantry in an organized manner. Be sure to label any bins or boxes or containers you use so everyone knows what belongs inside!!
PUT BACK
You just put a great deal of effort into organizing your pantry and if you want it to stay that way, you must train yourself and all of your family, to put items back where they belong.
Use the printables as a checklist to help you brainstorm how to personalize your space! They’re free, just sign up for our email when your visit our blog and we’ll give you access to our complete printable library!
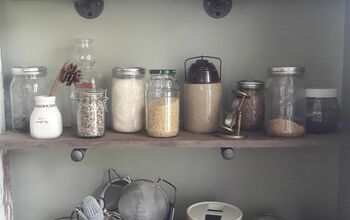
CLEVER WAYS TO ORGANIZE YOUR PANTRY ITEMS
Containers are a necessity in a pantry! But what if you don’t have the budget to buy them!
No problem, you can make them!
MAKE YOUR OWN CONTAINERS
Faux wood crates

Grab a box and some wrapping paper that looks like wood and ta-da you have a faux crate!
Wrap boxes to match your color scheme
Make your pantry look pretty and cohesive by wrapping up boxes! Don’t you love to get a beautifully wrapped package as a gift?
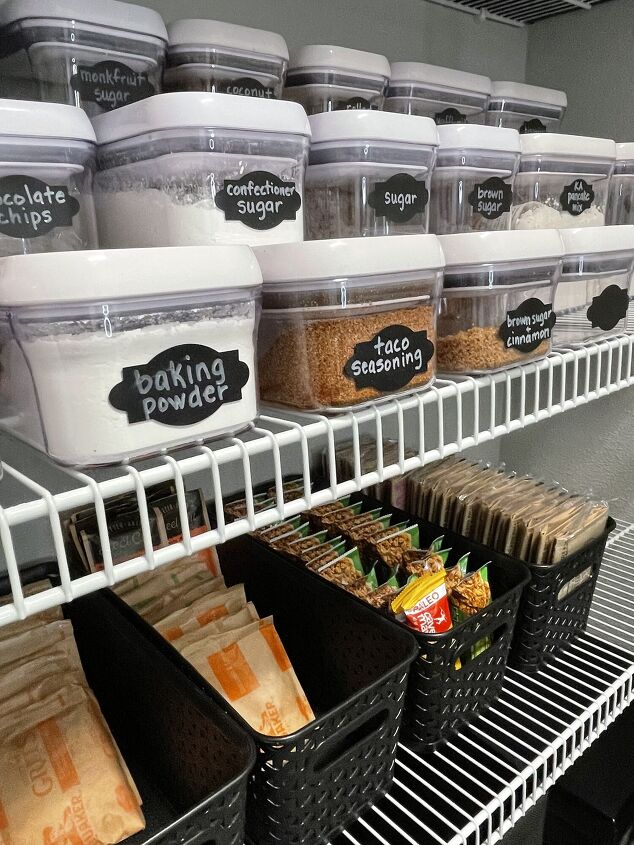
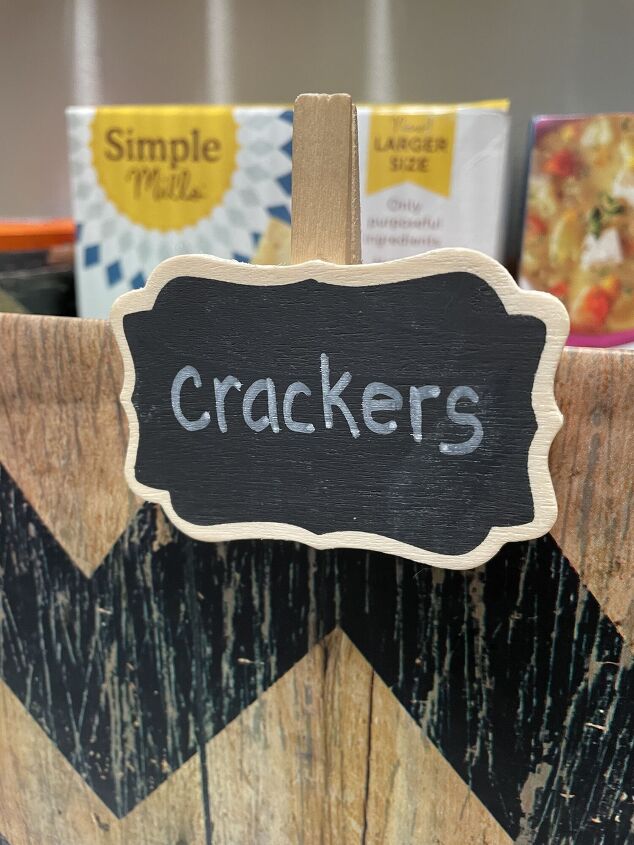
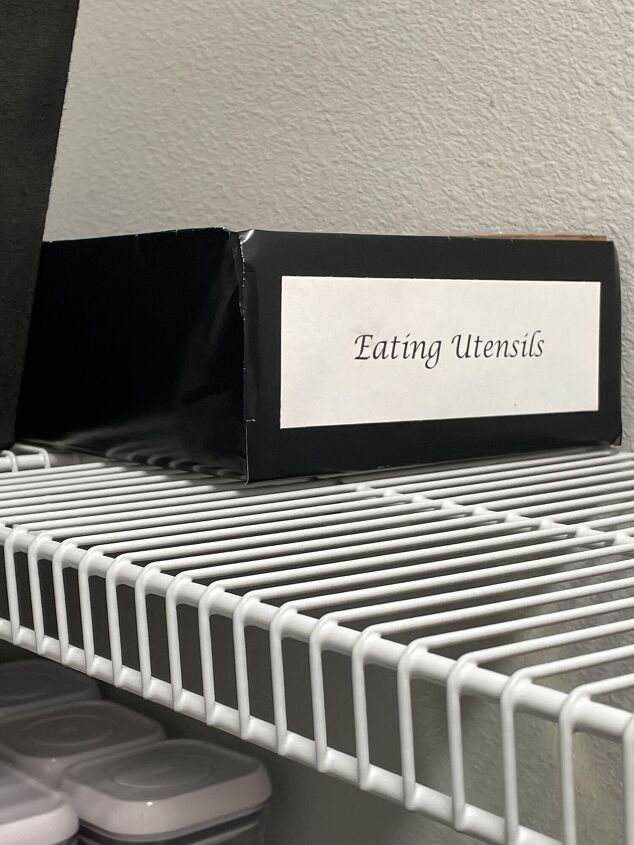
MAKE YOUR OWN LABELS
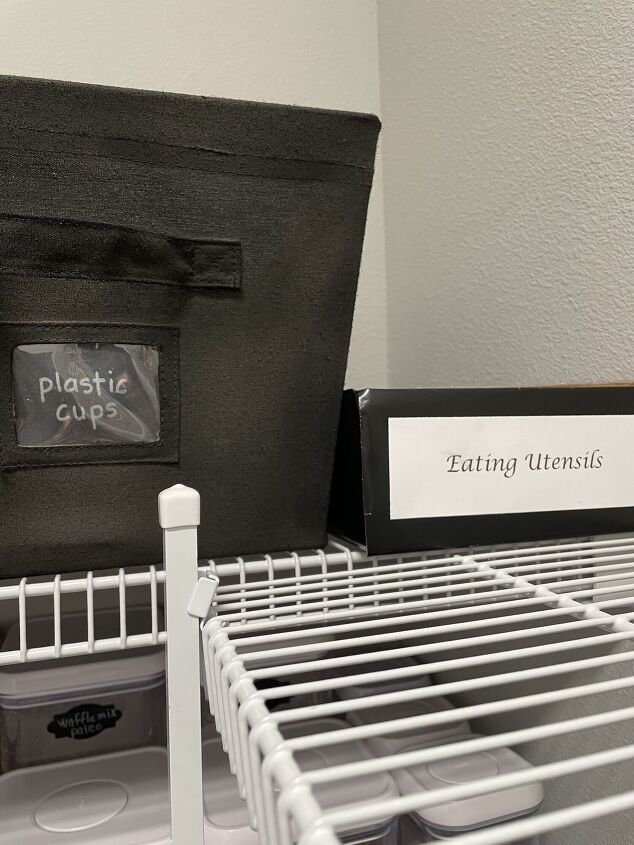
Did you know there is such a thing as chalkboard scrapbook paper? Well, guess what, there is! Now you can easily make your chalkboard labels! I used it to label the bin on the left!
If you can’t find specialty paper, use white cardstock and make labels in WORD (or use a black sharpie) like the label on the right!
STOP ITEMS FORM TIPPING ON WIRE SHELVES
If you have wire shelves as I do, then you know some items constantly tip over.
To solve that problem, I like to use plastic tubs to store items that tip, or can fall through the wires!
USE COMMAND HOOKS
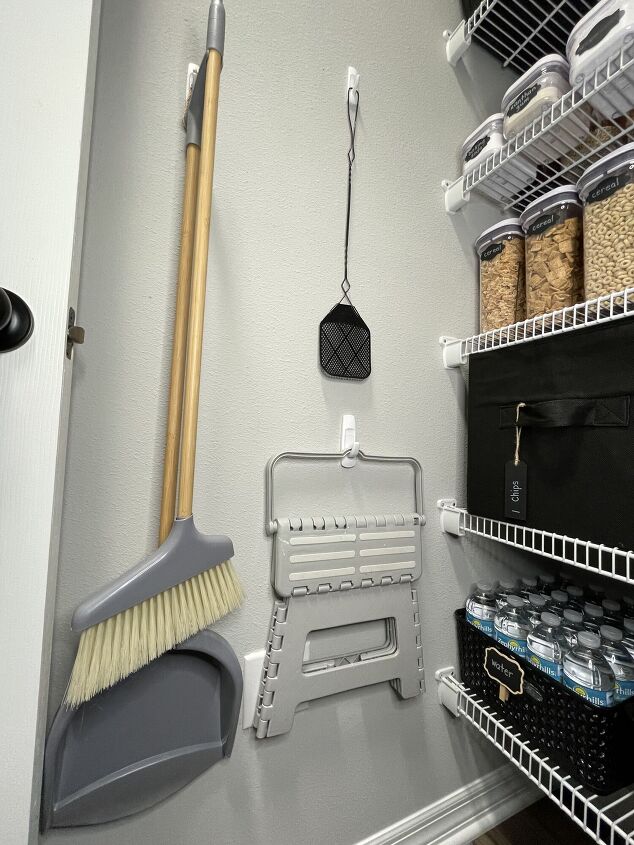
If you have wall space in your pantry, put it to good use with command hooks!
My dustpan, broom, and step stool were always in the way until I hung them on command hooks.
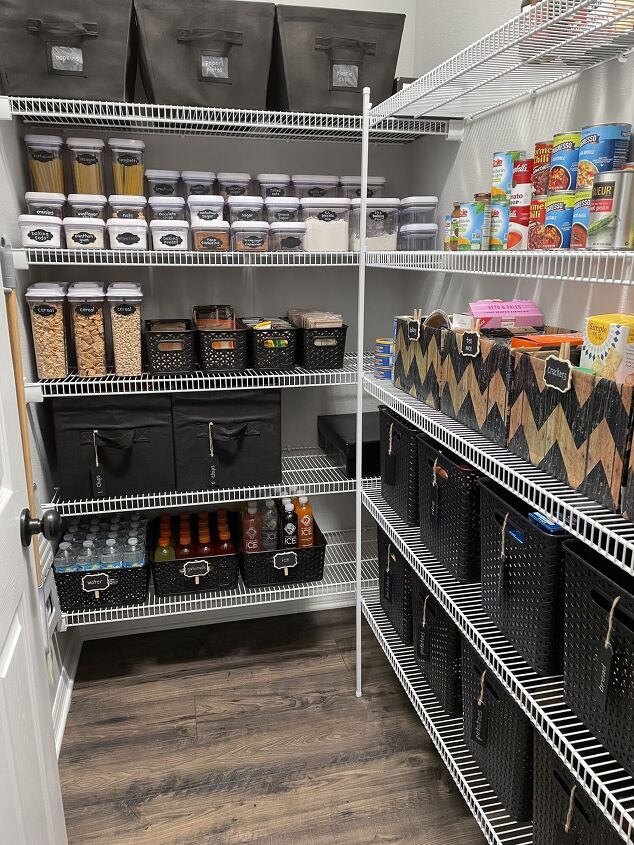
HOW I ORGANIZED MY PANTRY
I hope you liked my budget-friendly tips! Now you can see how I put those clever ideas to use as I organize my pantry!
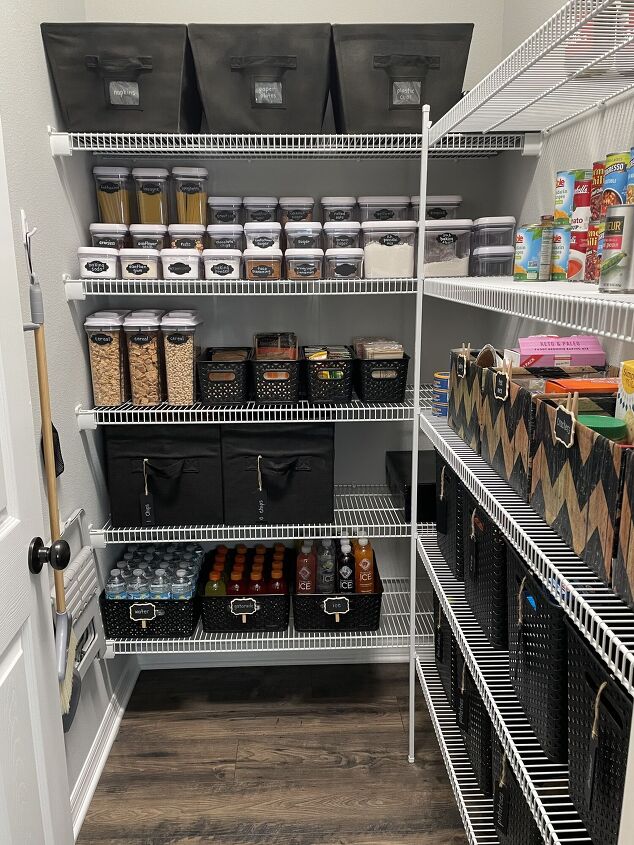
DISPOSABLE TABLEWEAR

I store napkins, paper plates, plastic cups, and cutlery on the top shelf. The bins used to be an olive drab color, but I spray-painted them black to match the other bins in the pantry!
BULKY CHIP BAGS
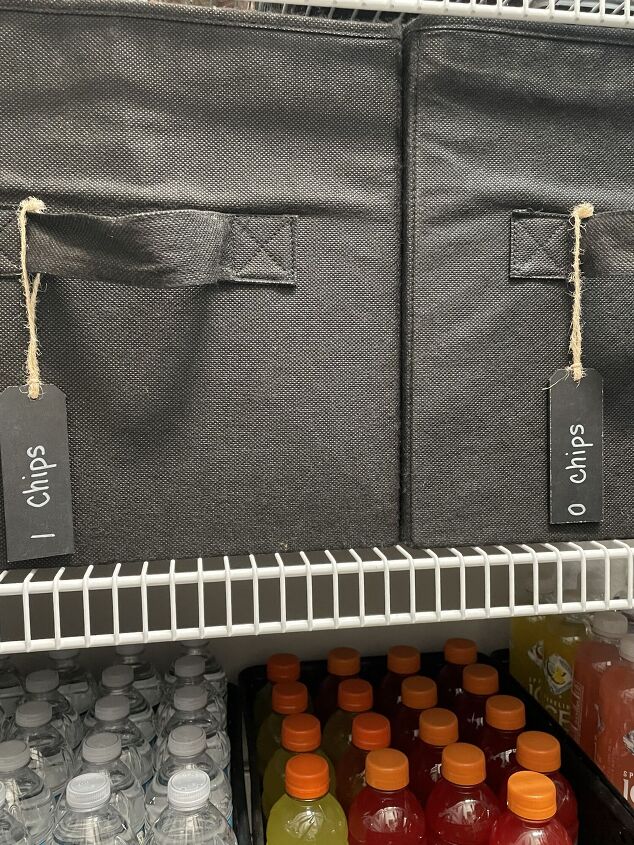
I use two large black fabric cube bins to store large bags of chips. The labels look like they say “I” chips and “O” chips, but those are symbols meaning closed and open. The closed bags are stored in the left bin and open bags are in the right bin!
FOOD STORAGE CONTAINERS
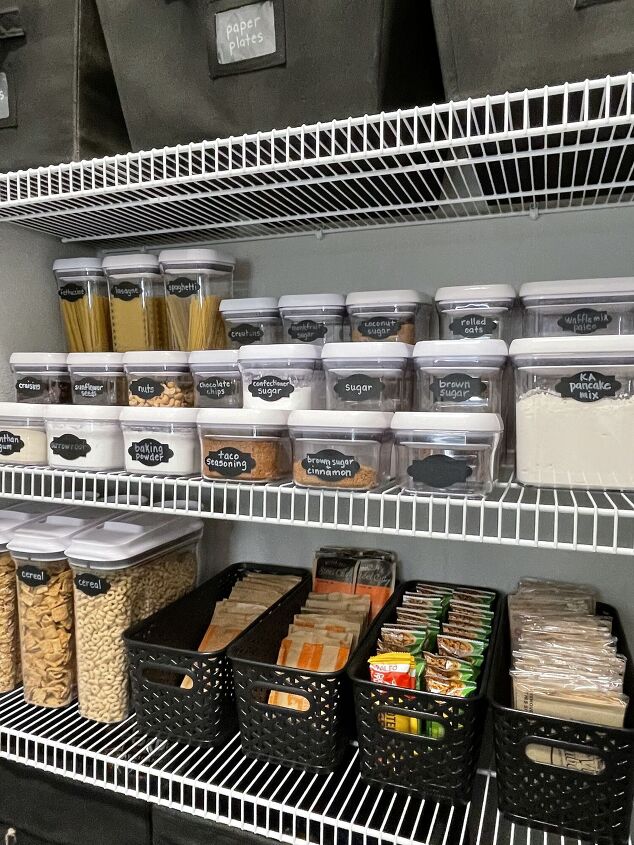
I have been collecting OXO food storage containers for several years. I love the different shapes and sizes! You can configure them in so many different ways!
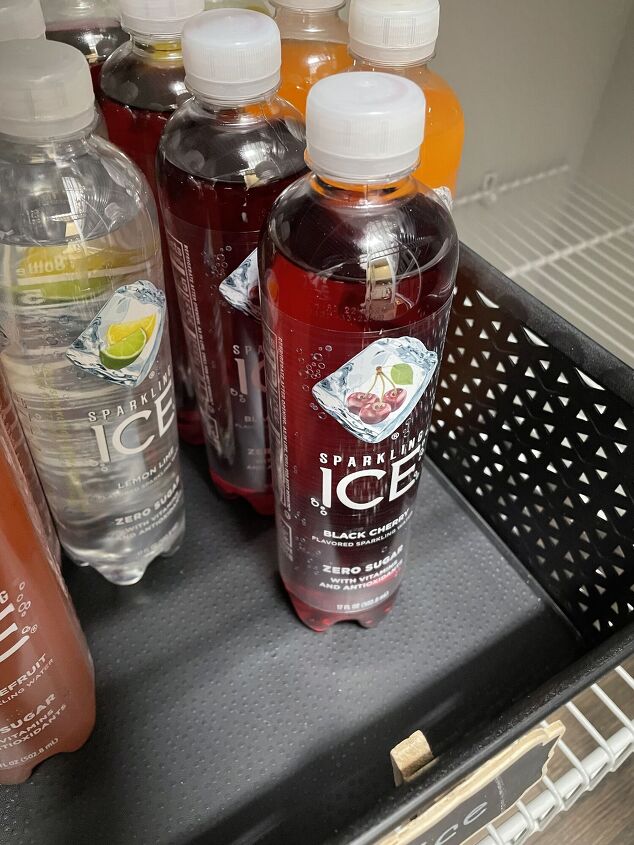
BEVERAGES

Bottled beverages are stored on the bottom shelf.
SMALL FOOD PACKAGES
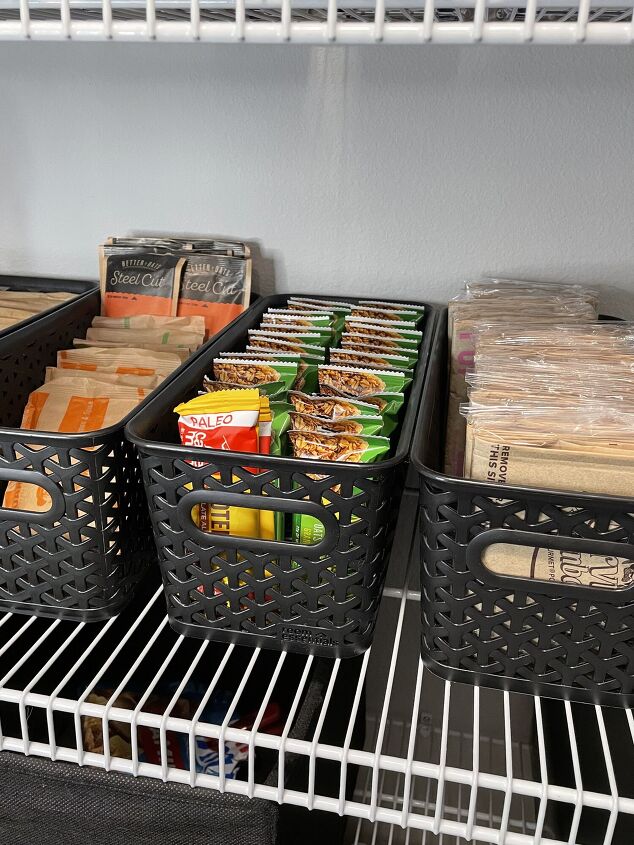
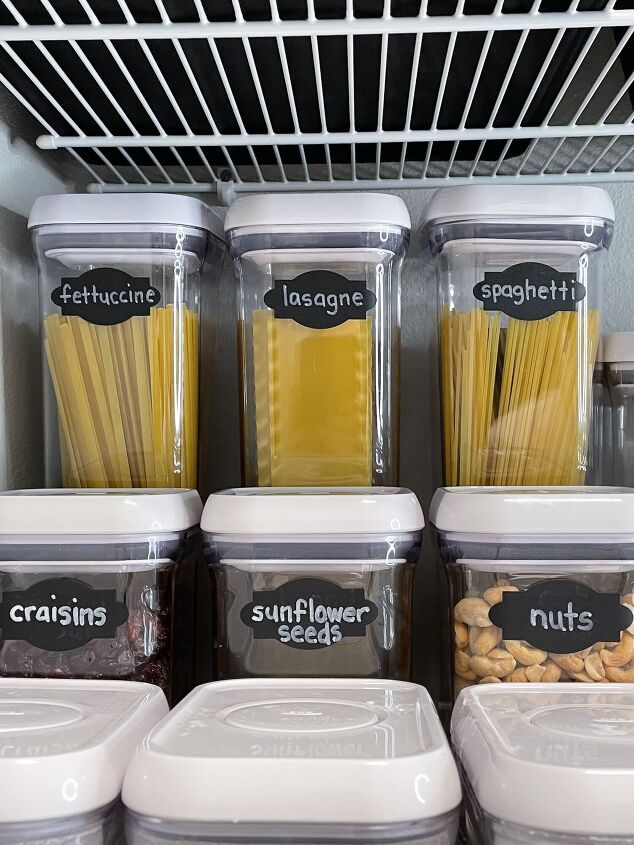
Long and skinny bins work perfectly for small packaged items like oatmeal, grits, granola bars, and popcorn!
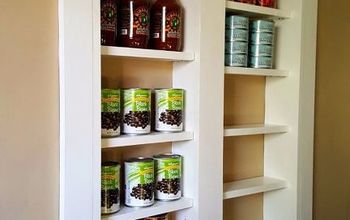
CANNED GOODS
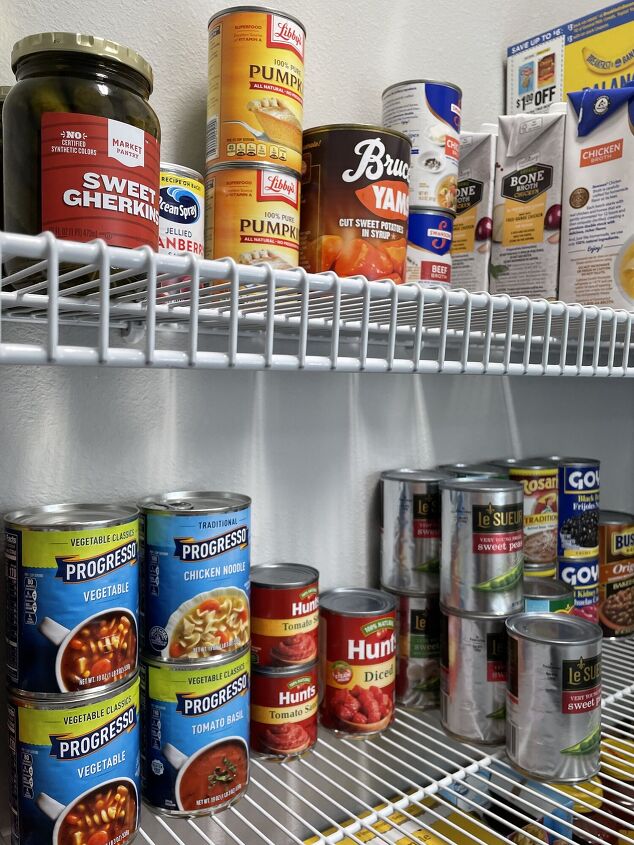
Canned goods and unopened boxes of cereal are stored on the top two shelves. I put them in groups like vegetables, soups, fruits.
CONTAIN SIMILAR ITEMS
My faux crates work great to hold similar items that are different shapes.
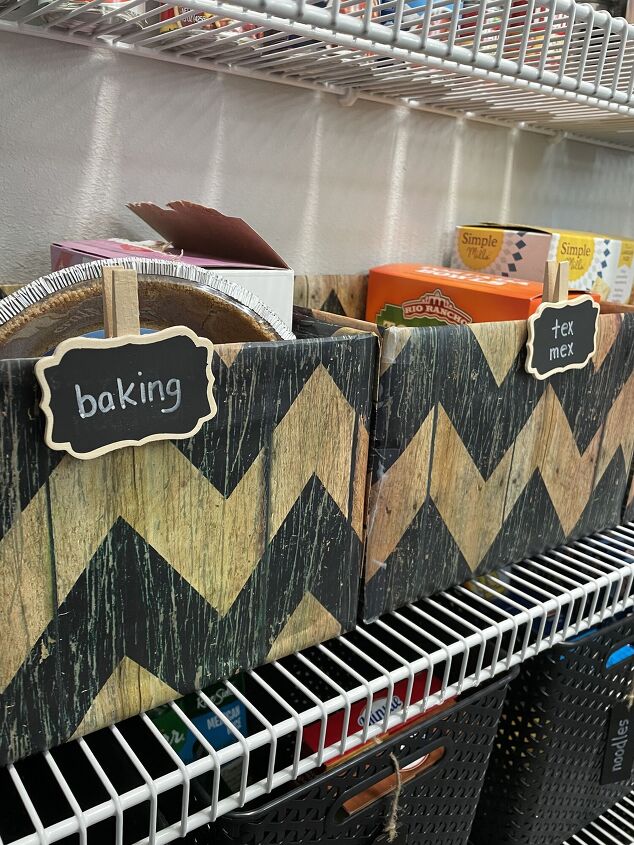
For instance, the baking box holds a pie crust and boxes of brownie and cookie mixes. The Tex Mex box holds different types of tortilla shells.
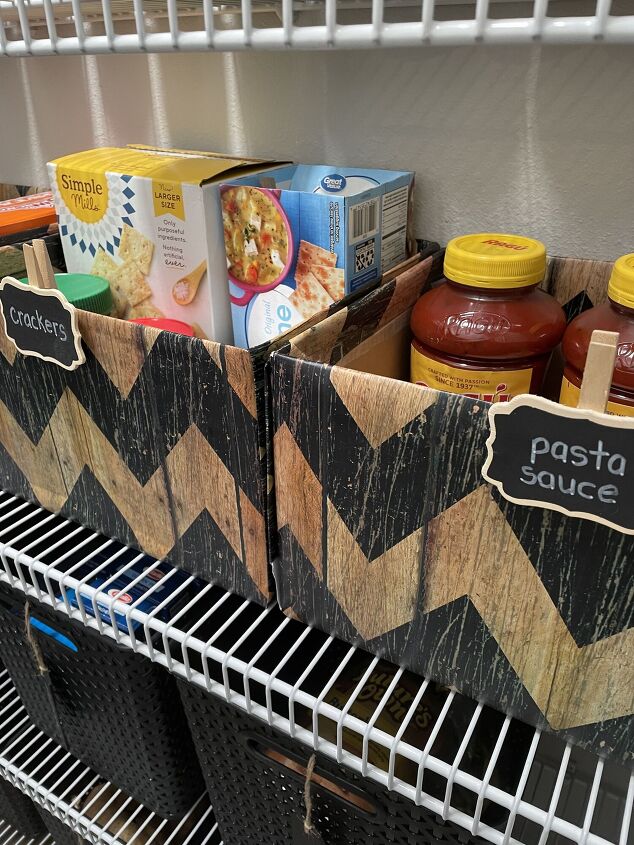
Crackers and nut butter are stored together, and different types of pasta/pizza sauce are grouped in the box on the right.
VEGETABLES
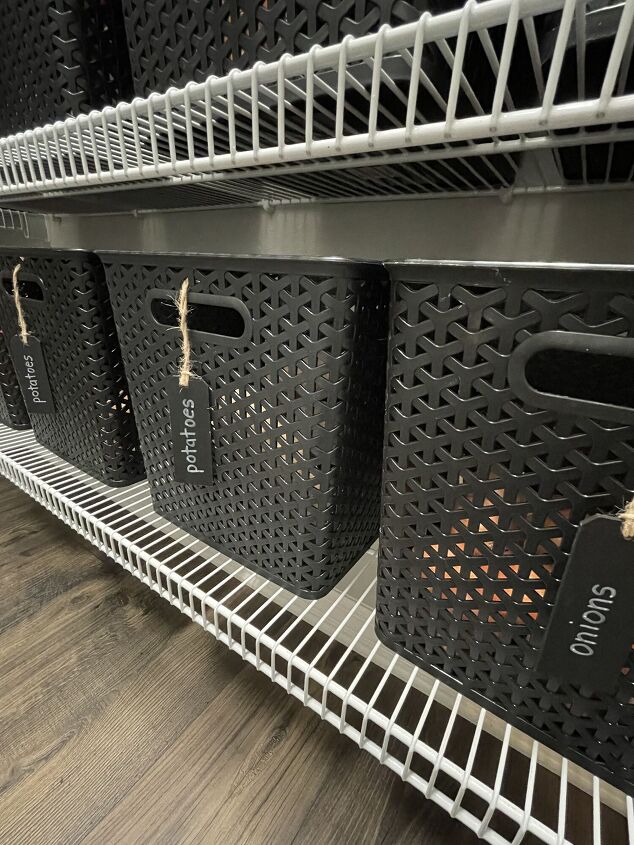
Be sure to store veggies like potatoes and onions in a well-ventilated storage container. The plastic bins I’m using came from Target.
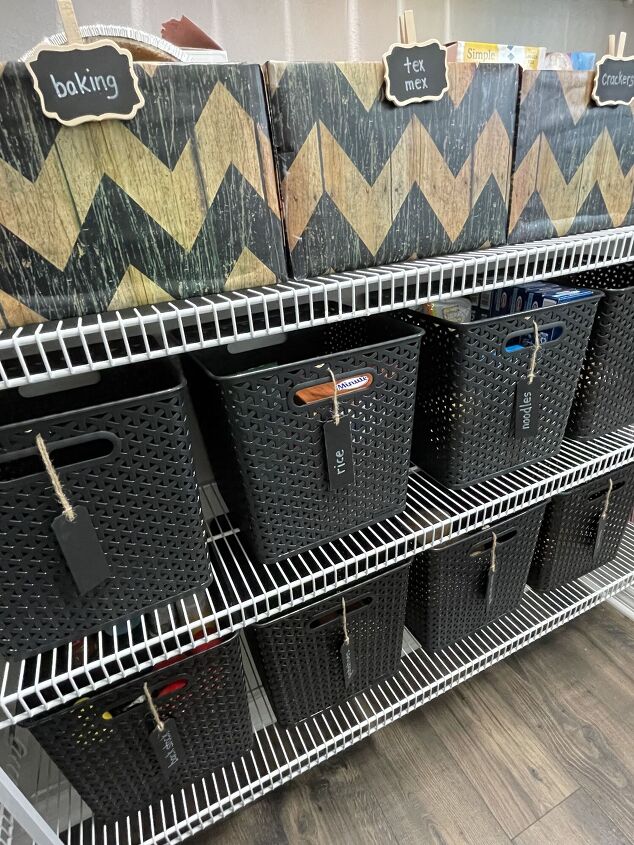
They store rice, noodles, bread, and backstock items! Did you notice that one of the tags is empty??? Believe it or not, I have one empty bin!! Woo Hoo!!
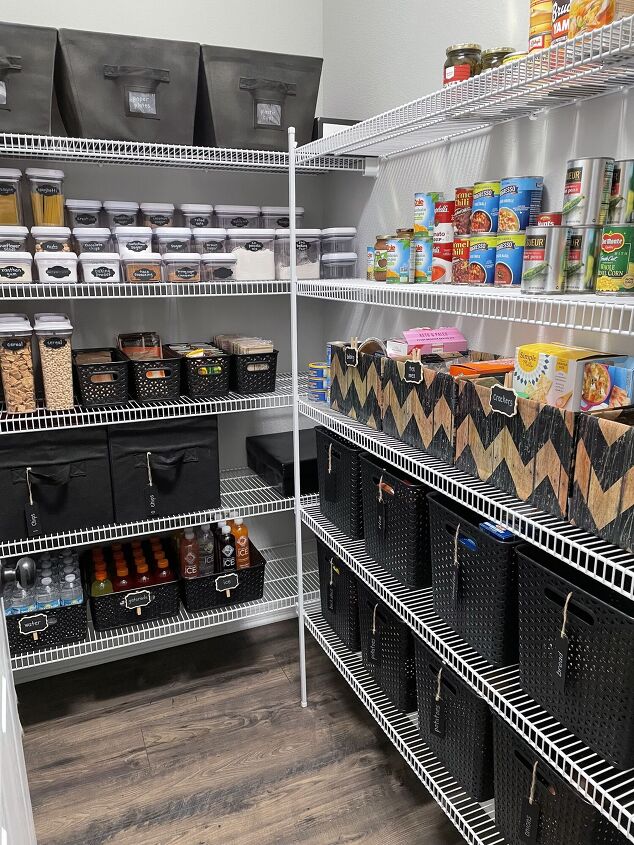
Well, there you have it, my organized pantry! I can easily find any item I need, and making out a grocery list is a breeze! This organized space saves me time and money!
Did you think my ideas to organize your pantry were clever?? Let me know in the comments below!
If you are interested in learning more about home organization, seasonal decor, and more diy projects, from simple crafts to full room makeovers visit our blog AnOrganizedSeason.com
Blessings, Donna and Rich


Comments
Join the conversation
-
Hello, love what you have done with your pantry. Do remember where you purchased the skinny containers that your granola bars in?
-
Great job, but all of those plastic containers cost more than $15, you must have had them!


Frequently asked questions
Have a question about this project?
On the shelf below the bins, what did you use to make your containers higher than the ones in front?
Where do you keep cooking directions when baking supplies are plastic containers?
This is the best post I have seen on this subject. Thank You.