DIY Wood and Copper Climbing Trellis

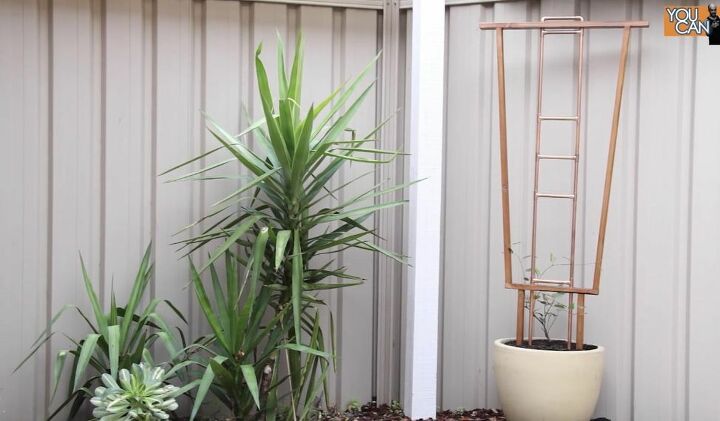
I realized that my hardenbergia was not thriving because it is a climbing vine and didn’t have anything to climb! Hardenbergias produce stunning purple flowers, is native to Australia, and makes a lovely addition to any space. I decided to build a wood and copper trellis to help bring the plant back to health and to give it a structure to climb with an artful design. This wood and copper trellis was simple and inexpensive to make using leftover pine and copper pipes and adds so much visual interest to my backyard.
You Will Need:
- Climbing plant (I used a hardenbergia, which is native to Australia, but choose your favorite)
- Pot
- Pressure-treated pine
- Copper pipe and fittings
- Pipe cutter
- Drill
- 40mm galvanized screws
- Miter saw
- Wood stain
- Paintbrush
- Glue
I measured the height of my pot and cut strips of leftover pressure-treated pine to form a ‘U’ shape inside the pot. I placed one board horizontally in the bottom of the pot and then two side pieces vertically.
After sanding my pine frame pieces, I screwed them together with 40mm galvanized screws to construct the bottom half of my trellis structure.
After completing the bottom half of the trellis, I set my miter saw to 5 degrees and cut two 1.8 meter long pieces with parallel angles to form the main uprights of the trellis. I cut, sanded, and then screwed the pieces together with 40mm galvanized screws.
I measured and marked where to join the top and bottom trellis assemblies and screwed them together to complete the trellis design.
I stained the wooden trellis the same color as the other timber in my backyard. It is a teak looking shade that looks amazing with the copper pipes. I applied the stain evenly over the surface with a paintbrush.
I started by finding the center of the wooden trellis and measured 70mm out from there to get the two copper uprights in the center of my frame. I did this for each horizontal piece. I drilled pilot holes and then used a 13mm spade bit to create the openings for my copper pipe.
I cut my copper pieces using a pipe cutter. I attached the blade onto my pre-marked lines, tightened it, and then gave it a few spins. As it cuts the copper, keep tightening until it cuts through.
I dry fitted and then glued the copper pieces together; measuring, marking, and cutting as I went. I created a copper climbing structure that consisted of two vertical side pieces with several horizontal pieces for the vine to climb in and through. I created straight copper pipe sides and used copper t-joint and 90-degree copper fittings that I attached with glue. You can get as creative and intricate with your design as your time and skill allow.
I added heavy rocks to the bottom of the pot to hold the trellis in place and then covered the base and filled the pot with potting soil. I created a hole for my plant and planted it just underneath the trellis base to ensure it would start climbing soon.
I am thrilled with how the copper and wood trellis design turned out and how wonderful it looks in the backyard. The contrast of the wood with the copper as well as the design appeal of the structure are amazing and add so much interest to what was before just a plain pot. Over time, the copper will age and tarnish and add even more visual appeal to the trellis. This was a very simple project to complete in a weekend.
Have you created a DIY trellis for backyard plants or incorporated wood and copper design elements in your outdoor spaces? Share your outdoor design style ideas or find inspiration for more DIY trellis and garden decor projects on Hometalk.
Enjoyed the project?
Resources for this project:
See all materialsComments
Join the conversation
-
-
 Robyn Garner
on Mar 17, 2021
Simple - and simply beautiful!

-
-











Frequently asked questions
Have a question about this project?
can the plant grasp and hold the copper to climb it?
How does the plant tolerate the heat of the copper in summer?