The Wizard of Oz's Tin Man & His Girlfriend...The Tin Lady!

Cr180
by Cr180
$20
8 Hours
Advanced
I had wanted a Tin Man for a while, so.... after much struggling with the pieces and parts finally managed to put one together. It took me hours and hours to figure out how to put him together, but I loved him as soon as I finished. I realized he really needed a mate, sooo.....I began collecting cans again......and alas I now have a pair - even though it took me months to get around to starting on her!!
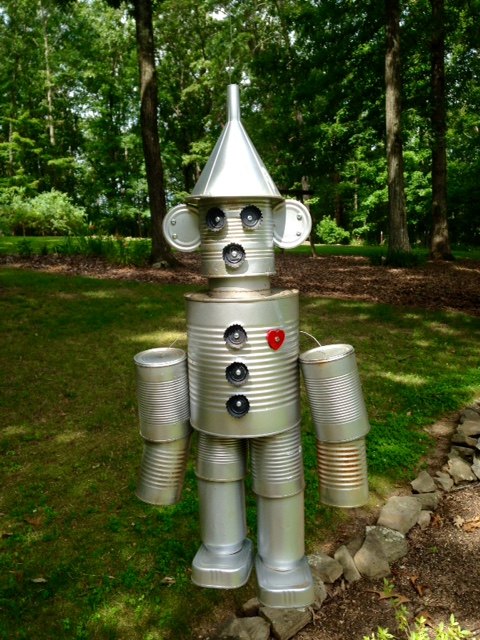
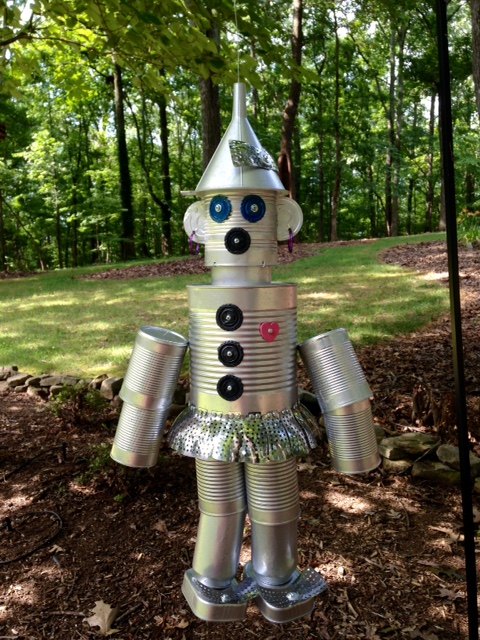
You would think that if I'd already made one it would be a breeze to make another, right??!! Not so, at least not for me. I didn't write anything down about how I put the first one together and what order to do this, what worked and didn't and certainly didn't take any pictures! I knew this would not be the last one I made so decided to make notes this time. It was still a trial and error method since quite a bit of time had lapsed between the first Tin Man and the next one.


The cost estimate to make this project assumes you do not have the screws, washers, wire, paint, funnel, steamer baskets and paint.


If you are interested in making a Tin Man or Tin Lady, keep reading.


MATERIALS NEEDED for each:


1 Large funnel – plastic or metal ------- HAT (needs to fit over can for head)


1 Large fruit or vegetable can – approx. 28 oz. ------HEAD


1 Tuna can – 5 oz. size (not the smallest one) -------NECK


1 Very large vegetable can (commercial size - approx. 105 oz) or 3 lb. coffee can ----BODY


4 Vegetable cans – approx. 15 oz. ---- UPPER ARM & UPPER LEG


2 Soup cans ---LOWER ARMS


2 Soup cans lids --- EARS


2 Coke/Beer cans ---LOWER LEGS


2 Sardine cans ----FEET


6 Bottle caps ---EYES, MOUTH & BUTTONS


1 Wooden Heart, painted


18 gauge wire


#6 x 1/2” (or shorter) sheet metal screws – 15 for Tin Man; 50 for Tin Lady


1 – 5/16” or larger flat washer


Silver Spray Paint


Spray Paint for eyes & buttons, if you want them something other than silver


Paint for Heart


Black Sharpie – for marking where holes go


Pencil – for marking measurements


***ADDITIONAL ITEMS NEEDED IF YOU ARE MAKING A TIN LADY***


2 Vegetable steamer baskets


2 Split rings (like you would use to put keys on)


3 - #6 flat washers


1 – 5/16” flat washer


TOOLS:


Wire Cutters


Screwdriver


Ice pick


Needle nose pliers


Sharp knife to cut slits in side of can (to insert ears)


**For those making a Tin Lady, the extra steps are highlighted with **


INSTRUCTIONS:


1) Begin by removing labels from cans, washing & allowing to completely dry.


2) Spray all cans with silver paint. This may take a couple of coats. If you want your EYES, BUTTONS, BOWS & HEART painted, now is the time to do that as well. Allow to completely dry at least an hour or two.


3) Attach EYES, MOUTH, BUTTONS & HEART


a) Decide where you want to put eyes, mouth and buttons on HEAD and BODY. Mark with black sharpie and make a hole with ice pick. ***Be careful not to make hole too big or screws will go right through and not thread. It’s not a big deal though – you can use a short machine screw with a nut on the back. I had to do that with one of my holes. You’ll get the hang of it and know exactly how far after a couple of holes. These are guidelines for where I put my bottle caps. Mark top center on front of HEAD can and measure down 1 ¾” for eyes, spaced about 1 ¾” – 2” apart. Mouth is centered between eyes 1 1/8” up from bottom of can. Buttons are spaced evenly starting approx. 1 ¾” down from top of BODY can. HEART is placed on right side of buttons (as you are looking at can). You'll have to refer to finished picture above.


**4) Attaching skirt


**a) If you are making a TIN LADY, steps 4a & b plus 9e apply. If not, skip to step 5 and ignore 9e. Now is the time to put your skirt on. This is tedious and very time consuming! You must take the individual strainer pieces off the vegetable steamer basket. I turn it upside down and using a table knife, slide the point into the slot where each piece is connected and press down (with knife), bending the piece hooking it in slightly so it will slide out.
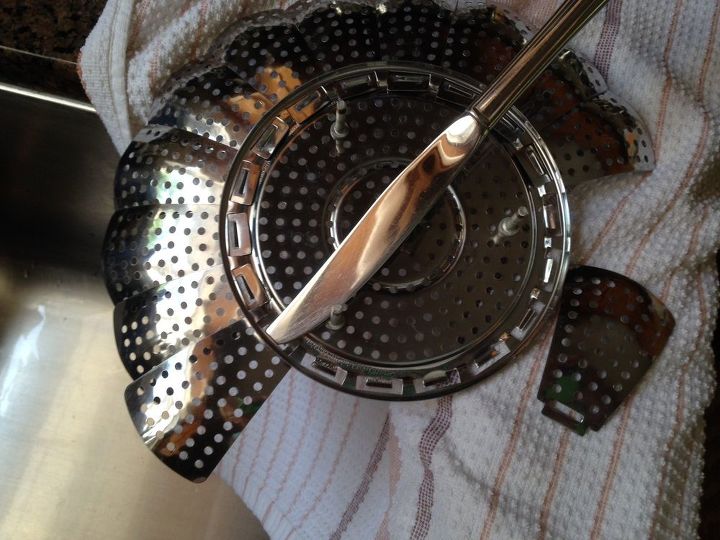
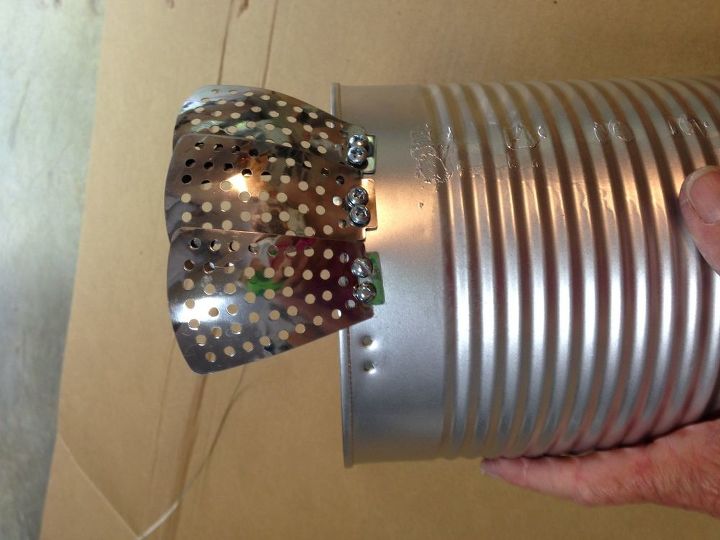
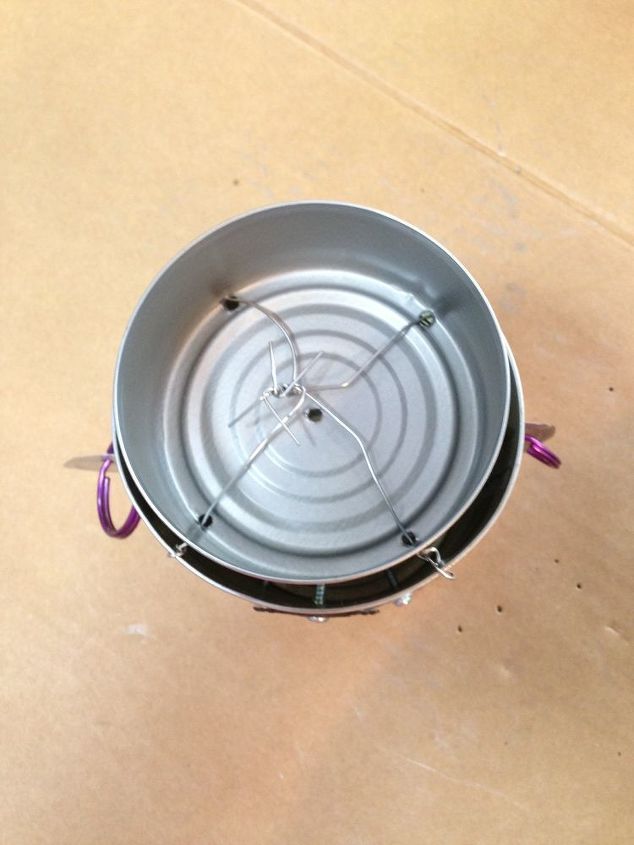
**b) It takes 18 strainer pieces for the skirt. I start in the back of the body attaching the pieces so that if they don’t match up exactly it is less noticeable. Start by holding a strainer piece against the bottom edge of the body, slightly up over the edge and mark (with sharpie) where screw holes(s) will go. Make hole(s) with ice pick and attach with screw(s). Some strainers have smaller slots for screws than others and you will only need 1 screw per strainer piece. Lucky you if you score some of those! ‼ Overlap pieces as you go around. Skirt will be in a fairly tight circle when done, but you can flair these out with your hand easily with a gentle bending.
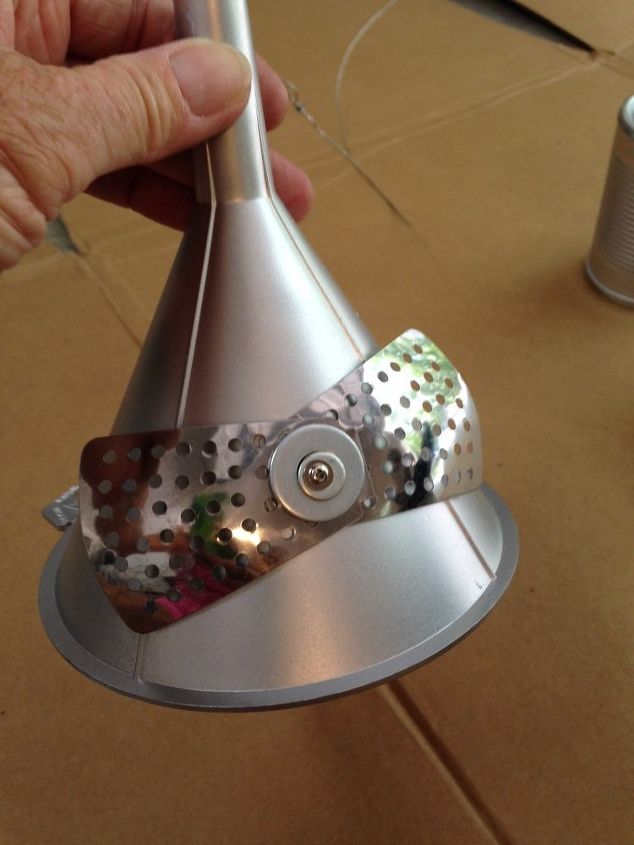
**5) Attach BOW to funnel (hat)


**a) I used a couple different sizes of flat washers to fully hide the slot, overlapped two pieces of strainer and inserted the screw (through washers) into the hole that I had marked and punched with ice pick.
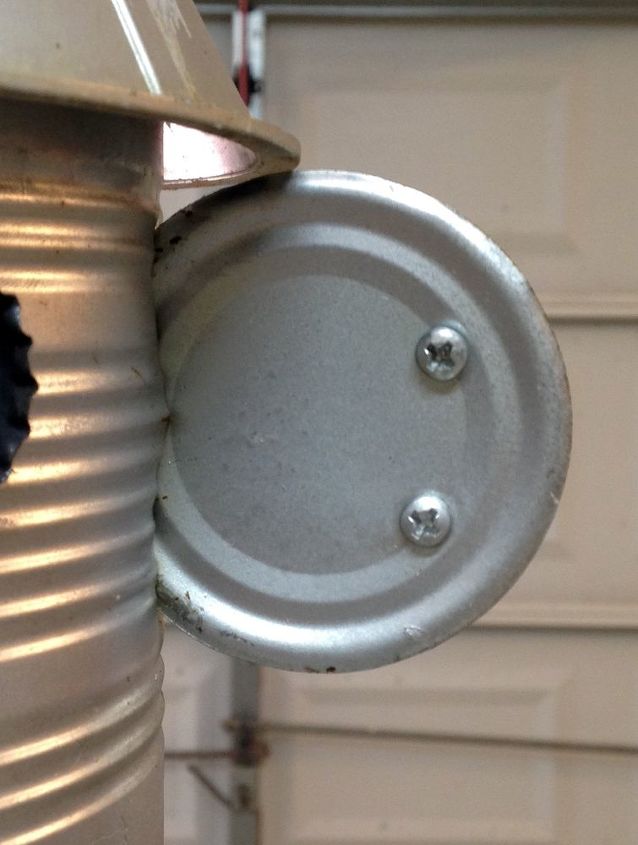
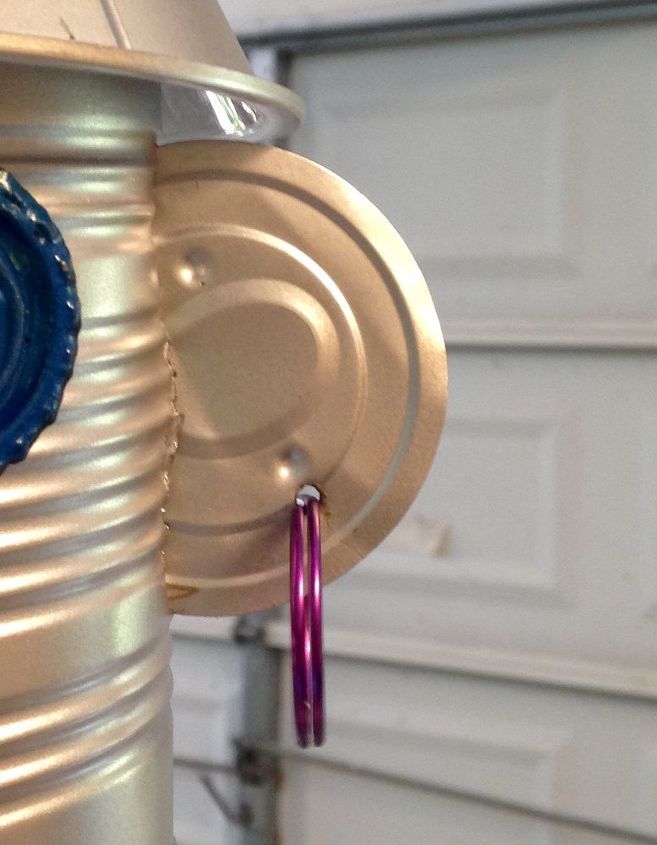
6) Attach ARMS to BODY.


a) Mark and punch holes in center top of all ARM piece cans. Cut two 18” pieces of wire. Straighten wire as much as you can so the cans will hang somewhat straight. Wrap one end of the wire around the end of your needle nose pliers a couple of times to make a ‘knot stopper’, so wire will not come through hole in can.
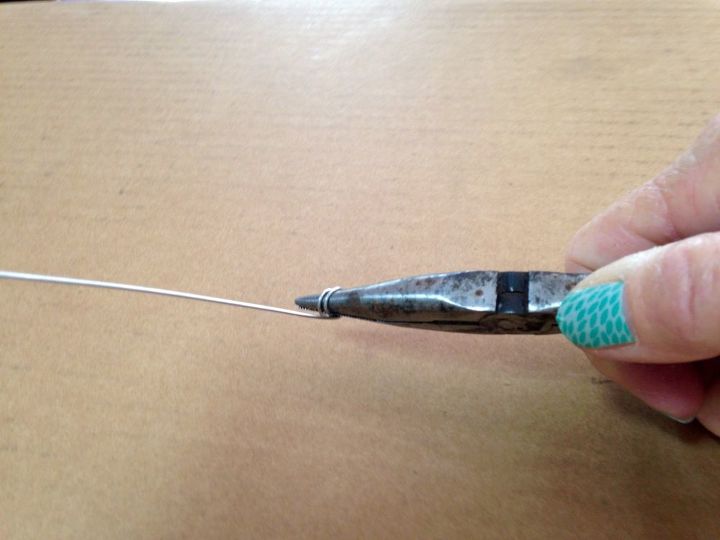
Making a Stopper Knot
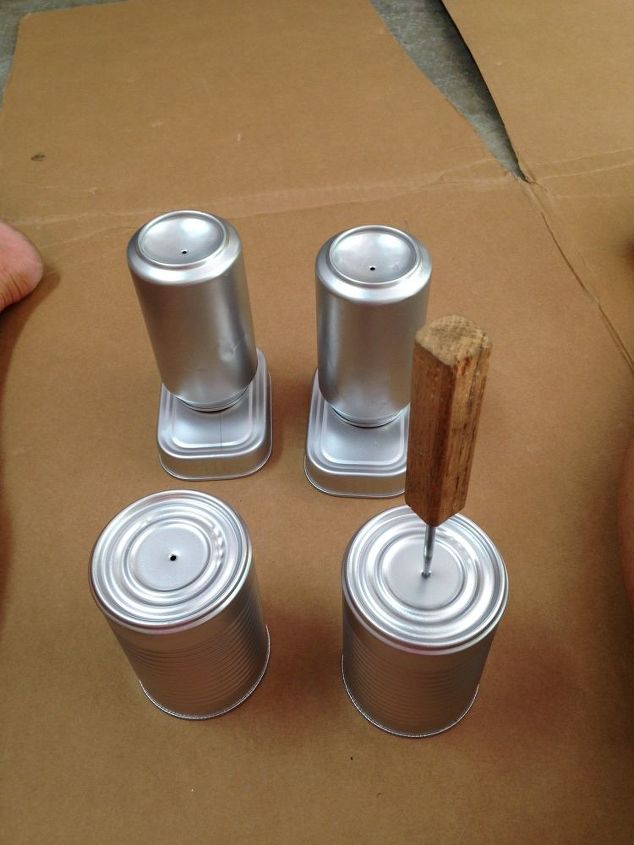
b) Fish wire up through bottom (soup) can (wire stopper knot inside bottom can) and up through upper (vegetable) can of ARM. When you let go the top can will slide down over bottom can. Here is how you fix that. You have to hold the wire with one hand and separate cans with other hand, allowing them to overlap a little. Bend wire at top of uppermost can and mark wire with sharpie. Remove top can from wire and using your needle nose pliers wrap the wire around the end of the pliers to make another ‘knot stopper’, JUST BELOW SHARPIE MARK. Feed top can back on wire and it should stop at knot and you have an arm‼
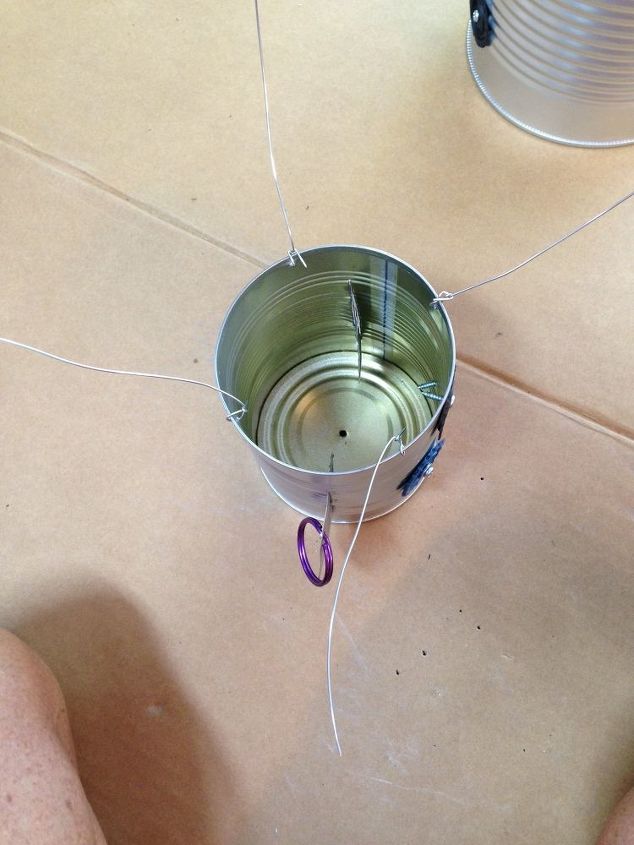

c) Repeat for other arm and attach each to side of BODY. I come down 2” from top of BODY can on each side, mark with sharpie and punch hole. Feed wire inside and adjust wire so arms hang to your liking. Make bend in wire (inside body) and using a stubby pencil (or something short) try to make another ‘stopper knot’ of some kind to hold the arm in place. Sorry……I forgot to take a picture as I was doing this.


7) HEAD ASSEMBLY – Cut a 2” slice on each side of HEAD (1” down from top of can) for ears. Wait to insert ears until end. The edges are very sharp. ‘Do as I say, not as I did‼’


a) NECK to HEAD attachment


i) Mark and punch 4 holes in bottom edge of HEAD can, as pictured.


ii) Mark and punch 4 holes in top edge of NECK can, as pictured.


iii) Mark and punch a hole in top center of NECK and HEAD can.


iv) Cut four 6” pieces of wire.


v) Feed each piece of wire through a hole in HEAD can holes, twisting off on inside edge.


vi) Feed each wire through holes in NECK can (with top of NECK can facing top of body).


vii) Slide NECK can up wires and into position so that it is just slightly inside the edge of the HEAD can.


viii) Tighten and gather wires in center inside of NECK can and twist together. Push them down to the top of the can and slightly out of the way of the center hole, as pictured. Clip wires off.
NECK
8) Attach BODY and HEAD/NECK.


a) Cut a 30” piece of wire and wrap/twist one end through the center hole of the 5/16” flat washer.


b) Feed wire up through center hole of BODY (leaving flat washer inside) and through center holes of NECK/HEAD piece and up through FUNNEL (Hat).


c) Loop top of wire & twist back on itself 6 – 8 times (wrapping the wire). Hang from something so you can continue to work.


d) If you’re making a TIN MAN, mark and punch 2 holes in each ear and put a screw in each one.


**e) If you’re making a TIN LADY, mark and punch 1 hole in each ear and put her earring (split ring) in each one.


f) Slide EARS into the slots you’ve cut for them. If you’ve cut the slots too big, or they don't fit tight, put a drop or two of hot glue behind them to hold in place.
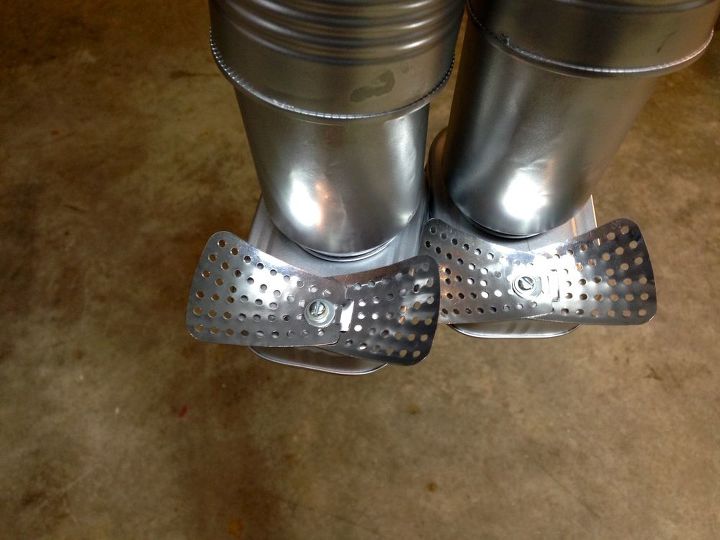
9) Attaching LEGS to FEET


a) Position bottom LEG can (coke can) on top of FOOT (sardine can), back pretty close to edge of FOOT(sardine can) and trace (with pencil) around the bottom edge of coke can, as pictured.


b) Now flip over FOOT (sardine can) and put coke can inside and back as far as you can. You really want to have the hole (the one the coke pours out of) facing the opposite edge of the sardine can so that when you punch holes you aren’t hitting the big hole. In the picture on with the coke can inside the sardine can, the ‘hole’ should be on the left.
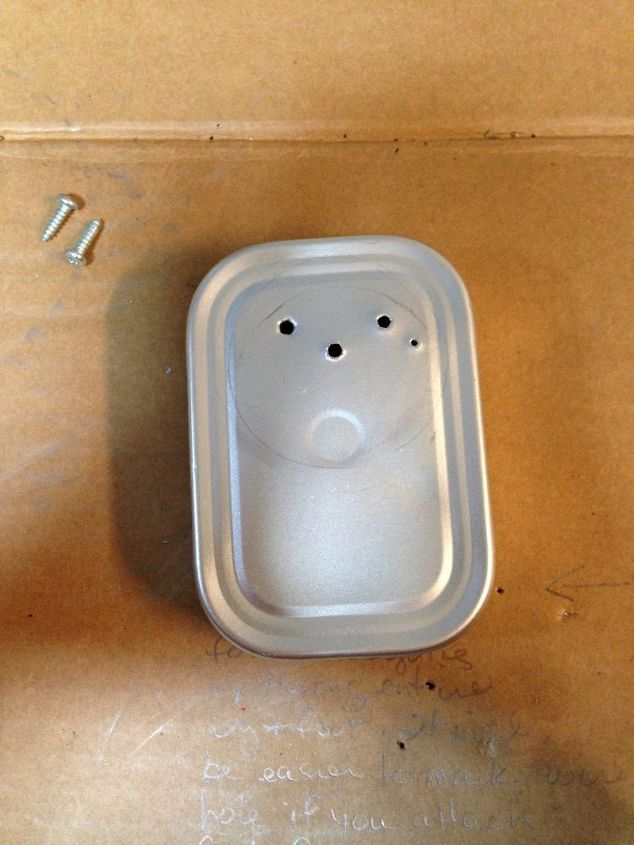
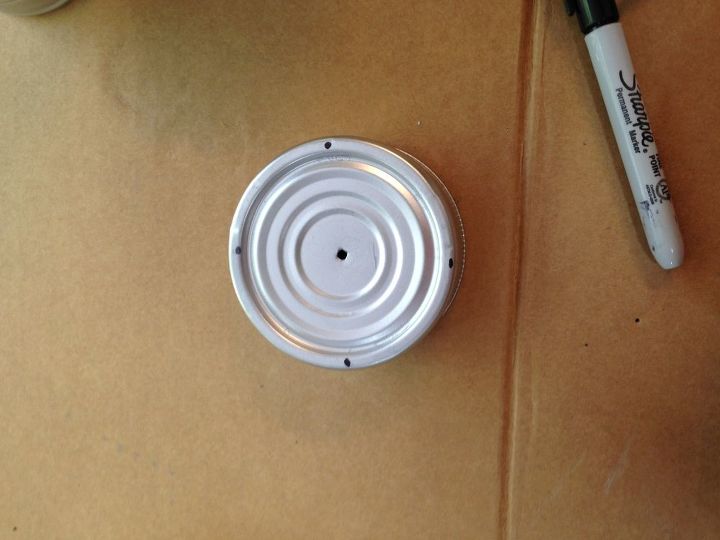
Ignore the hole to the far right
c) Flip the two cans over and mark and punch 3 holes, as shown in picture on left. ** Ignore the stray 4th hole to the right side in the picture of the sardine can….not sure what I did there**. The two holes at the top are for screwing the two pieces together and the 3rd (center) hole is for the wire that is going to go up through and into the next LEG piece and attach to the BODY.


d) Mark and punch holes in top center of bottom LEG pieces as well as top LEG pieces.


**e) If you are making a TIN LADY, now is the time to put her bow on her shoe. Use 2 overlapping vegetable steamer pieces. Hold them together on top of the shoe (pretty close to the front edge), mark with sharpie (through hole), punch hole, and using a #6 flat washer and screw, fasten the bows on. Refer to the picture below (j).


f) Cut two 30” pieces of wire.


g) Make a couple wraps of wire around the end of the needle nose pliers. Again, this is your ‘stopper knot’.


h) Feed wire through FOOT and bottom LEG pieces, with ‘stopper knot’ at bottom of FOOT.


i) Attach FOOT to bottom LEG piece with screws. Repeat for other LEG/FOOT.


j) Feed wire through top LEG piece and go through same process as when you spaced out the two ARM pieces. You have to hold the wire with one hand and separate cans with the other hand, allowing them to overlap a little. Bend wire at top of uppermost can and mark wire with sharpie. Remove top can from wire and using your needle nose pliers wrap the wire around the end of the pliers to make another ‘stopper knot’, JUST BELOW SHARPIE MARK. Feed top can back on wire and it should stop at knot and you have a LEG! Repeat for other LEG.
10) Attaching LEGS to BODY


a) Find the large flat washer up inside of the body. Feed one LEG wire at a time through the washer and adjust so that the top LEG can is just barely above the bottom of the BODY.


b) Twist wire around itself to hold in place.


c) Repeat for other LEG.


d) Clip excess wire off.


11) You may choose to give your TIN MAN or TIN LADY another light coat of spray paint if you’ve scratched him/her up in the assembly process. The only problem is if you have several colors…….eyes, buttons, earring, etc. You can use a piece of paper to shield those areas while you spray.


Hang your TIN MAN or TIN LADY and sit back and admire‼


I hope these instructions have helped you. Some of the pictures don’t match up exactly to my description, because everything didn’t always work in the order I thought it would. The written part takes precedence over the pictures.


**I used Rustoleum spray paint and you can see by looking at the Tin Man that he is showing signs of rust already. It’s been less than a year ago that I made him. So much for Rustoleum‼!


** I did NOT spray paint the vegetable steamer pieces as they are stainless and I kinda like the really shiny contrast.


**The can sizes and types are really just a general guideline. I found the plastic funnel @ Wal-Mart for approx. $2. I was also able to pick up a vegetable steamer at a thrift store, but had to buy the other one ($5). Since I don’t buy anything in the huge can needed for the body, I bought the cheapest thing on the store shelf that came in that size – about $2. Use whatever works for you. You can make these people as fancy or as plain as you want. I really think having a couple of kids to go with them would be cool!!


If you have any questions, leave me a comment with your question and email address and I'll try to help you out.
Frequently asked questions
Have a question about this project?
  1 question
  • DJ DJ on Mar 05, 2017
    This is amazingly cute! My granddaughter will love it. What size is the finished tin person
Comments
Join the conversation
2 of 102 comments
  • Theo Theo on Jun 10, 2018

    This is adorable! I'm going to make these for our new house! I think I'll put them in our garden, along with a scarecrow! I'm seeing a theme for the garden area!! Thank you for the inspiration!!

  • Sue Sue on Dec 18, 2018

    Definitely, if I can follow the directions given. Looks like fun.

Next