


How to Dress Up a Dollar Store Fall Sign
Other than browsing my local thrift stores, one of my other favorite things to do is check out the seasonal dollar store aisles. You can often find inexpensive things that are a great starting point to creating something for your own home decor.

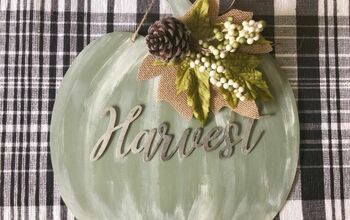
Like this fun fall sign that was just $3. Now technically it’s a Thanksgiving sign, but fall and Thanksgiving go hand and hand.
I fell in love with the colors, and decided that with a little dressing (ha ha) it would be perfect for this fall season. It would certainly be fine hung up just as found, but since it’s not that large it wouldn’t make much of a statement all on its own.

So I went into my stashes to see what I could find, and lo and behold I found the perfect thing. I’ve has this thrifted chicken-wired frame for quite a few years. It’s been hiding in the back of my craft room closet, just waiting for a some day project.
And its some day has finally arrived.

To dress up my sign in the frame I’m using some bits and pieces of fall leaves and things from my stash. Never throw away bits and pieces, because you never know when you might be able to use them.

The easiest way I found to do this was to turn the sign over and position is about where I wanted it in the frame. This gave me a guide of the space around the sign. I taped the jute hanger down to keep it out of the way. I don’t think I’ll be using it for this project, but I wanted to keep it on the sign for the future.

Then I just started hot gluing the leaves into place around the outside edges of the sign.
Just remember you want the fronts of the leaves facing down so that’s where the glue goes. I made the mistake several times of putting the glue on the back and ended up with hot glue fingers. Ouch!

I kept turning it over as I was making my way around just to see how it looked. And I continued until I had a base that I was happy with.
Then it was time to attach the sign to the chicken wire.

This was easily done with some 4" zip ties and some 3/4" zip tie clips. The clips are also known as cable clips and they have adhesive on the bottom. They're usually used to clip up cables and wires, but they have many other uses as well.
The reason I’m using the clips for the sign is because I didn’t want it to be permanently attached to the chicken wire. This leaves the chicken wire frame free to be reused for something else in the future, and also the sign can be hung on its own or on something else. All I have to do it cut the zip ties.

I put the clips in place where I thought they would work best. Just guessing really.

To make it easier to get the zip tie through the slot on the clip you just have to run your fingers over the tie to shape it a bit like the photo above.

Then you feed the zip tie through the chicken wire and the clip, and grab it with pliers to pull it through the other side of the chicken wire.

Then you pull it until the head gets to the right position and pull that through with pliers as well.

Once the zip tie is tight, snip the excess off.

Here’s the back of the sign all attached with the zip ties.
Supplies needed for this project
- Dollar Store sign
- frame of some kind
- misc fall leaves & decor
- hot glue gun and sticks
- 4" zip ties and 3/4" zip tie clips
- pliers
So here’s the original sign again.

And here’s what it looked like after I attached it to the chicken wire with the zip ties. You could leave it just like this, but me of little restraint had to add a few more bits and bobs.

I just couldn’t resist. I have a thing for scarecrows and butterflies so they often make it on to fall-ish projects.
This was such a fun project and pretty easy and inexpensive. Since I already had everything except the sign, I guesstimate it cost me about $4.
I hope this project has inspired you to take a simple sign from the dollar store and turn it into something more.
If you enjoyed this fall project you might also enjoy the following:
DIY Own Wreath with Faux Fall Leaves
Decoupaged Quilt Block Pumpkin
Lace and Ribbons Pumpkins Makeover
You can find more fall projects on my blog, Color Me Thrifty, here.


Frequently asked questions
Have a question about this project?