


How to Remove Popcorn Ceilings Quickly and Easily
2 Materials
$200
4 Hours
Medium
Yes, popcorn ceilings are dated and went out of style years ago. So, most new home owners are looking for ways to eliminate popcorn textured ceilings. Removing the popcorn texture is not that difficult, but it certainly can be a messy job (and I'm going to show you some simple solutions on how to do this in an easy and less messy way).
To read the full article on this topic, as well as a video demonstration and find where you can buy these tools (via Amazon), see the original article on popcorn ceiling removal on my blog.
Why were popcorn ceilings once popular? Believe it or not, there were real functional benefits for popcorn ceilings. First, they provide an acoustical benefit as they absorb sound and reduce reflection of noise. Second, they made it easier and less expensive for construction as they hide imperfections in the sheet rock and taping process. By using these textured ceilings, they eliminated the need to apply multiple coats of joint compound over nails/screw holes and other surface imperfections. They also reduce maintenance as they rarely need to be repainted (as dirt/imperfections are camouflaged by the texture.)
Safety precautions before you get started with popcorn ceiling removal There are two potential problems that can turn into a major headache, and you'll want to check on them BEFORE you get started.Asbestos: Unfortunately, many popcorn ceilings installed before 1980 contain asbestos. Asbestos was banned in 1978 during the Clean Air Act. Unfortunately, one of the clauses in this act allowed the manufacturers to sell material that was was already manufactured or in stock on shelves, so ceilings that were done up until the early 80's may have still contained asbestos. (Asbestos is a substance that can cause cancer). Lead Paint Ceiling (or painted popcorn ceiling):
The second potential problem is if you have lead paint. Lead was also banned from paint in 1978 and it often was found in inventory for a few years. If you find you have either asbestos or lead in your ceiling, this is not a safe option for you to do yourself. But, on my full blog post, I do share alternative solutions that are safe for your health.
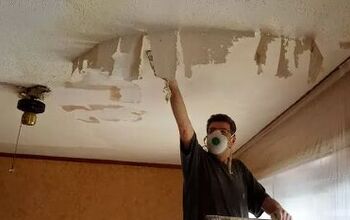
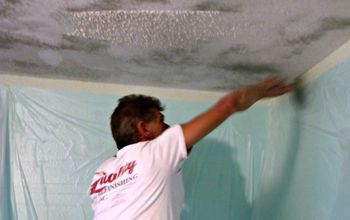
How to eliminate popcorn ceilings It's actually easier than most people think, so it's a great DIY job and you can save a lot of money this way. 1. First, prep the area: Remove all furniture and items off the wall (e.g. artwork, window treatments). Then put plastic sheets on the floor. Extend the plastic 1 foot up the wall and attach it with painter's tape. This will help you later so you don't get debris on the floor. (Note: do not add painter's tape to hardwood flooring as it often removes the polyurethane). I'm going to share a neat tool that will take care of most of the mess, but still, you need to cover the floors. Turn off heating/cooling vents for the area. You'll want to cover remove the vents/cover them with plastic (use painter's tape to seal these). You'll want to do the same thing with wall outlets and switches. Remove ceiling lights and ceiling fans. Make sure that all of these area that may lead to electrical outlets are covered with plastic and use painter's tape to hold in place. You don't want to risk getting these area wet (or dirty). You'll also want to protect the walls, so run painter's tape on the wall just below the ceiling and attach the plastic sheeting to it. Overlap the plastic above the plastic that is already in place at the bottom of the wall. Tape all sheets so nothing can penetrate behind it. To assist with clean up, cover the floor with rosin paper. Overlap the sheets and tape them together. Secret bonus tip: Here's a big short cut. Use pre-taped plastic sheeting. This stuff is amazing and will save you a ton of time! Basically, one edge already has tape attached, so all you need to do is peel and stick it to the top of your walls. Not only that, but when you're done, you just roll up the plastic, discard and your room is perfectly clean. It will save you so much time! 2. Second, you want to apply a nice coat of warm water to the popcorn ceiling. The easiest way to do this is with a standard garden sprayer. And, if you don't have one, here's where you can purchase one on Amazon. (They are inexpensive and can of course be used later for your flowers and garden.). It’s way easier than trying to sponge down your ceiling. Plus, since your entire room is already covered in plastic, you don't need to worry about getting water on anything else. Use this to add a nice even coat on the wall. The key to breaking the adhesive bond with the drywall is keeping it wet. 3. Let this sit for 10 to 15 minutes for full absorption. The water is going to break down the adhesive bond and allow you to scrape it off easily. (note: If there are many levels of paint on top, you may need to spray a second time or multiple times). 4. After the bond has broken, you're going to use a putty knife to scrape it off. I'd recommend a 12 inch scraper but can also be done with a 6" putty scraper (but it will just take longer). Usually, the popcorn ceiling just peels off very easily (if it doesn't, you'll just want to apply more warm water). Just glide your putty knife across the surface moving slowly with long strokes in one direction. The long, slow and even strokes will help prevent the corners of the knife from digging in and gouging the drywall. Now the slightly tricky part is all the mess that comes down from the ceiling. But, have no fear as I have a great solution for you. This entrepreneurial contractor created a new invention for this very purpose. It's call the Popcorn Ceiling Removal Bucket. It comes equipped with a pole so that you can hold it in one hand while scraping with the other. Easy peasy and it solves most of the mess. You can find where to get all these tools and see pictures of them on my original blog post. Most can be bought on Amazon and are relatively inexpensive. I also have advice on there what to do after you remove the popcorn ceiling and prepare for painting.

Want more details about this and other DIY projects? Check out my blog post!
Comments
Join the conversation
2 comments
-
Great tutorial! That is the way I and my crew used to remove popcorn ceilings. Then 1/4" x 10' drywall was made specifically to cover up the popcorn ceilings and we started using that. Less mess, less time, and less cost for the homeowner. My concern with the bucket, the weight of two pounds of wet popcorn compound can weigh up to twenty five pounds or more.
-
William - So glad you do things in a similar way. Excellent point about the weight. You may need to empty a big more often.


Frequently asked questions
Have a question about this project?