


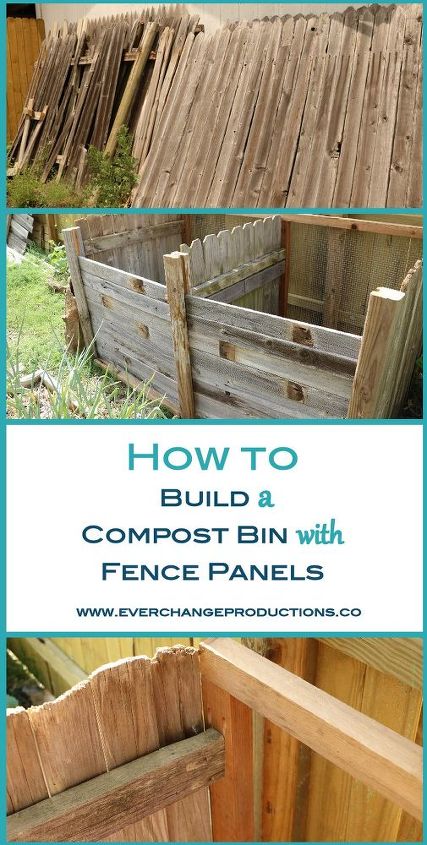
Compost Bin With Repurposed Fence Panels

Building a compost bin is the first real step to composting. Up until now, you’ve probably studied the benefits of composting, how to compost, compost bin options, what to compost, but now the real fun begins. Today we’ll show you how to reuse fence panels or other scrap lumber you have to make a sturdy compost bin that will last years to come.
Our privacy fence started falling over, so when we replaced it, we kept the best parts of the fence for our compost bin. You should use the scrap wood or pallets you have access to.
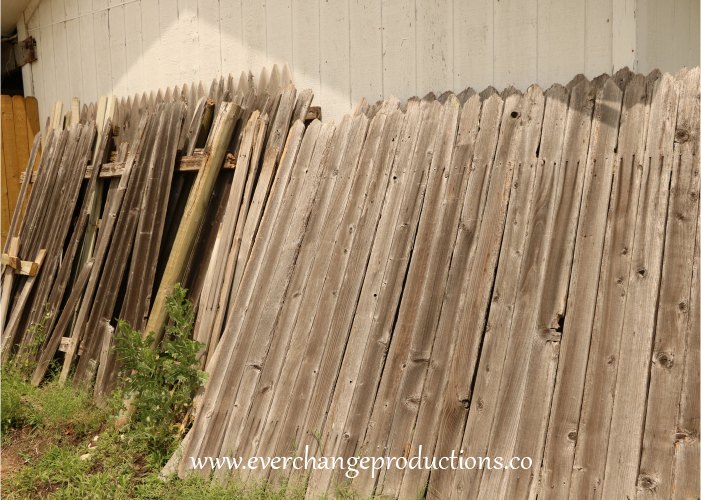
First things first, gather all the materials you need. The optimal size for a compost bin is 3 feet wide x 3 feet long x 3 feet high. We made a 2 bin system, so we used twice that with 3 foot separation panel and the back panel was about 6 feet long.
Step 1 - Cut the wood to size
Whether you use fence panels, scraps of wood or pallets, the panels needs to be at least 36 inches- ours turned out to be 39. You'll need an additional panel about 3 feet tall x 3 feet wide x 6 feet long for the back. You'll also need at least 3 square posts and 3 2 x 4s to use as a brace in the corner.
The front/sides:
- 3 36" tall corner posts
- 3 39" wide fence panels
- 2 2x4s
The back:
- 5 36" 2 x 4s
- 1 73" 1 x 4s
About 12-14 34" individual fence pieces for the slats on the front. Once you put the rest of the compost bin together, measure from post to post to see exactly the length needed.
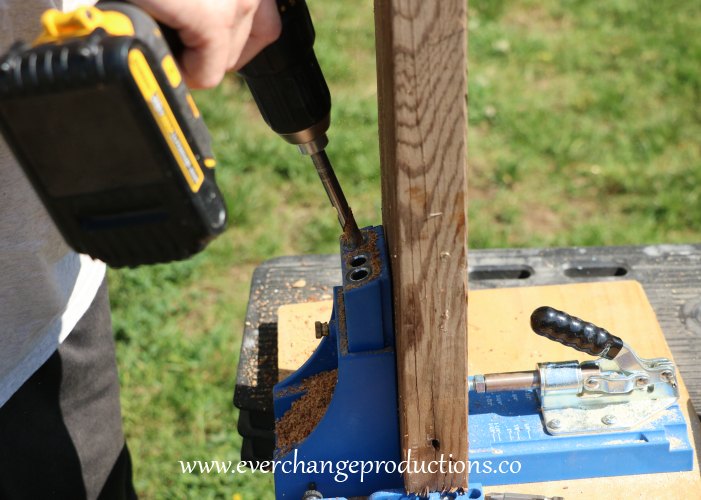
Now you're ready to start building a compost bin. Use your kreg pocket system and drill two pocket holes at both ends of the top and bottom fence rails. This is easier to do when the panel is laying flat on the ground or table. Repeat this process for the 3 panels and the pieces that will hold the screen in the back. Pocket holds allow you to create a stronger joint for the two pieces.
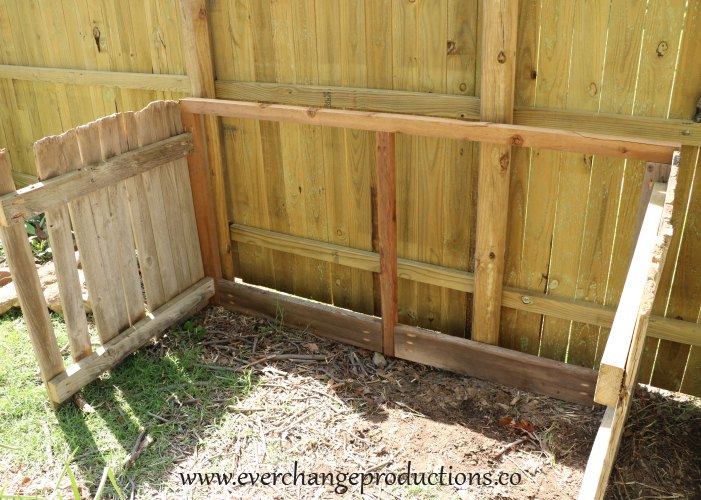
We started with the back panel, using pocket holes, we screwed in the 36 inch 2 x4 boards to the top 73 inch piece, as shown in the diagram. Then we connected the bottom 36" pieces to the divider board and 2 x 4s to complete the frame.
Once you put the back structure together, you can staple the screen mesh on. This will provide plenty of air holes to help ventilate the compost pile.
Next, using our pocket holes, we screwed the far left panel's inside corner to the back panel. We repeated this process on the top and bottom fence rails. We continued onto the right fence panel, then again with the divider fence panel. Once we had our panels attached, we were ready to build the front our compost bin.
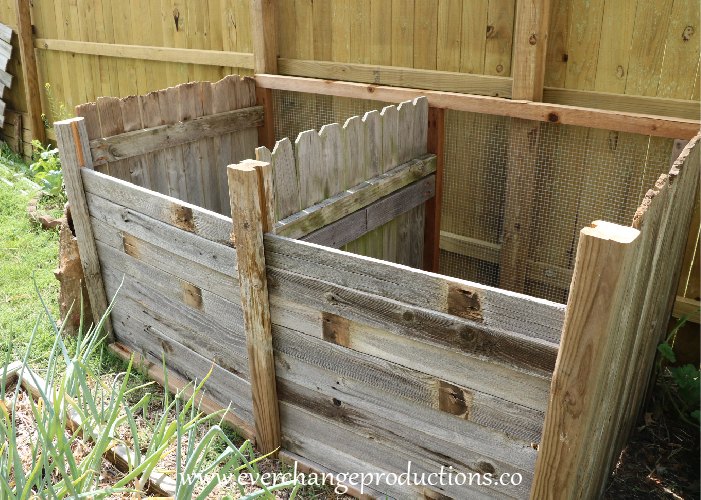
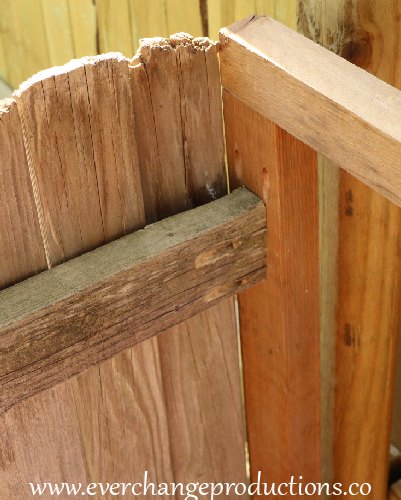
We used a rotary saw table to cut slits in our corner posts. If you don't have a rotary tool, you can make two rows of nails wide enough for the slats to fit through. You'll need about two nails per board to hold it in place.
If you feel it isn't sturdy enough, we also used 1 2 x 4 on each side to anchor it on the bottom with 2 pocket holes in the right and left side to drill into the corner posts.
Finally, you can cut remaining boards
Cut enough slats (12-14) down to size to finish the front of your compost bin.
And that's how we put together a compost bin. We've had it going for a couple of weeks and so far so good! We couldn't be happier. Follow the link to see the complete steps and get more information on making successful compost.
Resources for this project:
See all materials


Comments
Join the conversation
-
I have been trying to come up with a compost system. I have everything I need for this project, including a fence that needs repairing. TY for sharing.
-
IT MIGHT BE A GOOD IDEA TO USE WIRE GARDEN FENCEAND SAVE THE SPARE WOOD FENCE MATERIAL FOR THE MUNICIPAL WASTE PICKUP. ITS VERTY IMPORTANT THAT COMPOST BREATH. GARDEN FENCING/OPEN METAL NON RUSTING FANCE MATERIAL IS IDEAL. IT WILL HOLD THE COMPOPST AND OFFER PLENTY OF SPACE TO BREATH. A FEW ISSUES WITH THE FENCE IS THAT ITS MOST LIKELY TREATED LUMBER WIHICH MEANS THAT IT WAS TREATED WITH FORMALDEHYDE OR ANOTHER TYPE OF ANTI ROT CHEMICALS. THIS LUMBER IS INTENDED TO ONLY FENCE A YARD NOT TO BE USED AS AN APPARATUS TO ASSIST IN GARDENING AND THE PROCESS OF COMPOSTING. THE OTHER IS THAT WALL LIKE STRUCTURES AS THIS WILL NOT COMPOST AT ANY RATE THAT IS USEFUL FOR THIS NEED. EACH SIDE WILL LACK OXYGEN AND WILL MOST LIKELY BE A BREEDING GROUND FOR MUMMIFIED APPLE CORES AND GRASS CLIPPINGS AS OPPOSED TO AN OXYGEN AND NUTRIENT RICH SOIL RESOURCE.


Frequently asked questions
Have a question about this project?
How did you replace fence, without a lot of money?
Doesn't that stink to high heaven & wouldn't that attract a lot of wild life, like possums and raccoons ?
I've been using my cat litter plastic containers, the big ones, for compost...I'm a BEGINNER gardner and I haven't used the 'compose' yet..but my question is , wil the plastic containers be ok to use? Great idea on the fence stuff!! Thanks!