Antique Vanity Refinishing..A $35 Garage Sale Find!

by
M&B Furniture Decor Llc
(IC: professional)
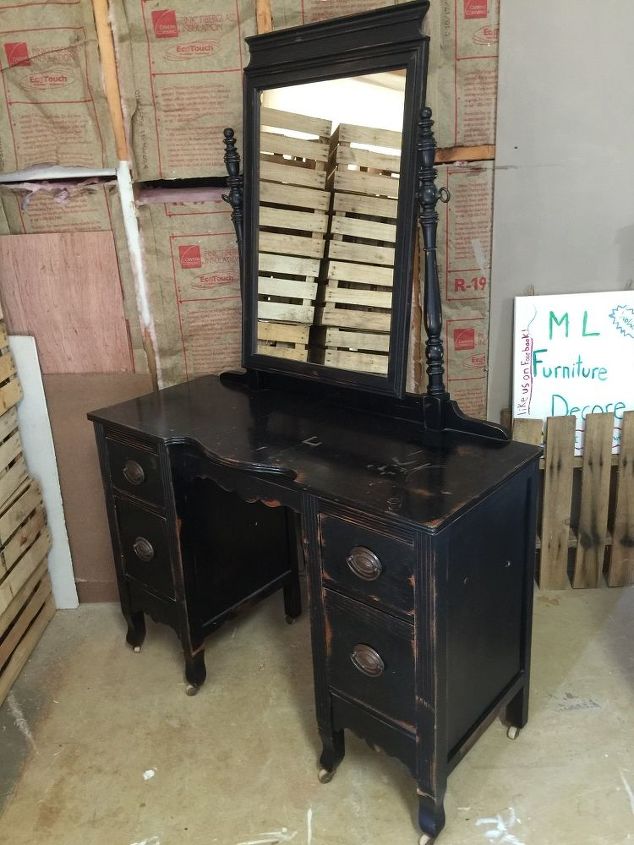
A client came to Us with this spectacular find she bought at a garage sale for only $35!! She brought it to Us the same day and gave me Green light to transformed it my way!! Yayyy!!
First, a must needed cleaning and repairing had to be done.. Two broken drawers fixed and adjustments in the mirror.
Now that it is clean and adjusted, I sanded the top area of the vanity and the drawers to get rid of the old black paint.. An hour later... done! We can start painting! I chose My Bermuda Blending Technique for this piece... My own mixed of different shades of blues, including turquoise, teal, aqua and dark blue.. And for a contrast color .. Orange!
The best way to be able to use any color you want in a chalk finish, is adding @Pixie Dust to your latex flat finish regular paint.
Now let's start blending! I created this technique using a variety of shades of the same color and a contrast color.. Playing with all the colors and a soft paint brush, apply from light colors like aqua then next to aqua a teal with a stroke of dark blue and some orange in between to make all colors simply pop!
With the same brush keep blending until you completely covered the desired area. Now let it dry for 20 minutes more or less depending on weather if you are painting outdoors..
Time to SPiT!! To make every single color to look vibrant and unique.. I used # SPiTGelStain. This natural stain with the most wonderful aroma will helped you to achieve the most spectacular colors.. It can be used by itself or in this case to enhanced the existing chalk paint base colors.. Randomly apply on top of the blues to get new shades and the orange stain will make the orange base to look on fire! Lol
After all the paint dries, distress just enough to give character to you piece.. (See ahead)
Mirror frame
Painted the existing knobs in two different shades of blue to then enhanced them with some metallic gold paint.
For the top of the vanity and the drawers I used Minwax Special Walnut stain color.
After dried and with the help of a sanding block #80 I started distressing corners, edges and random areas to the on top with the help of a dark antiquing wax and a round wax brush, I applied the dark wax from the corners to the center to get that old look..
Last but no least! Two coats of Minwax Polycrilyc Clear Satin was used to seal and protect this piece for many more years to come!
Enjoyed the project?
Published February 9th, 2016 11:40 PM









Frequently asked questions
Have a question about this project?
Awesome! So....you painted first, then added spit stain on top? Love this!! :)