Quick Easy Headboard Tutorial

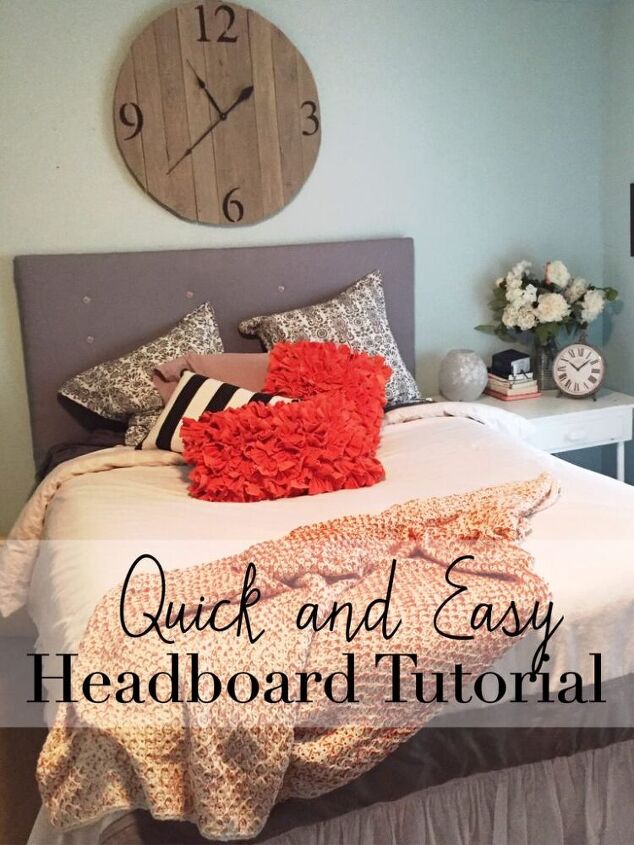
For Christmas this year my hubby and I made a quick and easy headboard for our daughter as a surprise.
We used 1 x 4 boards and cut them to fit a queen sized bed.
We found a tutorial from Our Small Town but we used bigger pieces of wood for ours.
We measured from the floor up to the point on the wall where we wanted the top of the headboard to rest.
Then we measured side to side with about a 1″ or 2 ” overhang on each side.
Then we…. or rather he… built the frame. He used screws and drilled them in.
TIP: Pre drill holes so the wood wont split…ask me how I know LOL
We realized we made one mistake…We should have butted the wood pieces up to each other and used a flat L bracket to hold them together instead of laying the wood pieces on top of each other because it leaves a gap when you put the fabric over it….
To compensate for the gap my hubby used the left over wood pieces and nailed them on top to make it flush.
All fixed now 🙂 Lay the headboard on top of batting leaving enough to fold over the tops of the wood. I doubled the batting to make it fuller.
Next use a staple gun to staple it all around the frame.
Fold over the edges of batting on corners and staple them down
Next lay the frame that has batting all stapled on it on top of your fabric. I chose these queen sized basic grey sheets from Target and doubled up the sheet to make it thicker.
We started stapling on the top of the headboard and moved to the bottom of the headboard and stretched the fabric as we went along and made sure it was smooth.
TIP- Check it by lifting it up and taking a look just to make sure it is smooth every so often.
Once the top and bottom were stapled down….we moved to the sides and did the same thing. On the corners we kind of folded and pleated the fabric to make it smooth on the corners and stapled.
Once the fabric was stapled and smooth we added buttons.
I measured to make sure they were even and sewed the buttons on and tried to pull the threads pretty tight to make it look tufted.
It doesn’t really look very tufted but I still love how it looks and best of all so does my daughter!
She was so surprised!
For the legs we added a little extra fabric and stapled it all the way down.
It just made the room look complete!
If you like this tutorial you will love how my hubby created a new planked top for an existing table.
It looks amazing and gives us more space.
Enjoyed the project?
Suggested materials:
- 0
- 0

Comments
Join the conversation
-
 Jeanne Martin
on Jul 27, 2021
Love your easy headboard!! I like the buttons too,, tufted or not. The link for the new planked tabletop doesn't work tho.
-








Frequently asked questions
Have a question about this project?