Quick and Easy DIY Mid-Century Modern Bookshelf

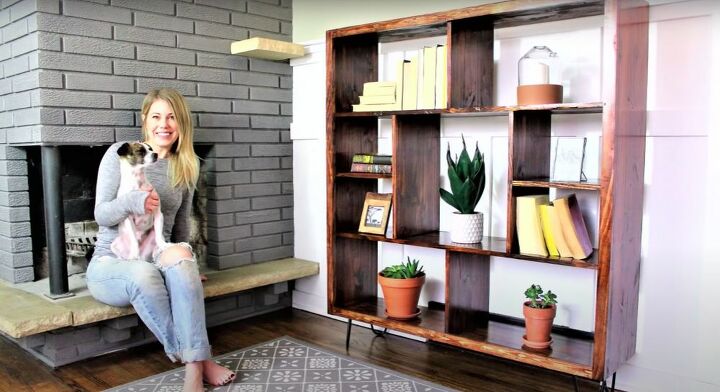
Looking for a quick project that is stylish and functional? Look no further! This mid-century modern bookshelf with hairpin legs is a quick and easy build, and is sure to be a real conversation piece in your home. You only need a few tools and supplies to create this beauty, and you probably already have most of what you need to build it. Follow my step-by-step guide and you’ll have your own homemade bookshelf in no time.
Tools and Materials
- Eight 1”x12” x4ft pieces of wood
- Two 1”x2” x8ft pieces of wood
- Four 6” hairpin legs
- 2” trim head screws
- Wood glue
- Sanding block
- Wood filler
- Stain
- Polyurethane
- Tape measure
- Pencil
- Protective gear
- Electric drill and impact driver
In order to make a mid-century modern bookshelf, I knew that I needed shelves of varying shapes and sizes, so I had quite a few cuts to make to my lumber. I cut the 1”x12” x8ft pieces into two 48” long pieces, four 46 ½” long pieces, two 19” long pieces, and four 13” long pieces. Then I cut my 1”x2” x8ft pieces into two pieces that were 48” long and two pieces that were 45” long.
During this build, I’m going to first lay out and glue the pieces, and then screw them together. I lay out two of the 46 ½” pieces and placed a 13” piece between them at the center.
Then I glued the pieces together at the joints. Use enough glue to make sure it’s secure, but not so much that it spurts out when you push the pieces together.
Next, I drilled pilot holes at the joints for the screws. Drilling pilot holes is especially useful when working with thinner pieces of wood, as without them your wood might split when you drill the screws into it.
With the pilot holes drilled, I screwed the pieces together. Then I flipped the piece over and repeated it on the bottom part of the boards.
Repeat this whole process one more time so that you now have two identical pieces.
On to the next part of the bookcase. I lay out a 48” piece, a 13” piece, and a 19” piece as shown in the picture above. Make sure that either side of the 13” piece lines up to the exact center of the 19” and 48” pieces. Then I secured them using the same process as with previous pieces, glue, drill pilot holes, and screw together. And, once again, I repeated this process so that I had two identical pieces.
With all of the shelves built, all I had left to do was connect them to each other. I lay them out as seen in the picture above.
Then I pushed them together. Doesn’t it come together nicely? They should all fit snugly if you’ve properly measured up until now.
Next, I connected all four corners together. Once again I glued them together, then drilled pilot holes, and finally screwed them together.
With the corners attached, it was time to add some more support to the bookcase. First I measured that the four corner cubbies had 13” of space between the boards. You don’t want to have crooked shelves, so it’s important to make sure that they are all even.
Then I secured those four boards to the outer framework of the bookcase.
Next I measured the inner cubbies to make sure that there was 13” of space between them.
And I secured them as well. Now the basic frame of the bookshelf was built and secured, I could move on to some of the more decorative features.
To add to the presence of the bookshelf, I wanted to add a frame that would make the outer edge of the shelves seem thicker. I lay one of the 1”x2” x48” pieces and lay it down the side of the bookcase.
Make sure that it sits flush against the edge of the bookshelf.
Then I screwed it on. I made sure to screw both into the outer frame of the bookshelf, and into the shelves themselves to make sure that it was secure.
Then I repeated the process with a 1”x2” x45” on the top and bottom of the bookcase, and another 1”x2” x48” piece on the opposite side.
Using wood filler I filled in all of the screw holes I had just made screwing on the frame. It’s quick and easy to do this using your fingers, just make sure to smooth it down as much as possible.
With the wood filler dry, it was time to sand. This project has quite a bit of surface area, so I really got a workout in while sanding it. Using a sanding block was a bit easier on my hands than a piece of sandpaper. While sanding, make sure to wear a mask to protect yourself from inhaling any sawdust.
A rich, dark stain is what this mid-century modern bookcase was begging for, so that’s what I gave it. I rubbed an even layer of the stain over the entire piece, which took a bit of time. Make sure to wear the proper protective gear when staining any piece.
With the stain dry, I moved on to sealing the bookshelf. I used polyurethane for a clear coat to protect all of my hard work. Once again, wear the proper protective gear while doing this step.
I placed a hairpin leg on each corner of the bookshelf, and secured them using the screws that came with the legs. The matte black legs bring a nice contrast to the shine of the bookshelf. Once this was done, all I needed to do was flip the bookshelf over and fill it up with goodies!
This mid-century modern bookshelf is timeless and will add character to any space you put it in!













Frequently asked questions
Have a question about this project?
Absolutely gorgeous!!! Approximately how much weight will the legs support??? Thanks
While this is a very nice piece you made, you didn't motion anything about weight load. It appears top heavy to me and could get knocked over very easily. Does it wobble, or did you find you have to anchor it on the wall for stability? I realize I am asking months after you posted this, but it is an important factor in constructing it. I'd hate to put the time in only to find out it isn't stable. Only asking to preclude any issues after the fact.
You made that look so easy! I know I could do this too bcz you are awesome providing step by step in your instructions and your videos. Now could you make a wall size book shelf for for books? And it provide instructions on how to make it sturdier for books?