


DIY Pottery Barn Easter Bunny Statue Dupe
Get the look for less! Learn how to make a DIY dupe of the popular Pottery Barn Essex Easter bunny statue for a fraction of the price.
*This post contains affiliate links. When you make a purchase using these links, I earn a small commission (at no extra cost to you!) To learn more, you may read my Disclosure Policy. Thank you for supporting my blog!
DIY Pottery Barn Easter Bunny Statue Dupe
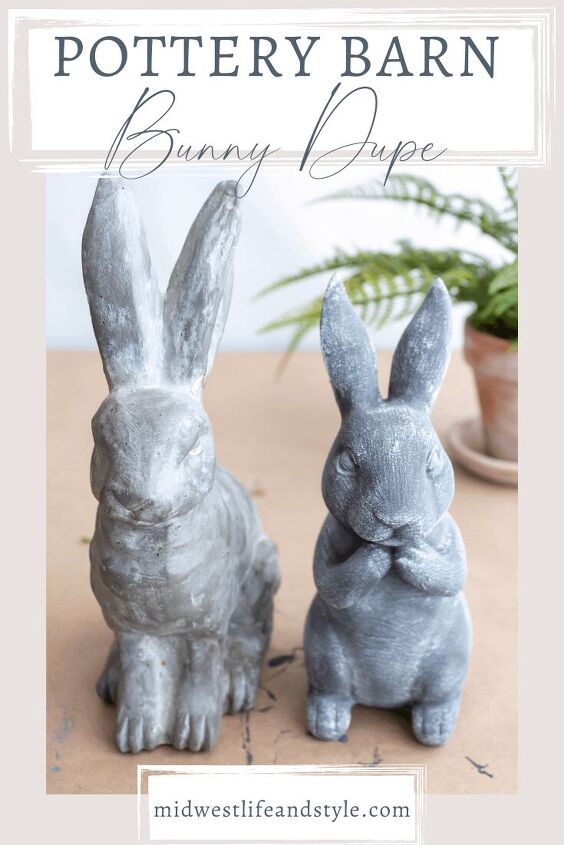
I purchased these gray bunnies from Pottery Barn a few years ago at the end of the spring season. They’re some of my favorite decor pieces to use around my home this time of year. After all, does anything say spring more than some cute bunnies?
In the past, they’ve graced my Easter table and made an appearance as part of my spring home tour.
But even on sale, they were a bit of an investment. I had seen several budget-friendly bunnies in stores lately. So, instead of splurging on more Pottery Barn bunnies, I decided to save some money and make a DIY dupe of the PB original.
Supplies
- A bunny
- Gray craft paint
- White craft paint. I used my favorite Fusion mineral paint in Lamp White.
- Paint brush
- Baking soda

How To Make Your Bunny
1 . Find A Bunny
First things, first. You need to find a bunny. For my DIY Pottery Barn Easter bunny statue dupe, I grabbed a few wood bunnies from Target for just $5 each.

Here’s one of the wood bunnies next to an original one from Pottery Barn.
If you don’t have a Target nearby, you can find small bunnies at the dollar store or just about any craft store.
Or, if you love to thrift, this is a great time of year to look for old Easter decor at your local stores. More often than not there are a few bunnies hiding on the shelves just waiting for you to give them a new home.
2 . Mix The Paint
This paint mixture is the same one that I used to create my DIY aged spring planter, and it’s easy to make!

First, pour one cup of paint into a disposable paper bowl. Then, sprinkle in 1/4 of a cup of baking soda. Use your paintbrush to stir the paint until all of the baking soda is mixed in.
The paint should be thin and look like it contains bits of sand. That’s from the baking soda which will help to give your bunny a textured look once the paint drys.
NOTE: Oil-based paints will NOT work for this DIY project! Make sure you only use water-based or latex-based paint.
3 . Paint The Bunny
Once the paint is mixed, begin to paint your bunny.

The first coat will look a bit thin and streaky, but don’t worry! It will take two coats to completely cover.

Here’s what one of my bunnies looks like after one coat of paint. Make sure you let the paint dry for about 30-40 minutes before you apply a second coat.

Here’s the same bunny after the second coat of paint. Much better, right?
After the first coat of paint dried, I wasn’t in love with the color. To make the gray a bit darker, I added some leftover paint I had from a previous project.
You can feel free to experiment with your color. But if you like it as is, there’s no need to add more paint to the baking soda mix in between coats.
3 . Distress The Bunny
The final step is to give your bunny a distressed look with just a bit of white paint.

To apply the white paint, you will use a technique known as dry brushing. If you are not familiar with it, this technique is easy. And, when finished, your bunny will look worn and distressed without ever having to pick up a piece of sandpaper.

Dip your brush in the paint, and then, use a swirling motion to dap the excess paint onto a paper towel.

Use a light touch to apply the paint to the bunny. Think about places that might get worn or chipped (like the ears or other raised surfaces) and start by adding your paint in those spots first.
Turn the bunny as you go to find spots that look like they could use a bit of distressing. And don’t forget to step back once in a while to check your progress.

You can distress your bunny as much or as little as you’d like. There’s no wrong way to do it! The most important tip I can share is don’t be afraid to mess up! If you don’t like how your bunny looks when you’re done, you can always paint over it and try again.

Here’s one of my bunnies side by side with the Pottery Barn version. What do you think?

For just under $20 I made three of the small look-alike bunnies for less than the cost of one of the Pottery Barn ones.

That’s my kind of dupe!
DIY Pottery Barn Easter Bunny Statue Dupe
Thanks for stopping by, today. For more Easter inspiration and easy DIYs, come and join me on Pinterest or get more of my favorite spring decor ideas [HERE].
Happy crafting!

Did you enjoy this post? PIN it for later!

Let’s Be Friends!
Don’t forget to follow along on my other social channels to get even more ideas for your home. You can find me on TikTok, come and pin with me on Pinterest, chat on Facebook, or catch up on Instagram.
You may also like: Affordable Kitchen Table Makeover With Oops PaintSet A Beautiful And Charming Easter Brunch TableLight and Airy Spring Home Tour

Comments
Join the conversation
-
I actually like yours better!!!! They so adorable 😍


Frequently asked questions
Have a question about this project?