


Handmade Angel Ornament

These were a hit last Christmas! I needed something small to add on to a few gifts and these were the perfect solution. I'll walk you through the process!
The cotton cord, rings and beads I used are all from this kit off of Amazon. I've used it for several other things since. It does only come with 6 of the medium sized rings, so shop around if you plan to make more than 6 of these ornaments.
--I'm going to refer to the photos as *top left, *top right, *bottom left, *bottom right. I actually find it easiest to understand the steps by just looking at the photos! So anytime you see an * I am referring to a photo.--
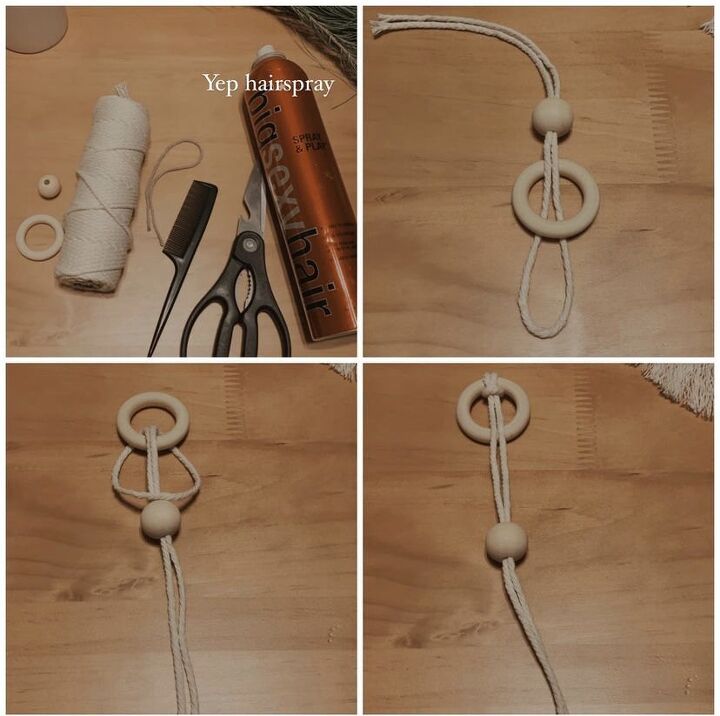
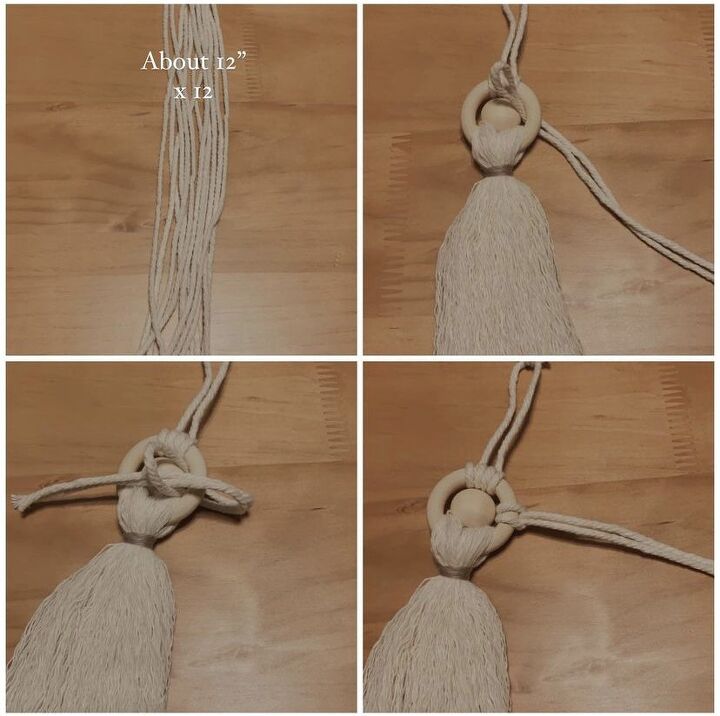
To start, cut a piece of cord about 20-24" long. Fold it in half and thread a bead onto it, pulling it halfway down *top right photo. Put the looped end through the ring as shown. Next, take the bead, fold it over the ring and pull it through the looped cord *bottom left. Pull tight (the cord will still be hanging from the bottom of the ring).
Now we move to the photo on the *bottom right. All you need to do here is take the ring and flip it under the cord, so that the cord is now hanging from the top. The "tail" of the cord should be lying on top of the ring as shown.
Slide the bead all the way up. Now you're going to take the whole thing and flip it to the other side so that the cord is underneath the ring *top left. (This could be done in fewer steps, but I wanted to break it down. You don't want to be halfway done and realize something isn't right! I had to redo the second one I made because of a little mistake like that, whoops!)
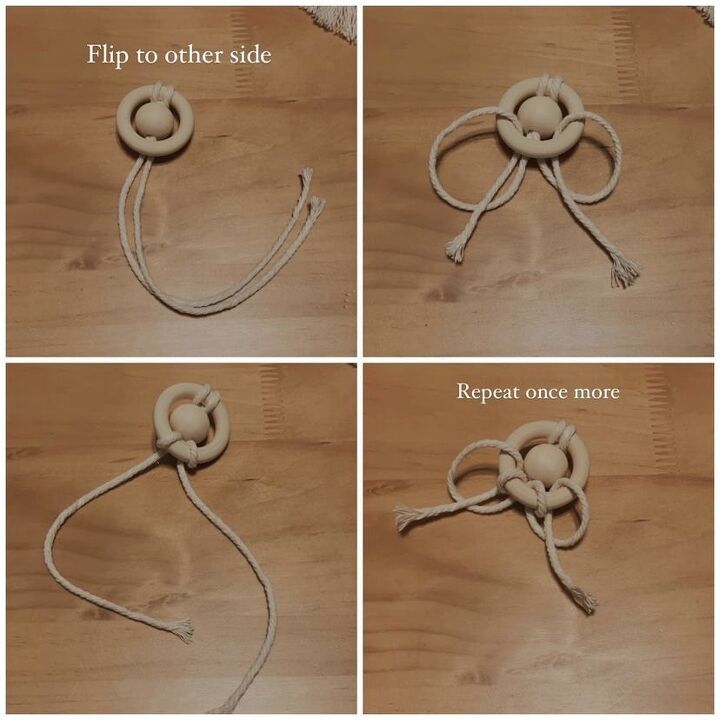
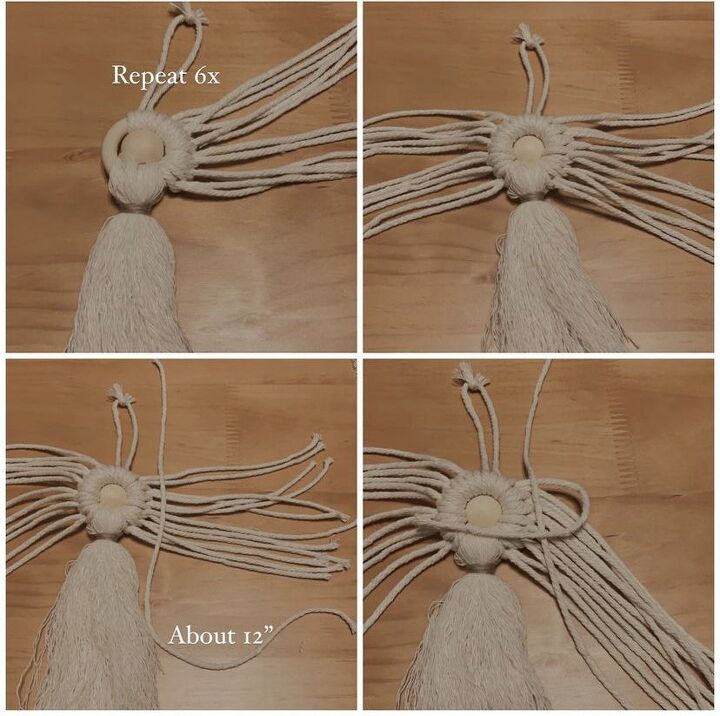
From here, separate the two parts of the "tail." You're going to take one piece and thread it down into the ring and out the bottom. The "tail" should be inside the loop you make *top right.
Repeat on the other piece and pull tight on both strings *bottom left. Repeat the same thing once more on each side *bottom right.
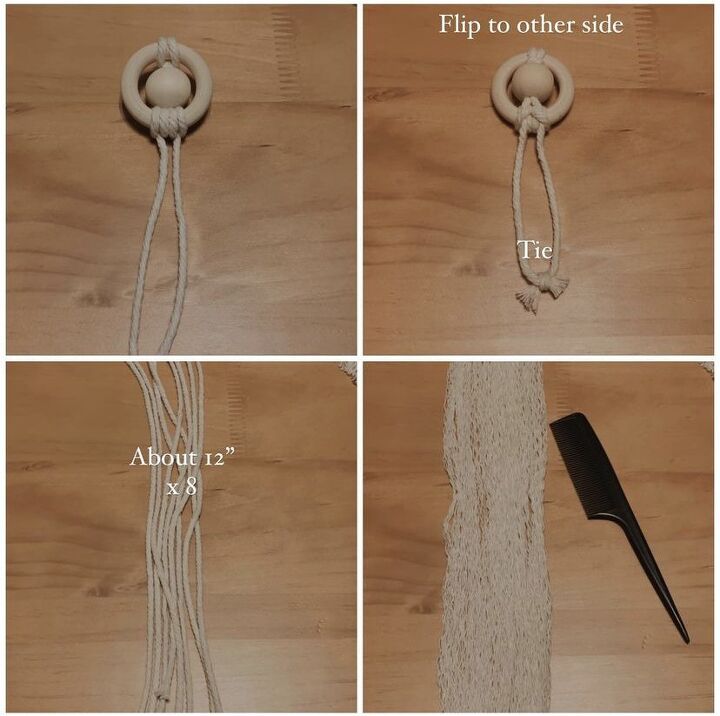
When you pull tight it should look like the *top left. Tie the "tail" pieces together and cut off the excess (this is what the ornament hangs from). Flip it to the other side *top right.
Next, cut eight pieces of cord each about 12" long *bottom left. You'll want to use a comb to brush out the strands in the cord. I suggest starting at the ends and working to the middle when combing them out *bottom right.

I did decide to rotate the ring 180 degrees so that the string is at the top now. It just made more sense to finish making it this way, since the string will be at the top when you hang it.
Take the cord that you combed out and separate it in two. Thread these through each side of the ring *top left. Pull them together and comb again if needed. This is the angel's dress *top right.
Next you will need a small piece of yarn or something similar to make the waist of her dress. It could be a thin ribbon or jute cord. I had this yarn on hand from the dollar tree. Cut it about 8" long and lie it on top of the angel as shown on the *top right.
Carefully start to wrap the yarn around the dress, leaving a tail at the top *bottom left. See how I left a little loop at the bottom as I was wrapping it around? That makes it easier for the next part. Wrap the yarn around the dress about 5-6 times. Take the free end and thread it through the loop you created at the bottom *bottom right. (In macrame, this is called a gathering knot or a wrapping knot. There are youtube videos of the knot if you need them!)
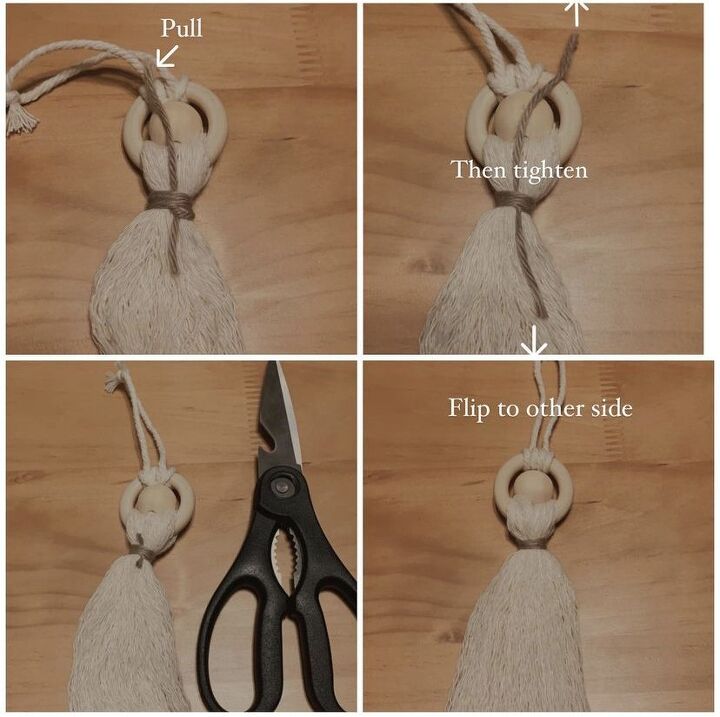
To finish the knot, pull on the top string until the loop disappears under the wrapped yarn *top left. Pull on both strings to tighten and cut off excess yarn. Flip once again to the other side *bottom right. (The reason we keep flipping sides is because some these knots that we're creating, look best from one side. We want all the "pretty" sides to be on the front of the angel, if that makes sense. I promise it's not for nothing!)
Time for the wings! This time you need 12 strands of the cord each about 12" long *top left. Take one of the strands, fold it in half and thread it under the ring and up through it *top right.
Take the tail and thread it through the loop you created *bottom left. Pull the tail tight. It should look like the photo on the *bottom right.
Now we're rolling. The rest is a lot of the same steps just repeated multiple times! On the *top left photo I should have said repeat 5x. You will use six of your 12 strands to do each side *top right. For the left side, make sure to do it exactly the same as you did on the right (push the folded end of each strand underneath the ring and thread it up through the middle).
Cut another piece of cord again at about 12" (you can cut all of your pieces ahead of time, but I find it easier to just move one step at a time.) Lie it on top of the strands as shown in the *bottom left photo. Each of the strands coming off to the right will get knotted around the new strand that you just layed on top. Take the first one and fold it over to the left, crossing over the new strand *bottom right photo.
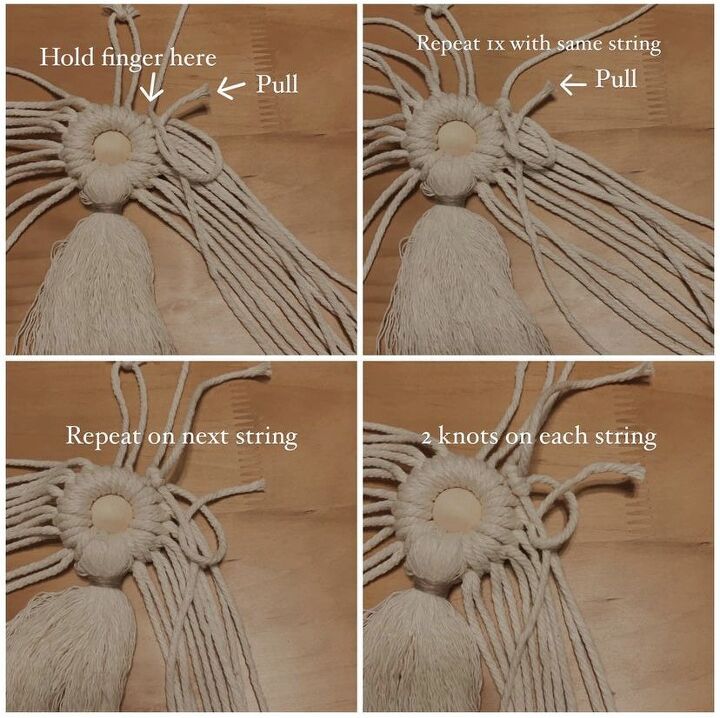
Using your finger to hold down the new strand, thread the other piece underneath *top left photo. Pull this to make a loop around the new strand. You can see the loop in the *top right photo. Using the same string, wrap it around the new strand a second time and pull.
Move down to the next one and repeat this process, making two knots with each one *bottom left and right photos.
Continue down the line until you've wrapped and knotted each of the strings on the right side. The thing you need to look out for here is making sure you keep track of where that "new strand" is. It sometimes can get mixed up with the ones that are coming off to the right or left.
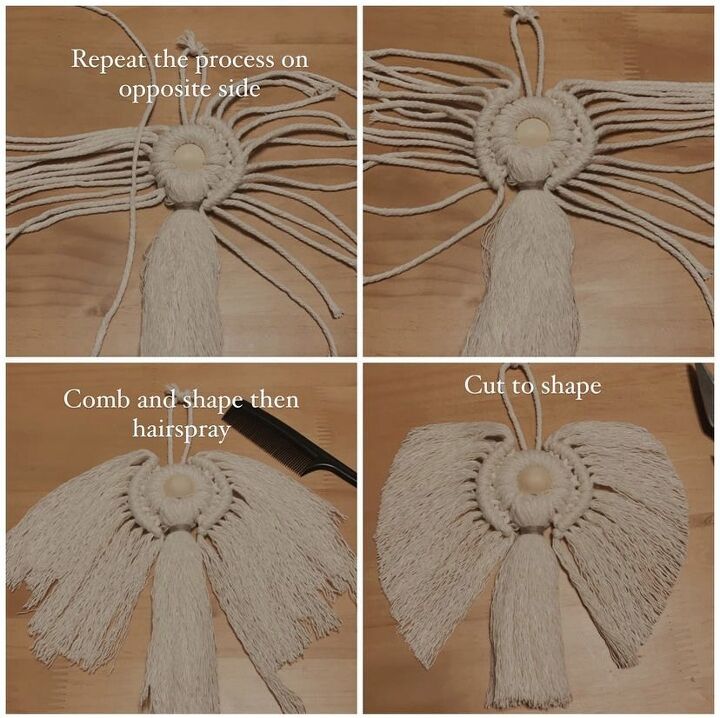
Almost done! Repeat this exact process on the left side (that means cutting one last 12 inch piece of cord, lying it on top as seen in the *top left and wrapping the rest of the strings around it 2x each *top right.
Next you'll need your comb again. You're going to comb out all of the strands on either side of the angel. These are the angel wings. Lie them down like I did in the *bottom left photo. If you have laundry starch, that works great to spray on the wings. It makes it stiff and helps it hold its shape when it's completed. If not, hairspray works pretty well. Cut to shape *bottom right and you're done! I picked up mine and sprayed the back of it down with the hairspray also.
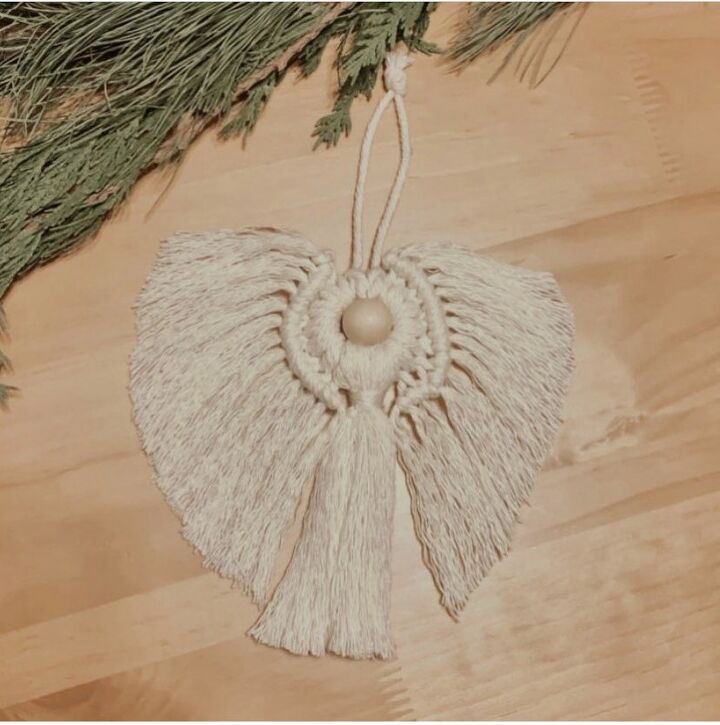
It should look something like this! (I somehow managed to take photos of every step above and forgot to snap one of the finished angel). This one here is one I made previously with a matching thread for the waistband of the dress. I see now that I could have done a better job cutting the wings on this one haha. I don't think my Grandma noticed ;)
The first one is definitely a little time consuming, but once you have the process down, it becomes pretty relaxing to do! Would you try this out? Let me know in the comments!
Comments
Join the conversation
-
I found the pattern last year and I made 13 of the angels for Christmas presents. My sister died Nov. 2 and she had 5 children and 8 grandchildren thus 13 angels. They all loved them and I felt her love while making them. I put them on waxed paper and coated the wings and bodies with Matt Modge Podge. Thank you for sharing your creation.
-
Just found this on Hometalk. I will definitely be making some of these for this Christmas. Thanks for sharing this!


Frequently asked questions
Have a question about this project?