


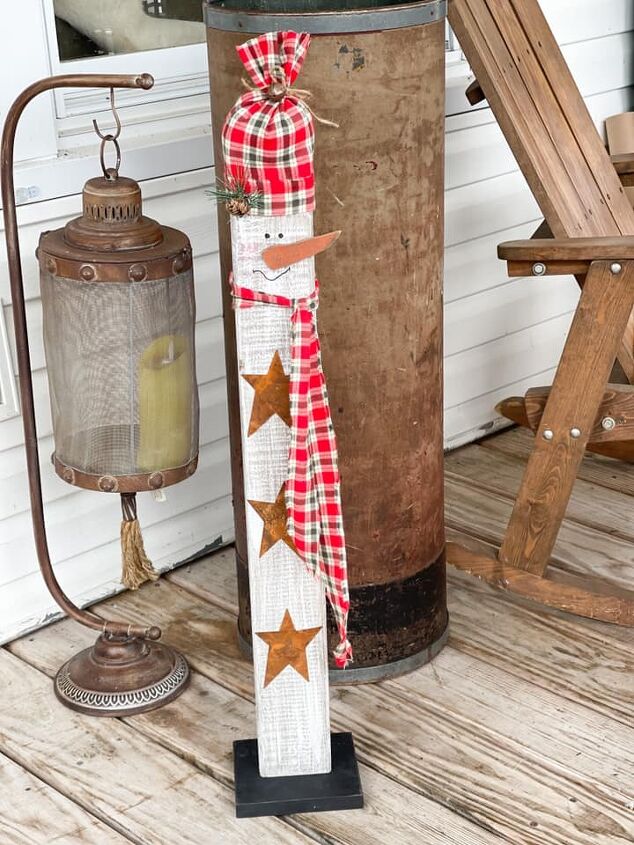
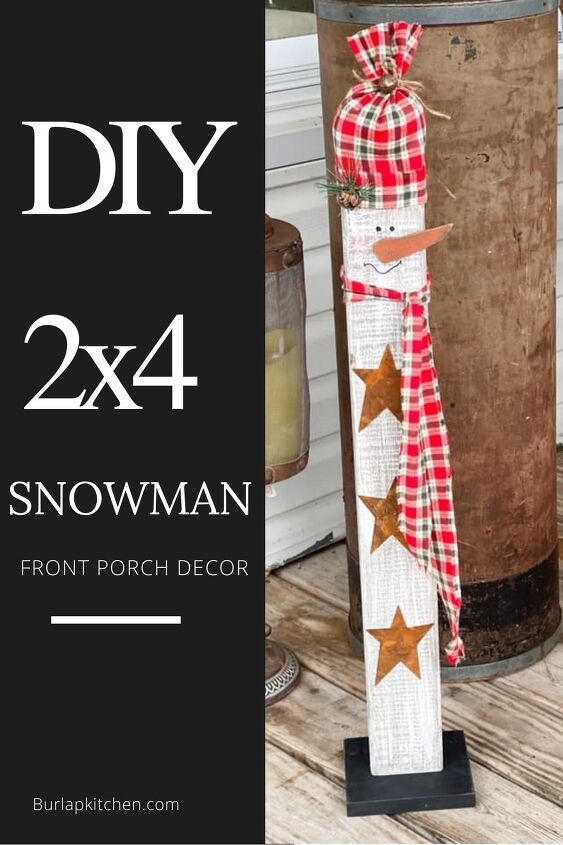
DIY 2x4 Snowman - Front Porch Decor
Today, I am going to share with you how to make a DIY 2×4 snowman for your front porch décor. This adorable 2×4 DIY snowman is such a simple, budget-friendly craft. If you enjoy giving thoughtful Christmas gifts, you have to give this cute snowman craft a try! This DIY snowman was such a fun Christmas DIY to make, and is also super budget-friendly. So, see if you have any scrap wood lying around and start crafting up some Christmas cheer!
Today, I am going to share with you how to make a DIY 2×4 snowman for your front porch décor. This adorable 2×4 DIY snowman is such a simple, budget-friendly craft. If you enjoy giving thoughtful Christmas gifts, you have to give this cute snowman craft a try! This DIY snowman was such a fun Christmas DIY to make, and is also super budget-friendly. So, see if you have any scrap wood lying around and start crafting up some Christmas cheer!
- 2×4 cut to desired hight
- scrap piece of wood for base
- wood nose cutout or cut one out of cardboard
- stain – Minwax, dark walnut
- white chalk paint
- black paint
- sanding block
- twine
- bell
- pine embellishment
- material
- rusty stars or embellishments of your choice
- hot glue gun and glue sticks
- plastic bag
- sharpie or paint for mouth
- drill and screw
- hammer and nails
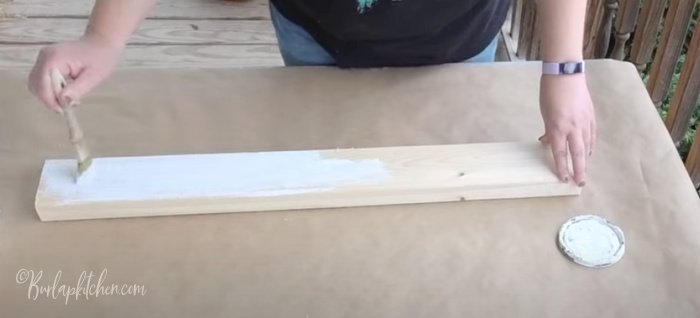
Step 1. Paint a scrap piece of 2×4 wood using white chalk paint. Allow to dry.
Step 2. Next, take a little scrap piece of wood in a square shape to use for the base of your snowman, and paint this base using black chalk paint. I don’t measure, you just want to make sure this piece of wood will be big enough to use as a support base for your 2×4 snowman. Allow to dry.
Step 3. Use a sanding block and go over your white chalk painted 2×4 and your black chalk painted base to scuff them up a bit.
Step 4. Using Minwax stain in the color “Dark Walnut,” take an old rag and rub the stain over both the base and the 2×4 snowman, then wipe it off. *I did go a bit too heavy handed with the stain on the snowman part, so I will fix that. However, you could always keep this in mind when you stain yours at this step and try to go very light handed with the stain on the 2×4 snowman. If you go too heavy handed with the stain, you can always wait until the 2×4 snowman dries, and then go in and dry brush on some more white chalk paint, and then allow it to dry again. After staining both the snowman and the base, allow them to dry.
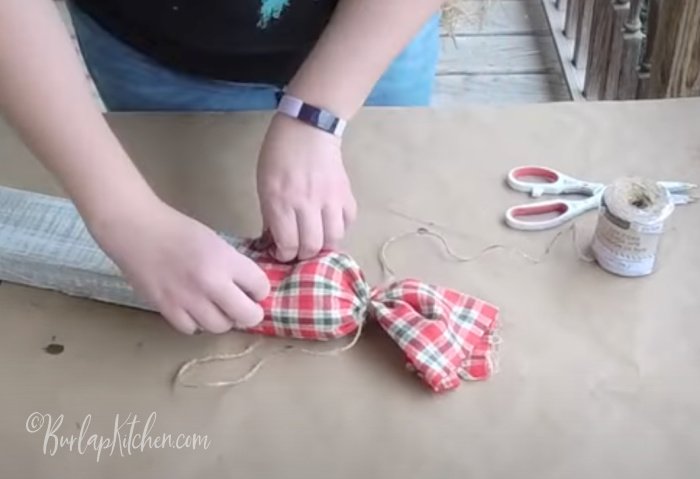
Step 5. Next, take some material of your liking, and use this material to make a hat and a scarf for your snowman. For the hat, cut a square shape from the material (it needs to be big enough to go around the top of the 2×4 snowman with some extra at the top since we will be stuffing this with a plastic bag to make the rest of the hat). Hot glue the material around the top of the 2×4 snowman. Once this is dry, stuff a plastic bag inside of the extra material to give the hat a bit of volume. Next, take a piece of twine and tie it securely around the top of the hat, slip on a rusty bell as an embellishment through one end of the twine, and then tie the twine into a little bow. Be sure to leave some material bunched up at the very top of the hat, but use scissors to cut away any excess.
Step 6. Use the same material, or different if you prefer, and make a scarf for the snowman. Simply cut a long strip of your material and tie it around the neck of the snowman to make a scarf.
Step 7. Carefully use black paint and paint on eyes for your snowman. I used the back of my paint brush to paint on/dot on the eyes. Then, take cosmetic blush and use your finger to place on for the cheeks. Then, I had an orange wooden nose from a previous project I glued onto the snowman, but feel free to cut a snowman nose shape out of a piece of carboard, or a piece of wood if you like and paint it orange.
Step 8. Use a black Sharpie to draw on the mouth of your snowman.
Step 9. I used rusty stars I bought at a craft store for the buttons, but feel free to be creative with this step and use what you have, or what you prefer. I used a nail to nail the rusty stars onto my snowman.
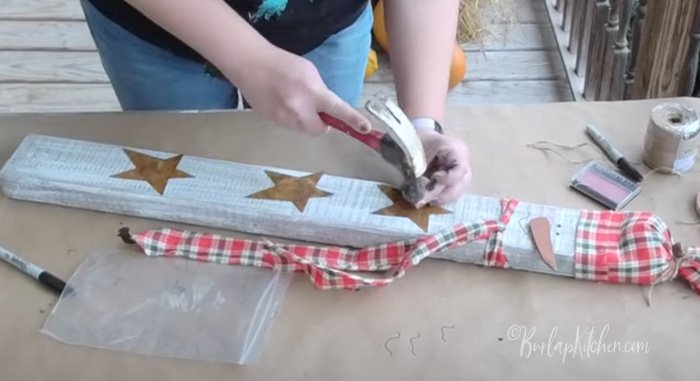
Step 10. Next, I used a small piece of pine along with a small pine cone to hot glue to the snowman’s hat for extra detail.
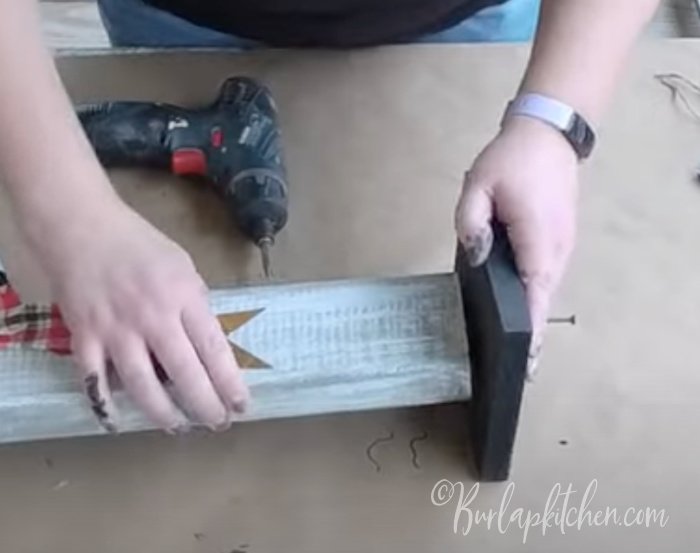
Step 11. Put a screw into the center of your base you made earlier, pre-drilling will prevent splitting. Then drill it to where it just pokes through, and then push it onto the bottom and finish screwing it all the way in. Enjoy!
.
Tags: 2x4-crafts, Christmas decor, Christmas gifts, Christmas-2021, Christmas-crafts, Christmas-day, Christmas-porch-ideas, front, front-porch-ideas, Gift-ideas, gifts-for-her, handmad, handmade-gifts, how-to, porch-decor, Rustic decor, rustic-Christmas-decor, simple crafts, snowman, snowmen, thoughtful-gifts, wood-projects

Comments
Join the conversation
-
Such a cute idea. I am sure that many of us have scrap wood hanging around wanting to be used instead of just lying around taking up space. This is something that would look great on a porch or standing guard by the fireplace. Just love this snowman.


Frequently asked questions
Have a question about this project?