


Upcycled Sweater Craft How to Sew a Gnome
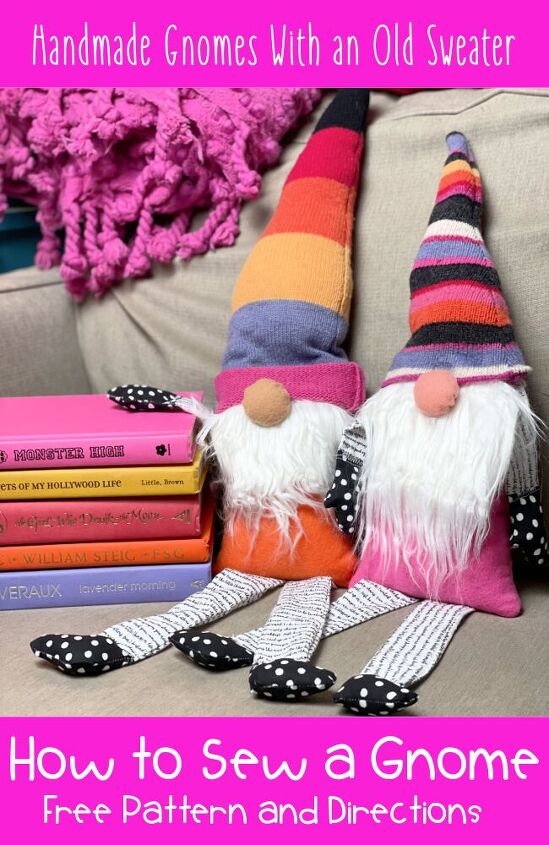
How to Sew a GnomeThis is an easy tutorial showing How to Sew a Gnome using the basic sewing materials, supplies and fabrics. I love this pattern and method because it creates and adorable handmade gnome with a weighted bottom, perfect for decorating. We actually sewed TWELVE of these cute gnomes and abandoned them on a road trip for people to find. I love art abandonment projects and the whole idea of spreading creative love. I upcycled my favorite sweater to make all of the darling hats. I think you could probably find awesome sweaters at the thrift store!
Materials to Sew a Gnome
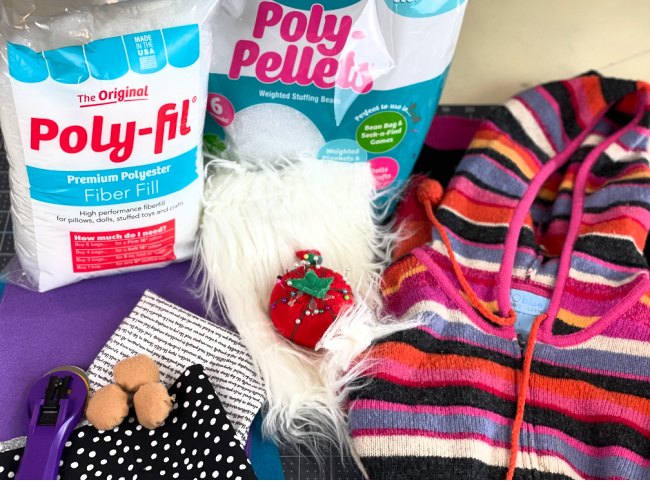
My favorite supply in this project is certainly the upcycled sweater. I wore it a bazillion times but it was time to give it a new purpose for so many reasons.
- Poly-Fil® by Fairfield World™
- Poly-Pellets® by Fairfield World™
- Kunin® Classic™ Felt 9” by 12” Craft Cuts – Cashmere Tan, Coral, Charcoal, Brilliant Blue, Candy Pink, Orange, Violet Sky
- Fabri-Fuse Fabric Glue by E6000
- Cotton Fabrics, Assorted – 1/8 of a Yard each
- Sweater to Upcycle
- Faux Fur Trim
- Rotary Cutter
- Self-Healing Cutting Mat
- Scissors
- Craft Knife
- Straight Pins
- Sewing Machine
- Needle and Embroidery Floss
- MONOTWIN Permanent Marker from Tombow
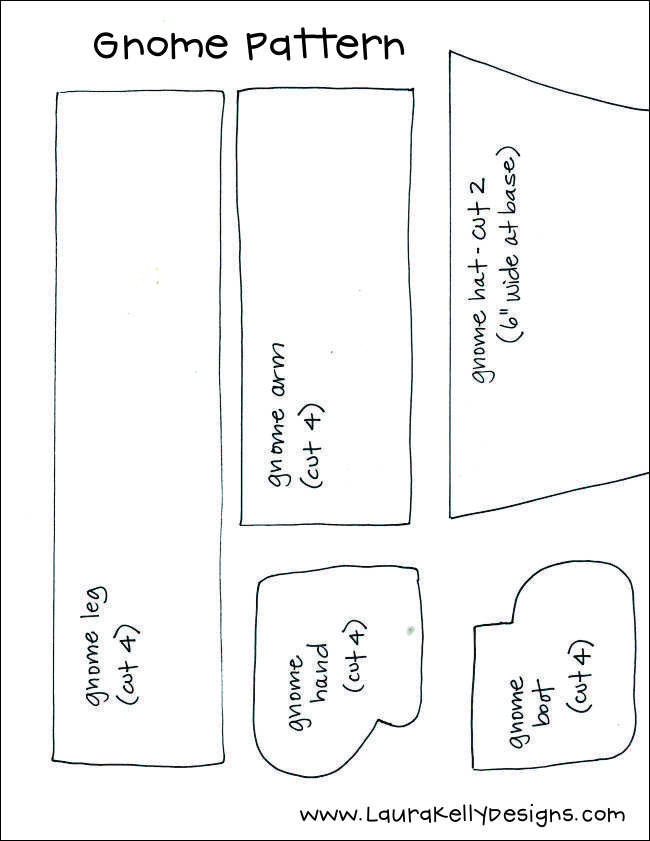
- GNOMES THAT NEED HOMES PATTERN
Directions to Sew a Gnome
STEP ONE
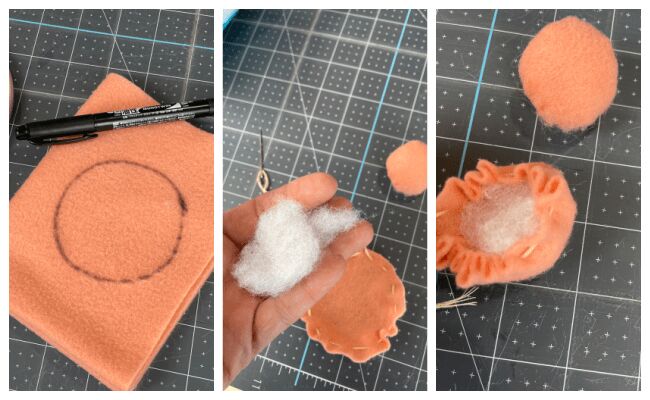
To create the Gnome nose, draw a 3” circle onto Cashmere Tan and/or Coral Kunin Felt with a permanent marker or use a circle template as your guide. Cut out the circle with scissors, and then sew a running stitch around the edge with a needle and embroidery floss. Gather the stitches, stuff with Poly-Fil® Premium Polyester Fiber Fill, pull stitches tight to create a sphere and knot the embroidery floss to secure.
STEP TWO
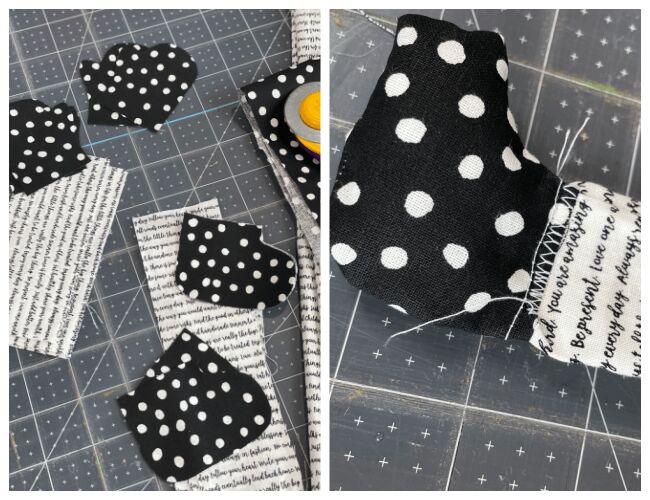
Download, print and cut out the Gnome That Needs a Home Patterns below. Trace and cut out four boots and four hands from cotton fabric. Trace and cut out four legs and four arms from cotton fabric. Mix and match fun patterned cotton fabrics.
STEP THREE
With the right sides of the fabric up, overlap the four boots on top of the four legs and attach at the ankle using a straight stitch on a sewing machine. Use straight pins to secure, if needed. Repeat with the four hands and the four arms, attaching at the wrist. Place two gnome legs, right sides together, and stitch around leg and boot with a sewing machine, leaving the top open for turning and stuffing. Repeat with the second set of gnome legs and with both sets of gnome arms.
STEP FOUR
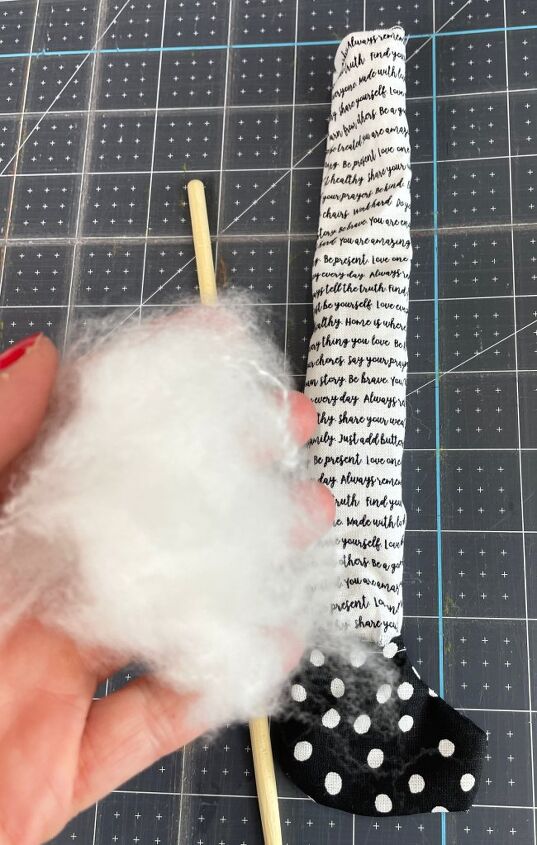
Turn both gnome legs and arms right side out, using a chopstick to push through the small areas. Stuff both boots and both hands with a small amount of Poly-Fil®, again using a chopstick. To secure the Poly-Fil® in place, stitch across both ankles and both wrists.
STEP FIVE
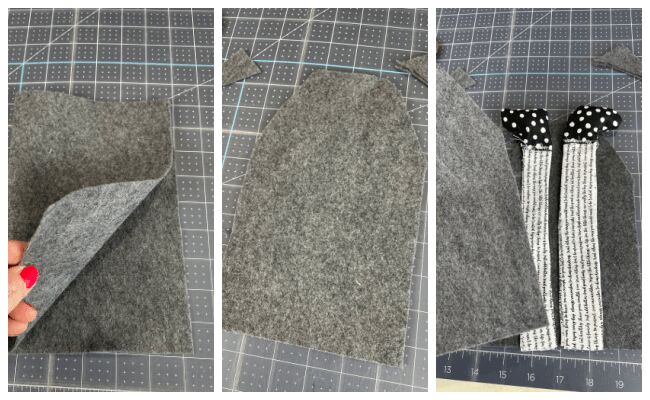
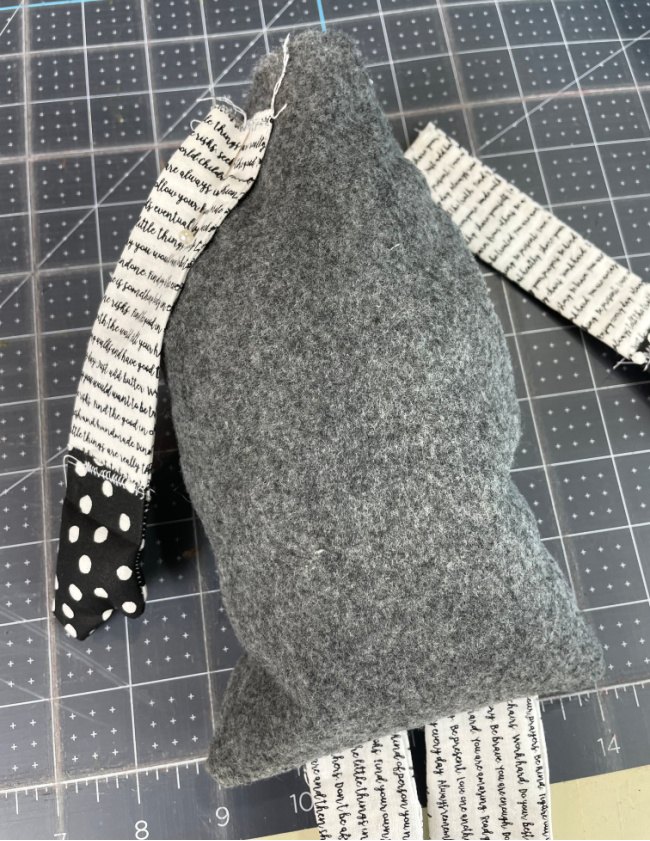
To create the gnome body, fold and cut a 9” by 12” piece of Kunin Felt in half to create a 9” by 6” rectangle. Cut the corners off at the top of the body to resemble shoulders. Place legs along the bottom edge, of the felt body, place the second felt body on top. Secure with straight pins and sew around the gnome body, leaving the top open for turning and stuffing. Felt doesn’t have a right and wrong side like fabric does.
STEP SIX
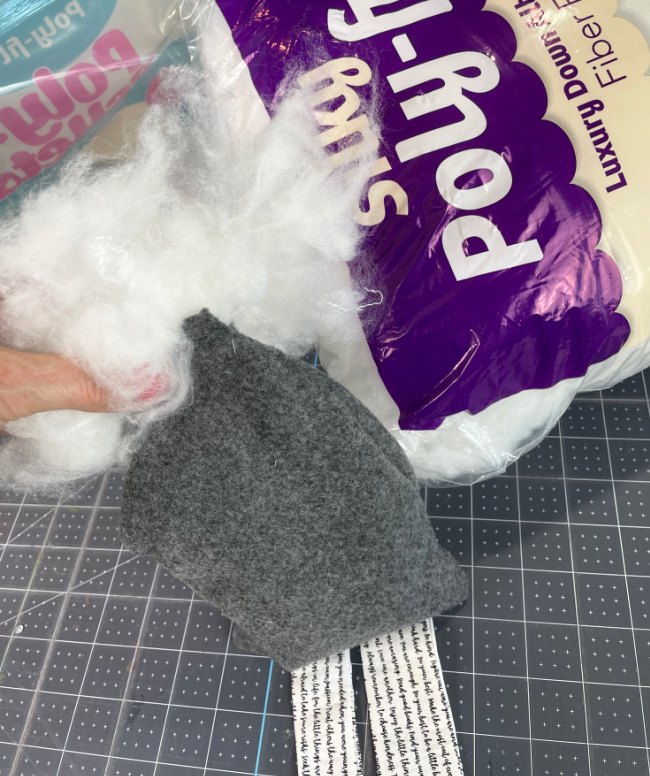
Turn the gnome body right side out and pour in 2 cups of Poly-Pellets® Weighted Stuffing Beads. I love the resealable, easy pour spout. Stuff the gnome body with Poly-Fil®, using a chopstick to get into all the tight spaces.
Secure the arms to either side of the top of the gnome body with straight pins and stitched closed on ta sewing machine.
STEP SEVEN
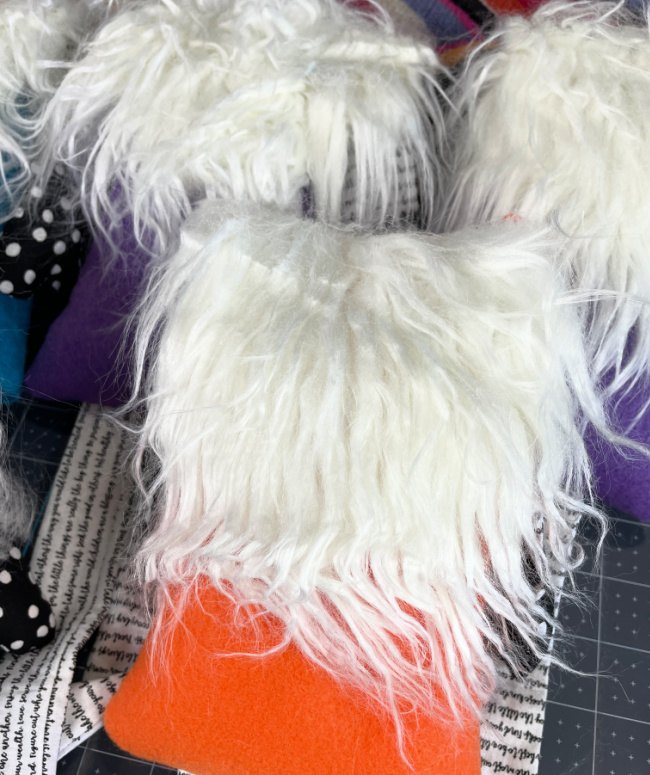
Measure a 4” by 5” rectangle of faux fur and cut out gently, from the back, with a craft knife. Cut only the woven backing and the fur will retain is natural shape.
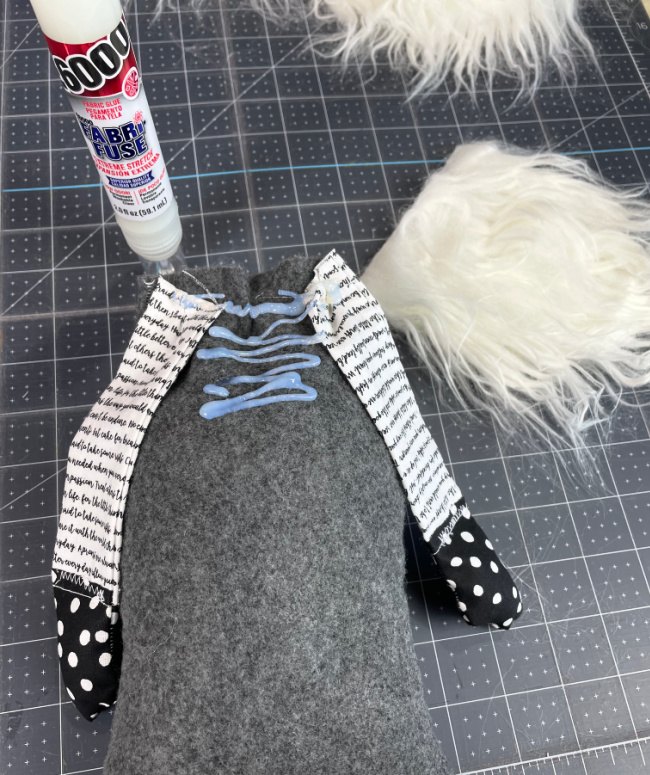
Attach gnome beard to body and gnome nose to beard using Fabri-Fuse Fabric Glue. Set aside to dry.
STEP EIGHT
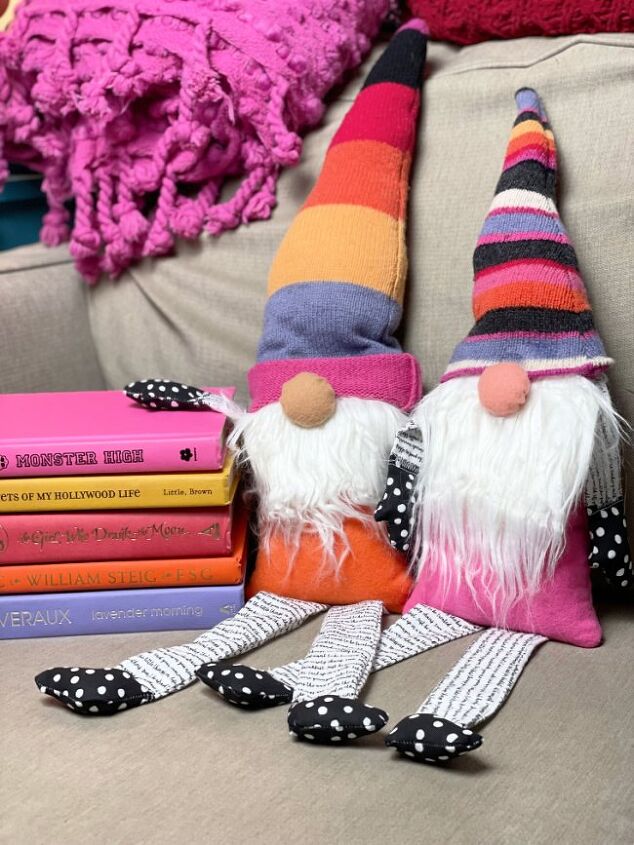
Measure, draw, and cut a gnome hat triangle pattern that is 6” across the bottom. Have fun and create a gnome hat as tall as you like! Turn the sweater inside out and trace the gnome hat pattern onto to sweater with a permanent marker. Sew the left and right sides of the triangular gnome hat on the sewing machine, leaving the bottom open for turning and stuffing. Cut the gnome hat out of the sweater, turn right side out and either fold over or fold under the bottom edge. Sewing first and cutting second will prevent the sweater from unraveling.
STEP NINE
Stuff the gnome hat with Poly-Fil® Premium Polyester Fiber Fill. You can stuff your gnome hat soft and squishy or firm and tight, by adjusting the amount of Poly-Fil® used. Fit the gnome hat down over the top of the body and secure by hand stitching with a needle and embroidery floss.
My Favorite Sewing Supply List
These are the sewing supplies that I keep on hand at all times. They get used over and over again and again in so many of my projects.
- Sewing Machine – This one has FIFTY built in stitches!
- Thread
- Ready Made Bobbins – I am not a fan of making my own bobbins so I LOVE these.
- Fabric Scissors – These are great because they cut through multiple layers of fabric.
- Pin Cushion and Pins – The cuter the better. I love this hedgehog.
- Poly-FIl Stuffing for Pillows
- Poly-Pellets for Bean Bags and Weighted Projects – The POUR bag makes all the difference.
- Rotary Cutter and Mat
Art Abandonment – Gnomes Needing Homes
Beth from Creatively Beth and I traveled for a week and abandoned gnomes in six states. It was so fun to watch and see how excited and happy people get when they find a gnome to adopt.

My favorite drop was at the Alpha Gamma Delta house where I went to college at the University of Kentucky.

Resources for this project:
See all materials


Frequently asked questions
Have a question about this project?